Deciding how to restore an antique door requires balancing preservation with modern functionality. This guide narrows the process to 12 preservation-grade steps that protect your home’s architectural integrity and resale value. Follow this workflow to ensure your restoration is a successful investment.
1. Assess the Door’s Age and Original Materials
Identify the hidden history of your door to ensure a restoration that lasts centuries.
As an Amazon Associate I earn from qualifying purchases. Affiliate links may earn me a commission at no extra cost to you.
Before you touch a screwdriver, you need to read the “fingerprints” left by 19th-century craftsmen to determine if you’re holding a solid treasure or a fragile veneer. This initial inspection dictates every tool and chemical choice you make moving forward.
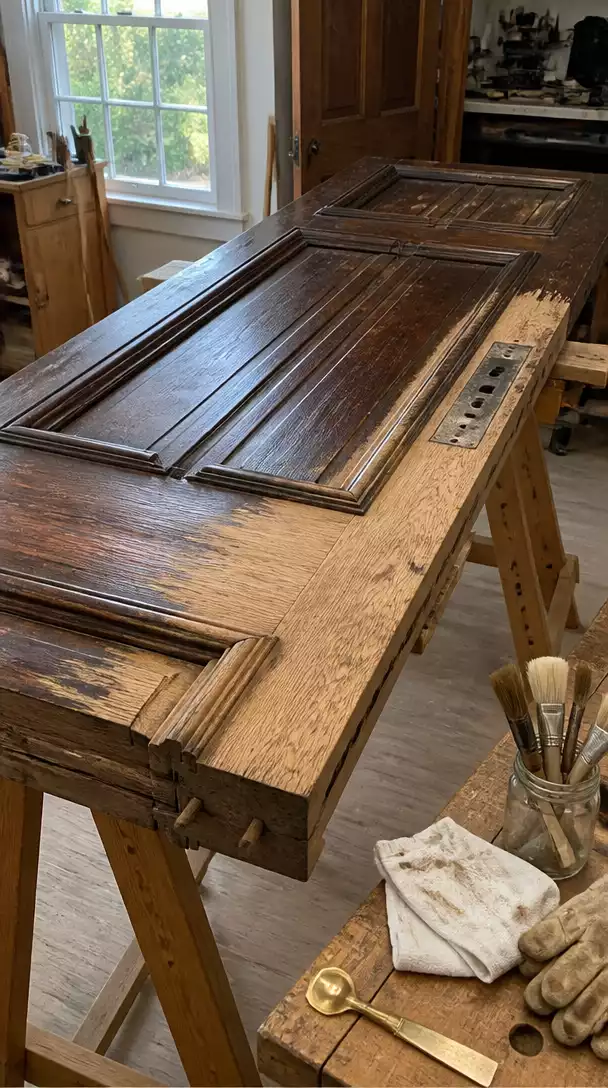
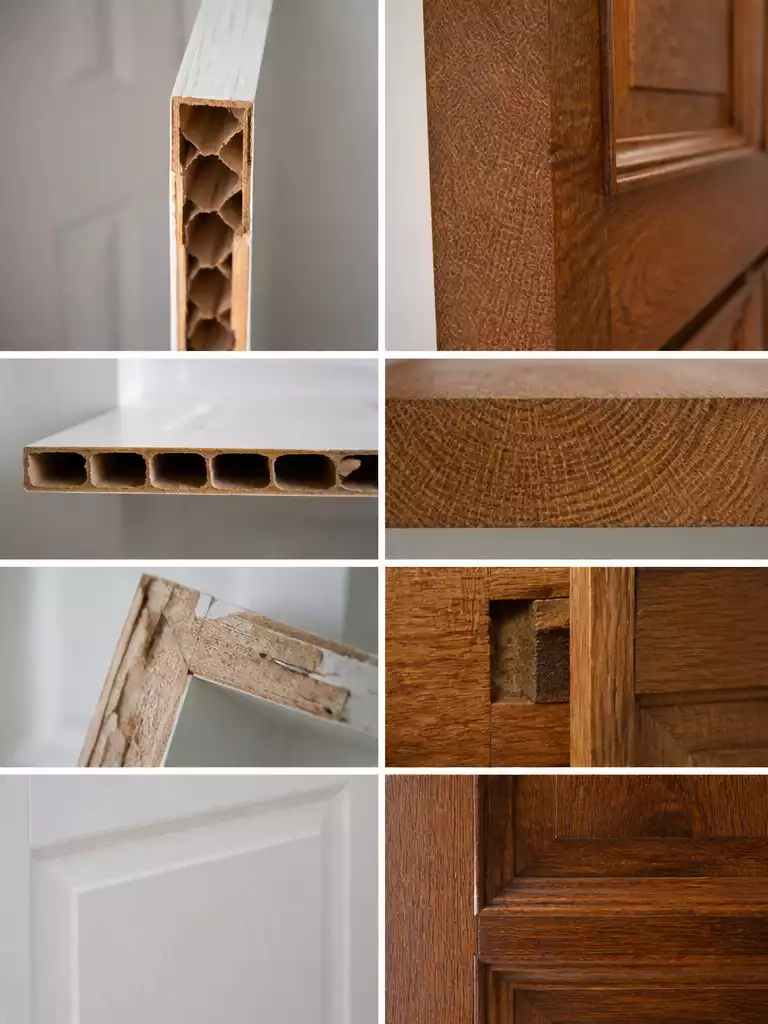
Examine the end grain on the top edge of the door. If you see the cellular pores of the wood continuing through the entire thickness, it is a solid-wood asset; however, a thin 1/8″ layer glued to a different core indicates a veneer that requires significantly less sanding pressure.
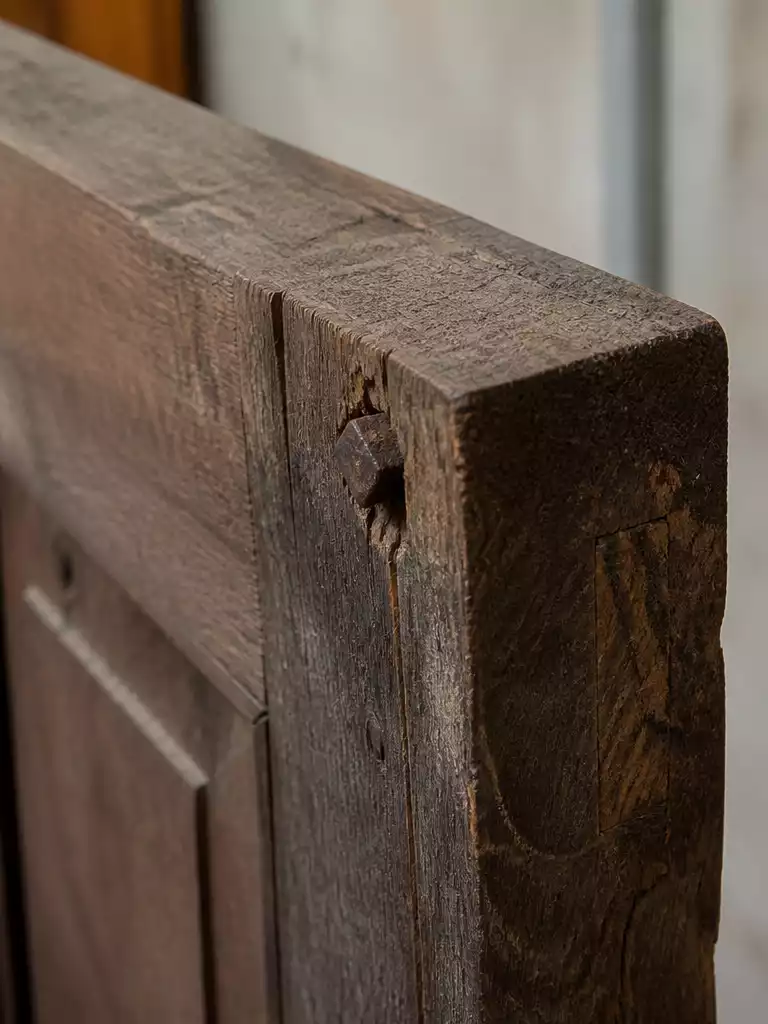
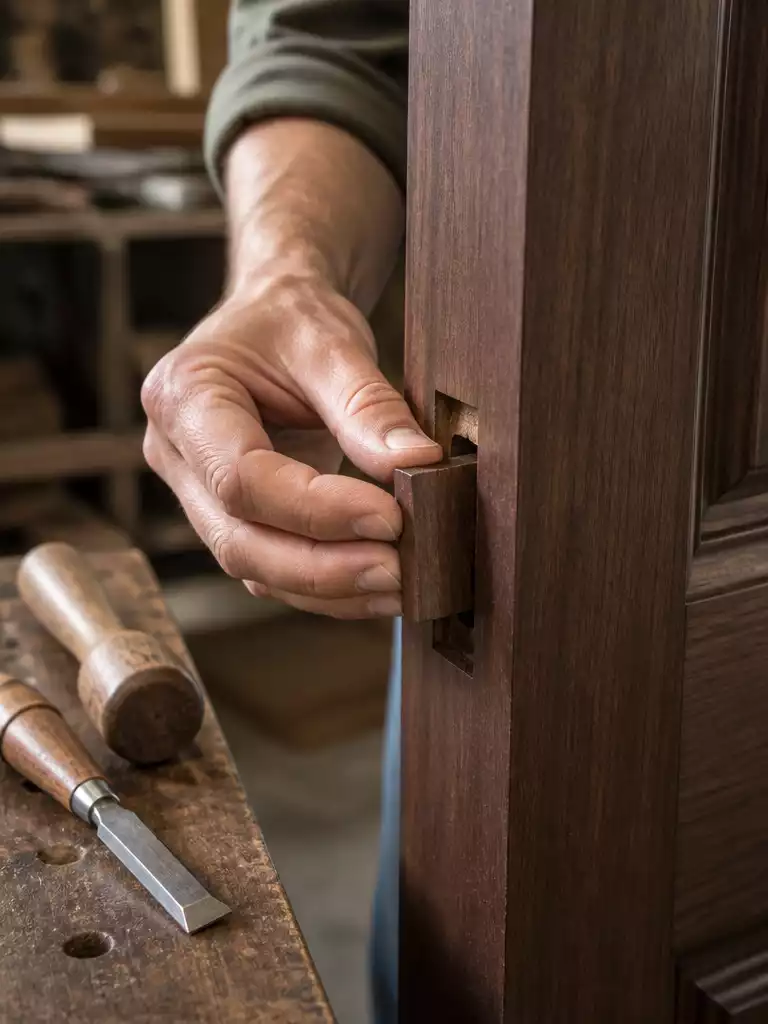
Next, identify the joinery by looking for mortise-and-tenon joints where the horizontal rails slide into the vertical stiles. If these joints are secured by visible wooden pegs, you likely have a pre-1850s door that demands extra care during dismantling.
Pro Tip: Look Beyond the Color
Avoid identifying wood species by color alone, as a century of “Tobacco” or “Oxblood” stains can make common Pine look like expensive Mahogany. Look at the grain density and cellular structure instead; hardwoods have visible pores while softwoods generally do not.
Finally, locate a hidden nail, perhaps behind a hinge or inside a latch mortise. Squarish, blunt-tipped “cut nails” indicate a build date between 1790 and 1890, while round “wire nails” signal a post-1880 door.
Once you know what the door is made of, you must record how it currently sits before it’s dismantled.
⭐ Top Products for Assessing Antique Doors
Antique Indian Style Wood Barn Door
Heavy Duty Antique Cast Iron Hinges
💰 Appraisal & Investment Reality:
- The equity multiplier: Preserving an original-surface door can yield a valuation 5 to 10 times higher than using modern reproductions.
- Hidden value: Authentic provenance—the verifiable history of the door—can add a 25% to 40% premium to its appraised value.
- Sourcing tip: If repairs are needed, avoid new lumber; use salvaged old-growth wood to maintain the door’s structural integrity.
Document the Original Finish and Hardware
Preserve the structural blueprint of your door to ensure every vintage screw returns to its home.
The biggest mistake in restoration isn’t the stripping—it’s the “puzzle-piece panic” that happens three weeks later when you can’t remember which hinge faced which way. Antique doors are rarely perfectly symmetrical, and their hardware has often spent a century wearing into a specific mechanical groove.
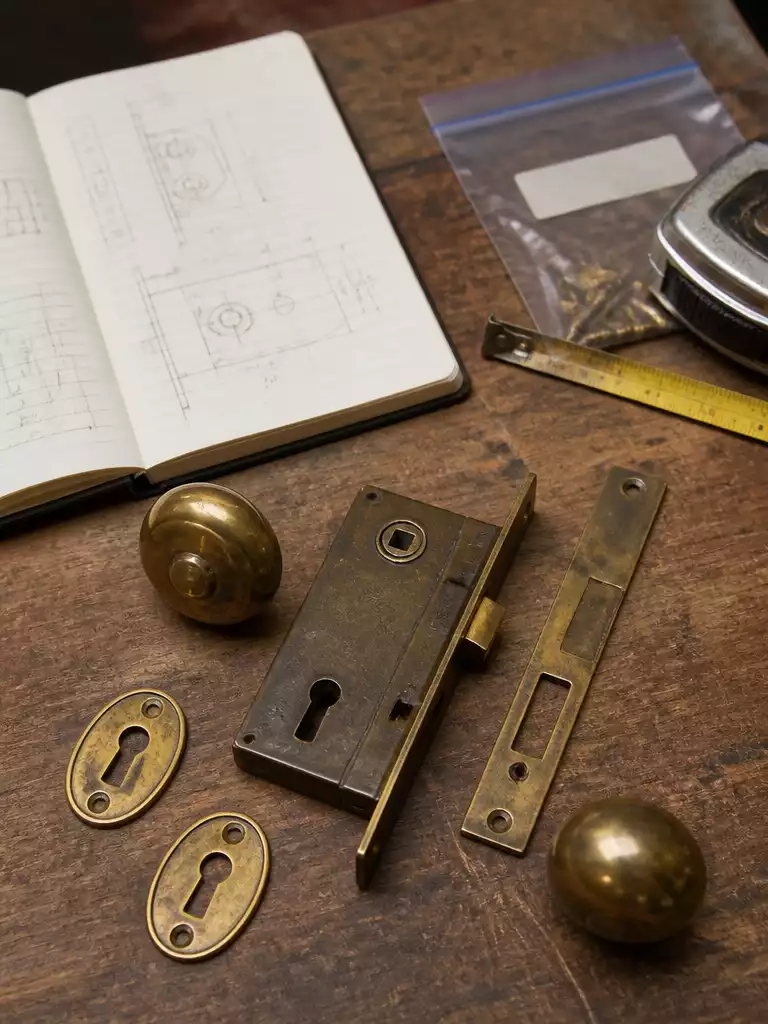
The “Hardware Diary” System
Organize your dismantling process by using a Ziploc bag system. Tape each bag to a specific photo printout of that part’s original location to prevent swapping parts that have been hand-fitted to their mortises.
Before you remove a single screw, create a comprehensive “Hardware Map.” You need to record the technical DNA of the door so you aren’t guessing during reassembly.
- Measure the Backset: Document the exact distance from the door edge to the center of the keyhole or knob.
- Map the Knob Height: Measure the distance from the bottom of the door to the center of the spindle; this is vital if you ever need to repair the door frame.
- Photograph the “Shadows”: Capture high-resolution shots of the “ghost marks” left behind by hinges and lock plates. These outlines are your only blueprints for perfect re-alignment later.
Hardware from the 1800s was often hand-fitted to a specific mortise. Swapping the top hinge for the bottom one, even if they look identical, can cause a permanent sag or a door that refuses to latch.
✓ Pre-Restoration Inventory Checklist
- Label every screw and plate using a masking tape system.
- Note the original sheen, transparency, and wear patterns of the finish.
- Record how many turns it takes to remove the spindle from the knobs.
- Identify if hinges are “loose pin” or “fixed pin” styles.
By documenting the “as-is” state, you protect the door’s mechanical integrity. This step ensures that once the wood is beautiful, the door actually functions as well as it did the day it was hung.
.
📈 Resale Value & Long-Term ROI
Preserving original hardware and finishes isn’t just about aesthetics; it’s a high-yield investment. Original-surface antique doors can command valuations 5 to 10 times higher than modern reproductions. By documenting and keeping the hand-fitted mechanicals intact, you secure the provenance that historic buyers crave and avoid the cost of structural jamb replacements.
The Value Multiplier: Provenance and original surfaces can add a 25–40% premium to the door’s appraised architectural value.
Test for Lead Paint Before Sanding
Ensuring a safe restoration environment protects your health and the integrity of your historic home.
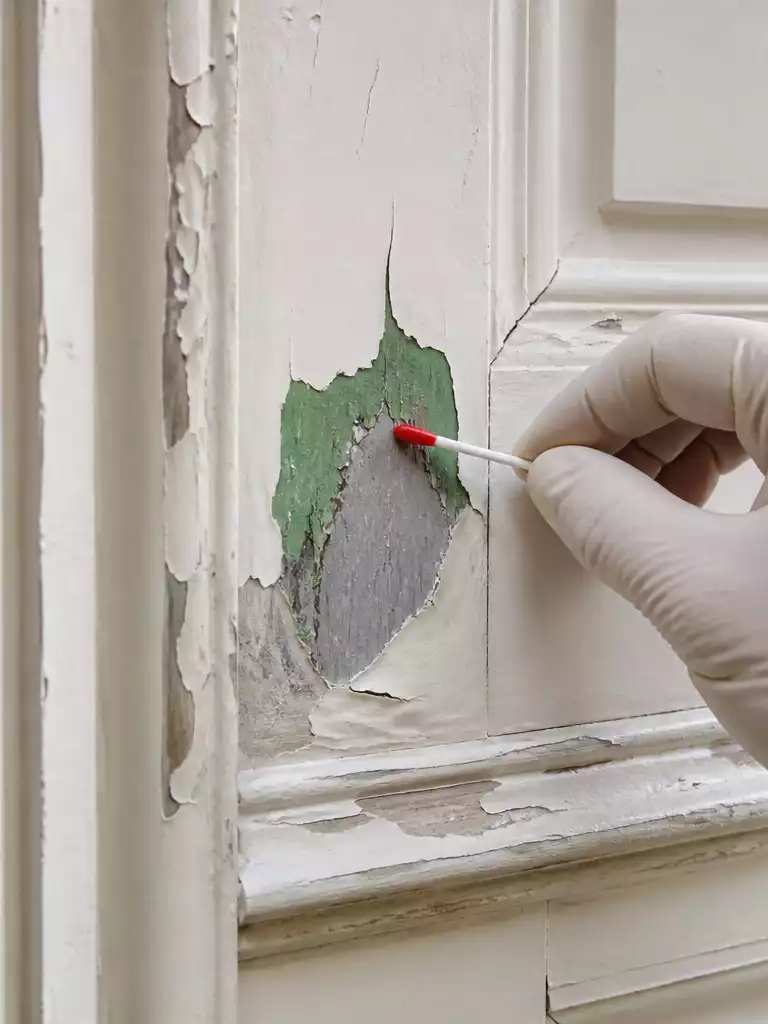
If your door was painted anytime before 1978, you aren’t just looking at “old paint”; you’re looking at a potential biohazard that requires more than a standard dust mask. Assuming a surface is safe because it was recently repainted is a common mistake that can lead to permanent home contamination.
Lead is rarely found in the top coat of a renovated home; it is usually the primer layer sitting directly against the wood. To get an accurate result, you must nick the paint with a utility knife to test the bottom-most layers where the oldest pigments hide.
The “Lead Flour” Risk
Doors are high-risk fixtures because the friction surfaces—the edges where the door hits the frame—grind lead-based layers into a fine “lead flour.” This invisible dust is easily inhaled and nearly impossible to remove from carpets or upholstery without professional help.
While DIY swabs are a helpful starting point, they aren’t foolproof for high-value restorations. For a definitive answer, sending a small paint chip for lab analysis (NLLAP) or hiring an inspector with an XRF scanner is the only way to guarantee a lead-free workspace.
If lead is present, sanding is strictly forbidden. You must switch to a chemical stripping “wet method” to keep dust levels at zero and prevent toxic particles from becoming airborne in your living space.
Pro-Tip: Never dry-sweep debris after testing or stripping. Use a HEPA-certified vacuum or wet-mopping techniques to ensure any microscopic residue is safely captured and removed from the wood pores.
⭐ Top Products for Assessing Antique Doors
Antique Indian Style Wood Barn Door
Heavy Duty Antique Cast Iron Hinges
💰 Surprise Costs to Plan For:
- The real range: Professional lead-safe inspections or lab chip analysis typically require a project-specific quote rather than a flat fee.
- Hidden cost: If lead is found, expect higher material costs for specialized chemical strippers and HEPA-certified filtration equipment.
- Worth it / not: Investing in testing early prevents the massive expense of professional lead remediation for your entire home later.
Choose Restoration Over Replacement
Preserving original old-growth wood secures your home’s historic integrity and significant long-term resale value.
A modern replica door from a big-box store may look clean on the shelf, but it lacks the old-growth heartwood density that allows an antique to survive another century. These historic slabs were harvested from forests that grew slowly over hundreds of years, resulting in tightly packed growth rings that are naturally more rot-resistant and stable than today’s fast-grown, kiln-dried lumber.
The 5x Value Rule: In the eyes of historic home buyers, an original-surface antique door can carry a valuation 5 to 10 times higher than a modern reproduction. If the door has documented provenance, that value can jump by another 25% to 40%.
Structural triage often reveals that what looks like a “lost cause” is actually a simple localized fix. Cracked panels or rot at the very bottom “foot” of the door are not death sentences; they can be cured with precision Dutchman repairs that save the asset without requiring a total jamb replacement.
Beyond the financial ROI, keeping the original door preserves the settled fit of your home. Attempting to hang a new, perfectly square door in a 100-year-old, slightly slanted frame is often a mechanical nightmare compared to simply tuning the door that has lived there for a century.
If the core structure is sound, the “gentle” work of revealing the wood begins. Choosing to restore is a commitment to stewardship that modern materials simply cannot replicate.
⭐ Top Products for Assessing Antique Doors
Antique Indian Style Wood Barn Door
Heavy Duty Antique Cast Iron Hinges
⚠️ Where This Can Go Wrong:
- The Refinishing Trap: Over-sanding to create a “perfect” modern look can strip away the valuable patina, reducing resale value significantly.
- Mismatched Species: Using new, fast-grown pine to patch old-growth oak creates an obvious, unsightly repair that expands at different rates.
- Square-Peg Syndrome: Forcing a new, perfectly square replacement door into a settled, out-of-plumb historic frame leads to permanent sticking.
Restoration feels heavy because the stakes for historic character are high, but you aren’t required to be a master carpenter to succeed. A few high-impact decisions regarding material integrity carry the weight of the entire project’s ROI. Focus on the structural bones first, as authentic preservation usually beats a perfect cosmetic finish in the eyes of future buyers.
🎯 The Calls Worth Getting Right:
- Prioritize structural density before you refinish a weathered door properly.
- Ensure mechanical alignment by checking your front door frame for squareness.
- Use period-correct methods for repairs to maintain long-term resale value.
Gently Strip the Old Finish
Slow and steady chemical stripping reveals the hidden beauty of century-old wood grain without damage.
Forget the industrial “dip tanks” that strip the life and natural resins right out of the wood. Restoration-grade stripping is a slow, methodical process that uses moisture retention to do the heavy lifting for you.
The “Saran Wrap” Method
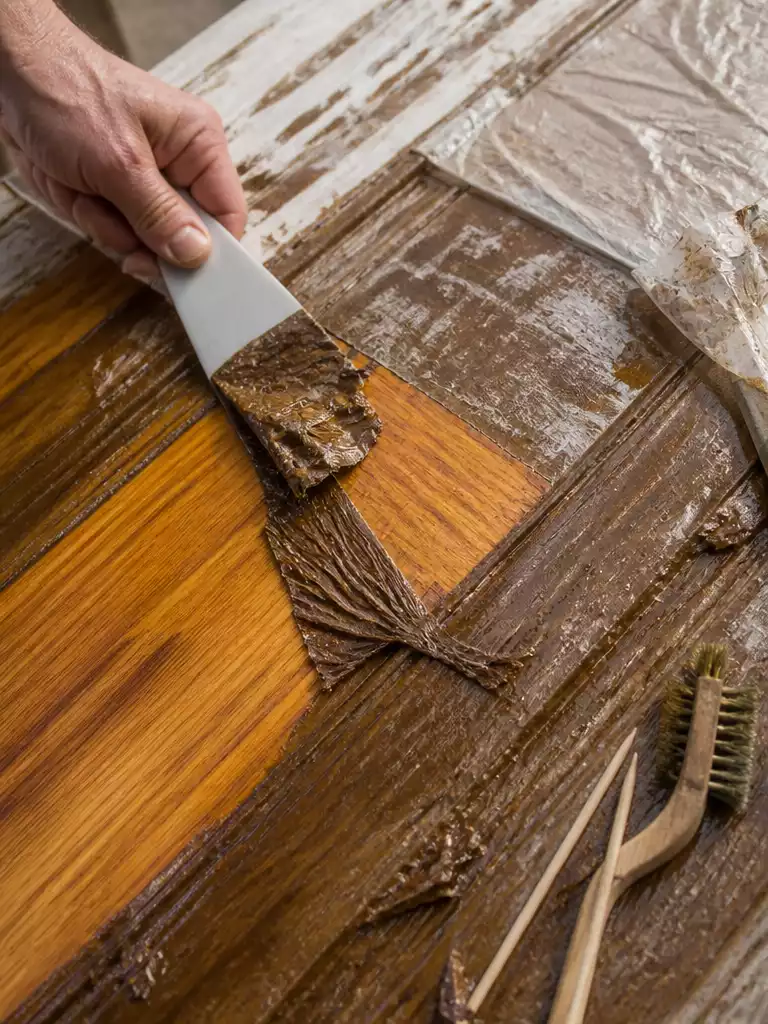
Apply a thick, consistent layer of citrus-based or soy-based stripper to a manageable section of the door. Immediately cover the area in plastic wrap to prevent the chemicals from evaporating; this allows the stripper to work for up to 12 hours without drying into a gummy, impossible mess.
When it’s time to reveal the wood, the 45-degree rule is your best defense against accidental damage. Always use a plastic scraper—never metal, which can easily gouge softened wood fibers—and hold it at a 45-degree angle to lift the sludge in long ribbons.
Intricate detailing requires a lighter touch than the flat panels. Use brass brushes or even simple kitchen skewers to pick out the “gunk” from the small grooves in the molding where finish likes to hide.
The “Over-Stripping” Trap
Avoid the urge to scrub until the wood looks like it just came from a modern lumber yard. Your goal is to remove the failing finish, not the 150 years of character and history baked into the fibers.
Be mindful of your working windows; while citrus strippers are gentle, leaving residue to dry completely can make the final cleanup twice as hard. Most water-based strippers reach their peak effectiveness between 30 and 45 minutes under plastic.
⭐ Top Products for Assessing Antique Doors
Antique Indian Style Wood Barn Door
Heavy Duty Antique Cast Iron Hinges
💰 Investing in the Right Stripping Setup
- The supply budget: Plan for a range of $60 to $120 for high-quality citrus strippers, plastic scrapers, and detailing brushes.
- Hidden cost: Budget for heavy-duty 6-mil plastic sheeting and drop cloths to protect floors from corrosive, lead-tainted sludge.
- Worth it: Investing in soy-based formulas is well worth the premium; they stay active longer, reducing the total volume needed.
Repair Damage With Period Appropriate Methods
Seamless repairs using salvaged wood ensure your door remains a structurally sound piece of history.
If you reach for a tub of pink wood filler to fix a crack in a 1920s door, you’ve already lost the restoration battle. Modern fillers are rigid and prone to popping out, whereas historic wood needs a repair that breathes and moves alongside it.
The “Organ Donor” Strategy: When sourcing materials for a repair, try to find wood from the same era. If you are shortening the door, save the off-cuts from the bottom edge to use as perfect-match patching material later.
For significant rot or deep holes, the Dutchman patch is your gold standard. This involves cutting a clean, rectangular recess into the door and gluing in a matching “patch” of salvaged wood of the same species.
The secret to an invisible Dutchman is grain matching. Ensure the “cathedral” or straight grain of your patch aligns perfectly with the door’s grain direction, or the repair will “glow” and stand out once the finish is applied.
When executing a Dutchman, cut the patch slightly proud—meaning it sits just a hair above the surface of the door. Once the glue has fully cured, you can plane or sand it flush for a perfectly level transition.
Never use epoxy on end grain or as a general primer for small nail holes. It creates a plastic barrier that won’t take stain or oil at the same rate as the surrounding wood, leaving permanent spots.
For small, irregular cracks known as “checks,” use a high-quality two-part architectural epoxy. This material is designed to grip the wood fibers tightly while remaining just flexible enough to prevent future splitting.
⭐ Top Products for Assessing Antique Doors
Antique Indian Style Wood Barn Door
Heavy Duty Antique Cast Iron Hinges
🔢 The Right Sequence for an Invisible Repair
Getting the order right prevents the “halo effect” where patches reject the finish and look like obvious scars.
- Dry-fit the Dutchman patch to ensure the grain lines flow into the existing wood.
- Apply hide glue or wood glue, clamp firmly, and let it cure fully overnight.
- Plane the patch slightly proud, then sand flush only after the adhesive has set.
Preserve the Original Patina Where Possible

Revealing the deep, time-earned glow that only a century of history can create.
Patina is the chemical reaction between a century of sunlight, oxygen, and human touch—and it is the one thing you can never manufacture. It represents the “soul” of the wood, and once it is sanded away, you have essentially turned a historic asset into a piece of new lumber.
The “Stop Early” Rule: Clean the wood with distilled water and a single drop of pH-neutral soap. Stop the moment the dirt is gone; if you keep scrubbing until the wood is white, you’ve destroyed the mellowing that takes 100 years to achieve.
Unevenness is actually a sign of value in the world of architectural antiques. A perfectly uniform color often looks “fake” or over-restored to a savvy buyer or historian.
The slight darkening around the doorknob area is a witness mark of history that collectors value. These areas tell the story of every hand that has pushed the door open for decades, and preserving them anchors the home’s identity.
The Mineral Spirits Preview Trick
Unsure if you should keep sanding? Wipe the bare, cleaned wood with a cloth dampened with mineral spirits.
- The Test: The way the wood looks while it is wet with the spirits is exactly how it will look once a clear finish is applied.
- The Decision: If that rich, deep amber “glow” appears, put the sandpaper back in the drawer immediately.
Every millimeter of wood you sand off is a millimeter of history you can’t put back. Over-sanding remains the leading cause of value loss in door restorations, as it flattens the crisp edges of original moldings and removes the aged surface density.
Mistake to Avoid: Never use all-purpose household sprays or silicone-based cleaners. These can saturate the wood fibers and prevent new finishes from bonding, forcing you to sand deeper than you ever intended.
⭐ Top Products for Assessing Antique Doors
Antique Indian Style Wood Barn Door
Heavy Duty Antique Cast Iron Hinges
📈 Worth It at Resale
Preserving the original surface isn’t just an aesthetic choice; it’s a direct investment in your property’s appraisal. In the world of historic preservation, an original-surface antique door can command a valuation 5 to 10 times higher than a modern reproduction or an over-restored piece that has been sanded back to “new” wood.
The Value Premium: Authenticity and documented provenance can add a 25–40% premium to the door’s individual market value.
8. Clean and Restore the Original Hardware

Transform blackened, paint-crusted metal into the crown jewels of your historic entryway restoration.
Don’t you dare throw those blackened hinges in the trash just because they look like industrial scrap. Under that century of grime is often heavy, hand-cast brass or iron that modern hardware stores simply cannot replicate in weight or detail.
The “Crock-Pot” Trick
For hardware buried under 10 layers of paint, simmer the pieces in a slow cooker with water and a single drop of dish soap overnight. By morning, the paint will peel off like an orange skin, sparing the metal from the scratches caused by aggressive scraping.
Once the paint is gone, you need to identify what you’re actually holding before applying any polish. Grab a refrigerator magnet; if it sticks firmly, you are working with iron or steel, which requires a light oil film to prevent future rust.
If the magnet doesn’t stick, you likely have solid brass or bronze. These materials respond best to gentle buffing with 0000 steel wool and a light wax rather than harsh chemical shines.
⚠️ Avoid Over-Polishing
Resist the urge to make 100-year-old brass look like a shiny new penny. Leave the deep crevices dark to maintain the three-dimensional look of the casting, and be especially careful with plated hardware—aggressive polishing will rub the thin gold or silver layer right off.
For the internal mechanics, skip the WD-40, which eventually attracts dust and gums up delicate internal springs. Instead, use a dry graphite lubricant to ensure the mortise lock slides as smoothly as it did in the 1800s.
⭐ Top Products for Assessing Antique Doors
Antique Indian Style Wood Barn Door
Heavy Duty Antique Cast Iron Hinges
Refinish to Match the Era
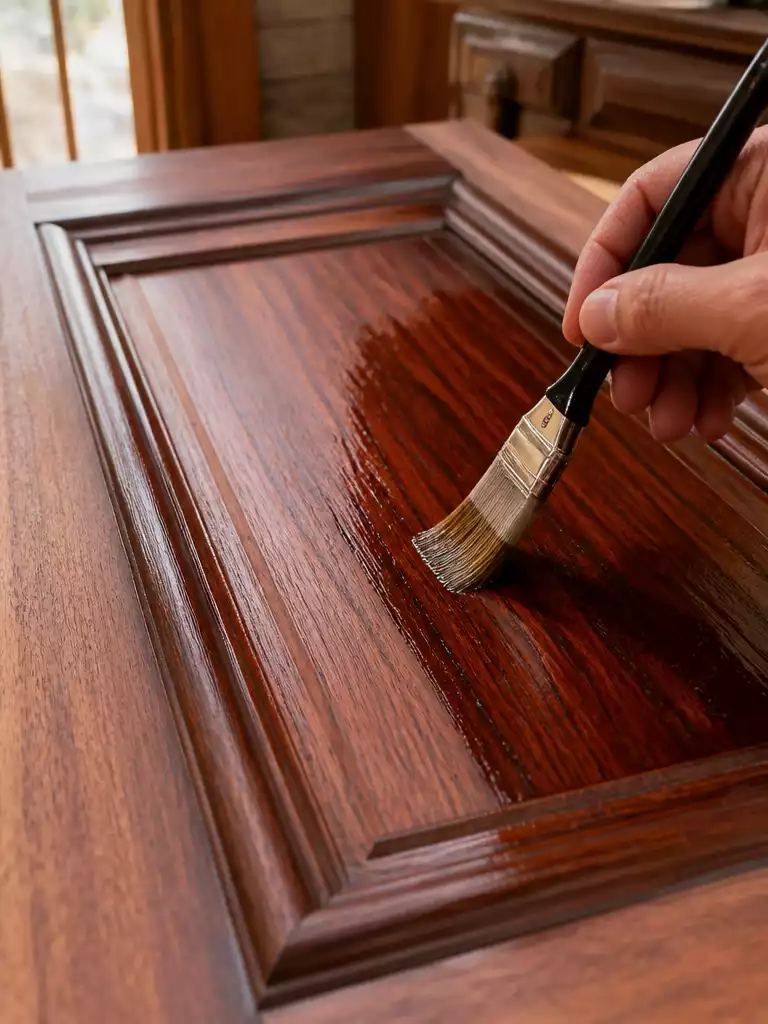
Revive the historic depth of your door with breathable, period-accurate finishes that age gracefully.
If your door was built before 1930, it likely never had a “plastic” coating; it lived under a breathable shield of shellac or natural oils. Modern polyurethane might seem like the durable choice, but it creates a film that sits on top of the wood and eventually peels, whereas historic finishes bond with the fibers for a repairable, lifetime glow.
Shellac is widely considered the “forever finish” for antiques because it is made from natural resin and remains soluble in alcohol. If a shellac-finished door gets scratched in five years, you don’t have to sand it down; you simply apply a fresh coat, which dissolves and merges with the old layer perfectly.
For those seeking a “close-to-the-wood” feel, Boiled Linseed Oil (BLO) is unmatched for bringing out the chatoyancy of old-growth timber. However, patience is required here as BLO needs a full week to cure properly before it loses its tackiness.
Pro-Tip: The “Matte Hack”
If your shellac or varnish looks too shiny or “plastic,” wait for it to fully cure, then rub it lightly with 0000 steel wool and a high-quality paste wax. This creates a soft, furniture-grade satin glow that looks truly authentic to the period.
When applying shellac, start with a thin “seal coat” (a 1-lb cut) to ensure even absorption into the parched wood. Subsequent coats can be heavier (2 or 3-lb cuts) once that initial layer has stabilized the grain.
If you need more durability than oil but want to avoid the plastic sheen of modern poly, traditional resin-based varnish is the answer. Unlike modern coatings that sit on the surface, traditional varnish sinks into the pores, preserving the three-dimensional texture of the wood.
⭐ Top Products for Assessing Antique Doors
Antique Indian Style Wood Barn Door
Heavy Duty Antique Cast Iron Hinges
⚠️ Watch Out for These Refinishing Traps:
- The Polyurethane Seal: Avoid modern poly; it creates a “plastic” film that cannot be spot-repaired and kills the wood’s depth.
- Excessive Oil Pooling: Never leave puddled linseed oil on the surface; it will become permanently tacky and won’t cure properly.
- High-Gloss Finishes: Shiny, high-build coatings look “fake” on antiques; stick to satin or matte sheens to preserve historical authenticity.
Reseal for Protection Without Overcoating

A thin, breathable seal protects the wood’s history while allowing it to age gracefully.
A common mistake is thinking more coats equals more protection, but on an antique door, a thick film is just a layer that will eventually crack. Historic wood needs to breathe to accommodate the natural expansion and contraction caused by seasonal humidity shifts.
To avoid a suffocating plastic shell, choose low-build, high-solids finishes that offer UV protection without the heavy buildup of modern resins. These professional-grade sealers provide the necessary barrier against the elements while maintaining the tactile depth of the original grain.
The “Wet Edge” Technique
To prevent lap marks—those dark, unsightly stripes where layers overlap—always work your brush from the dry area back into the wet area. This ensures the sealer levels out perfectly before it begins to set.
Precision in application is as much about quantity as it is about technique. You should aim for a coverage rate of 350–450 sq ft per gallon for your first coat to ensure the wood is sufficiently saturated.
Subsequent coats should be much thinner, typically covering 600–800 sq ft per gallon. If you use significantly more product than this, you are overbuilding the finish and inviting future peeling as the wood moves underneath the rigid coating.
The Bottom-Edge Rot Trap
Avoid sealing the very bottom edge of the door with a thick, impermeable film. If moisture enters through a crack or hardware hole elsewhere, a sealed bottom edge traps that water inside, causing the door to rot from the inside out over time.
When applied correctly, a two-coat treatment has a life expectancy of approximately five years before requiring a maintenance check. This breathable approach ensures your restoration remains an asset rather than a maintenance nightmare.
⭐ Top Products for Assessing Antique Doors
Antique Indian Style Wood Barn Door
Heavy Duty Antique Cast Iron Hinges
💰 Investing in the Right Protection:
- The maintenance cycle: Expect to apply a fresh scuff-and-recoat every 4–6 years to keep vertical surfaces fully shielded.
- Product yield: A single gallon should cover roughly 400 square feet; buying more usually leads to wasteful, overbuilt layers.
- Long-term payoff: Prioritizing breathable UV protection over cheap poly prevents the $500+ cost of a total future strip-and-sand.
List 11 Rehang the Door Correctly
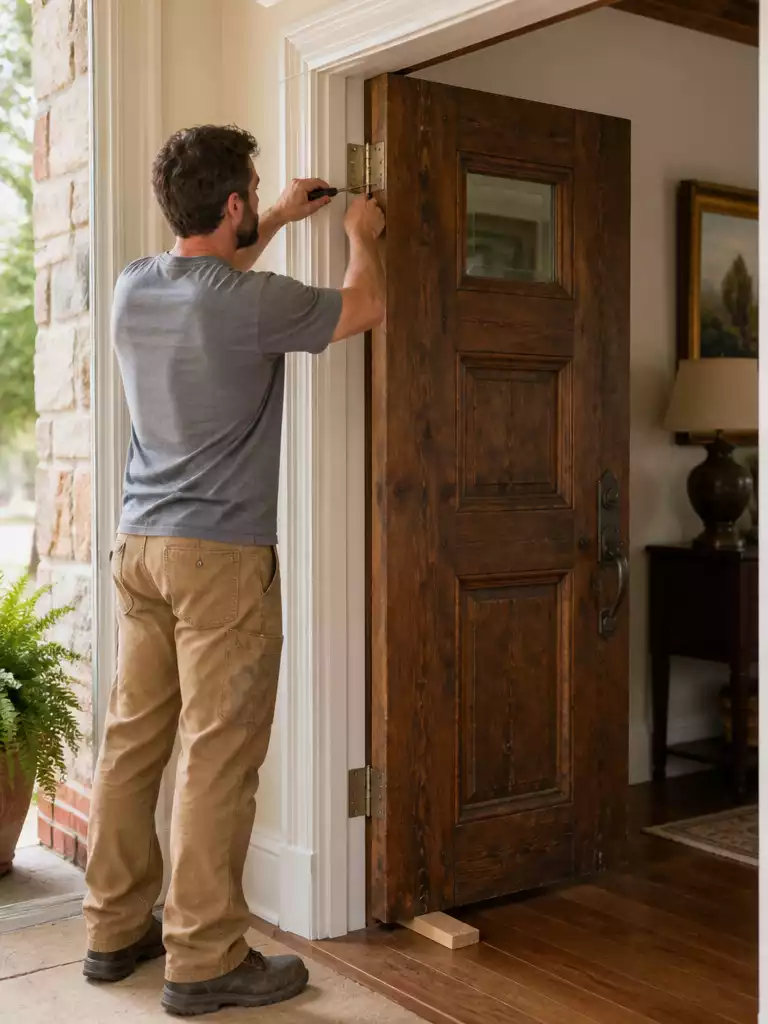
Precision hanging ensures your heavy historic masterpiece swings smoothly for another hundred years.
Don’t just screw the door back in and hope for the best; a 60-pound solid oak door will tear out old, stripped screw holes faster than you can say “historic preservation.” After weeks of meticulous finish work, the final hurdle is managing the sheer mechanical stress of the door’s weight against a frame that has likely shifted over the decades.
The Pro’s Alignment Checklist
- The Toothpick Trick: If the original screw holes are enlarged, glue a few wooden toothpicks or a golf tee into the hole, trim them flush, and then re-drill to give the old screws fresh “bite.”
- Top-Down Hanging: Always attach the top hinge first, as this allows the door to hang naturally so you can check the “swing” before committing to the bottom and middle hinges.
- Shimming for Plumb: Since old houses settle, use thin cedar shims behind the hinge leaves to “tilt” the door slightly if the frame is no longer perfectly square.
Support is everything during this stage to prevent permanent damage to the wood fibers around the mortise. Use a door wedge or a sturdy stack of magazines under the “foot” of the door while you are aligning the hinges.
Never let the door’s full weight hang on a single, partially-tightened screw while you reach for your tools. This precaution protects the integrity of the original hinge locations and ensures the wood doesn’t splinter under sudden tension.
Avoid the Force: Never try to force an antique door into an out-of-square opening; if it sticks, use shims to adjust the hinges rather than planing off your freshly restored edges.
By following a methodical hanging sequence, you respect the “settled” fit of the house. This patience prevents the door from ghost-opening or rubbing against the jamb, preserving your finish for years to come.
⭐ Top Products for Assessing Antique Doors
Antique Indian Style Wood Barn Door
Heavy Duty Antique Cast Iron Hinges
💰 What This Really Costs
- The real range: Restoration costs vary wildly and must be quoted per project; no universal figure exists for historic work.
- Hidden cost: Budget for replacement screws and vintage-style cedar shims, as original fasteners often snap during the reinstallation phase.
- Worth it: Investing in a heavy-duty manual screwdriver prevents stripping original brass screws, which are expensive and difficult to source.
Maintain the Restored Finish Over Time
Consistent, gentle care ensures your historic door remains a high-value architectural asset for decades.
Restoration isn’t a “one-and-done” event; it’s the start of a new relationship with a piece of history that needs checking every season. Because you’ve chosen era-appropriate materials rather than plastic coatings, the door is now a living surface that responds to its environment.
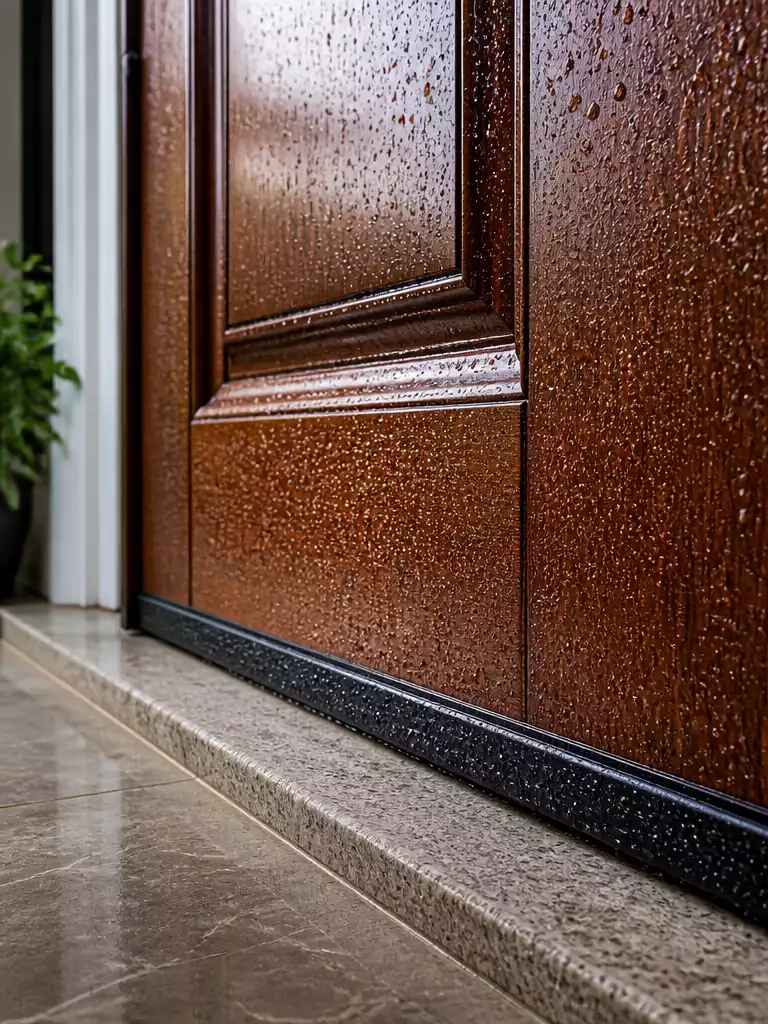
The “Water Bead” Test
Every six months, flick a few drops of water onto the door surface. If they bead up, your seal is healthy; if they soak in and darken the wood, it is time for a maintenance “scuff-and-recoat” to prevent deep moisture damage.
When it comes to daily grime, your cleaning protocol should be strictly minimalist to protect the 100-year-old patina you worked so hard to save. Use only a damp microfiber cloth for dusting and light soil.
Avoid “lemon oil” or “orange glow” sprays at all costs, as these products often contain silicones. These chemicals create a slick residue that penetrates the wood fibers, making it nearly impossible for future finishes to bond to the surface.
For your antique hardware, mechanical health is just as important as aesthetics. Use a dry graphite lubricant for the locks rather than WD-40 or heavy oils, which attract dust and eventually gum up the delicate internal springs of antique mortise sets.
Finally, always keep an eye on the “threshold” or the bottom edge of the door, where 90% of failures begin. Ensuring water doesn’t pool against the foot of the door will keep your restoration intact for the next generation.
⭐ Top Products for Assessing Antique Doors
Antique Indian Style Wood Barn Door
Heavy Duty Antique Cast Iron Hinges
⚠️ Where This Can Go Wrong:
- Over-oiling Hardware: Excessive oil on hinges or locks can bleed into the wood grain, causing permanent, dark oily stains.
- Power Washing: Never use high-pressure water for cleaning; it forces moisture deep into fibers and destroys 100-year-old glue bonds.
- Silicone Shortcuts: Using modern “glow” sprays creates a chemical barrier that prevents any future touch-ups or finish repairs from sticking.
You now have the technical roadmap to preserve your home’s architectural integrity without the risk of over-restoration. The choices that actually protect your investment are fewer than this full list suggests, so focus on the structural and safety essentials first.
Deciding to prioritize the original hardware or a period-correct finish is enough to ground the entire project in authenticity. Once you stabilize the wood and seal the grain, your front door becomes a permanent asset rather than a maintenance burden. If you are also looking to refinish a weathered door elsewhere, these preservation principles will ensure the work lasts.