Stopping drafts and weatherproofing an exterior door is about securing your home’s thermal barrier before the first deep freeze. These 12 tactical steps narrow your focus to the repairs that stop heat loss and protect your investment. Start by hunting for the leaks you can’t see.
Inspect the Door for Gaps and Drafts
Locating hidden energy leaks ensures your winter weatherproofing efforts target the exact source of cold air.
As an Amazon Associate I earn from qualifying purchases. Affiliate links may earn me a commission at no extra cost to you.
Before you spend a dime on materials, you need to conduct the “Midnight Light Test.” This diagnostic step is best performed after sundown when the contrast between interior darkness and exterior light reveals exactly where your heated air is escaping.
Have a partner stand outside with a high-lumens flashlight and slowly trace the door’s perimeter while you stand inside with the lights off. Any sliver of light piercing through the jamb or header represents a literal hole in your home’s thermal envelope.
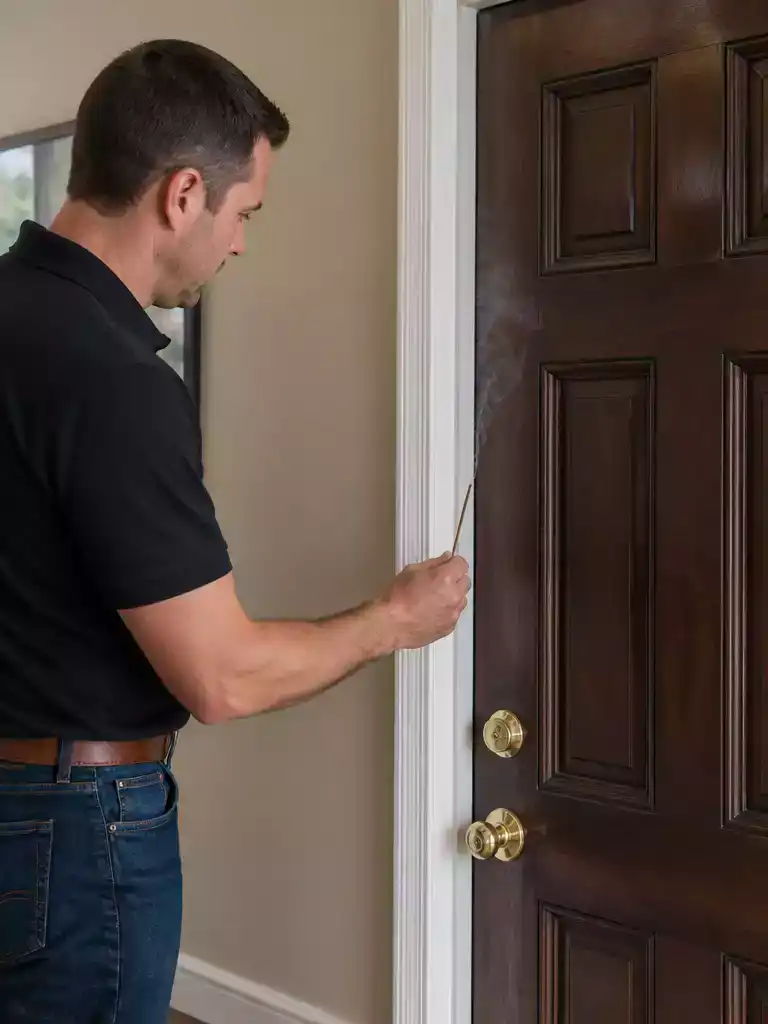
The Trace & Detect Method
Light shows you the gaps, but pressure tells you the volume of the leak. Use these sensory checks to map out your repair plan:
- The Smoke Trace: Hold a lit incense stick near the door jamb. If the smoke pulls horizontally or swirls aggressively, you’ve identified a high-pressure air leak.
- The Damp Hand Check: Wet your hand and move it slowly along the frame. Evaporative cooling makes even the tiniest “pinch” of cold air feel significantly sharper on wet skin.
- Visual Geometry: Inspect the upper corners where the header meets the side jambs. Structural settling often creates “daylight” gaps here that standard weatherstripping might not reach.
While you’re inspecting the frame, don’t ignore the mechanical behavior of the door itself. A common culprit for persistent drafts is the “Ghost Latch” phenomenon.
Expert Insight: If the door rattles within the frame when it’s fully latched and locked, the gap between the door face and the stop is too wide. This mechanical play means even brand-new seals won’t be compressed enough to create an airtight barrier without hardware adjustment.
Once you have mapped these leaks and identified whether they are caused by physical gaps or poor alignment, you can move on to evaluating the health of your current seals. Often, the difference between a cozy home and a drafty one is simply knowing if your existing strips are dirty or physically dead.
.
⚠️ Where Diagnostics Can Go Wrong:
- Ignoring the HVAC: Performing a smoke test while the furnace is running can pull air unnaturally, masking small, consistent leaks.
- Overlooking the Header: Many homeowners only check the sides; structural settling often creates the largest gaps at the very top.
- False Positives: Mistaking a cold glass pane for a draft. Feel for moving air rather than just a cold surface temperature.
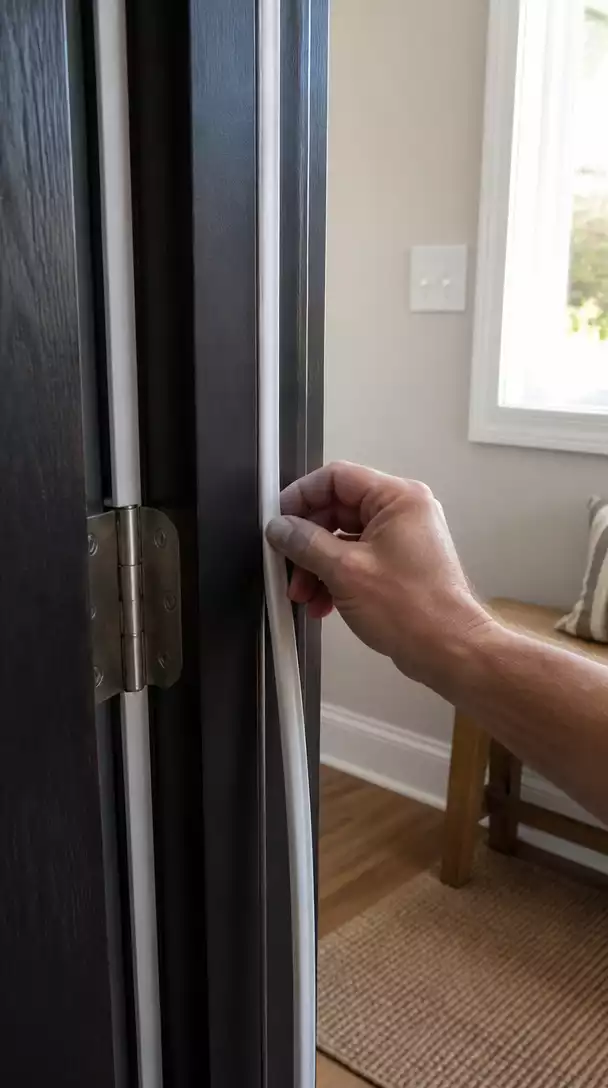
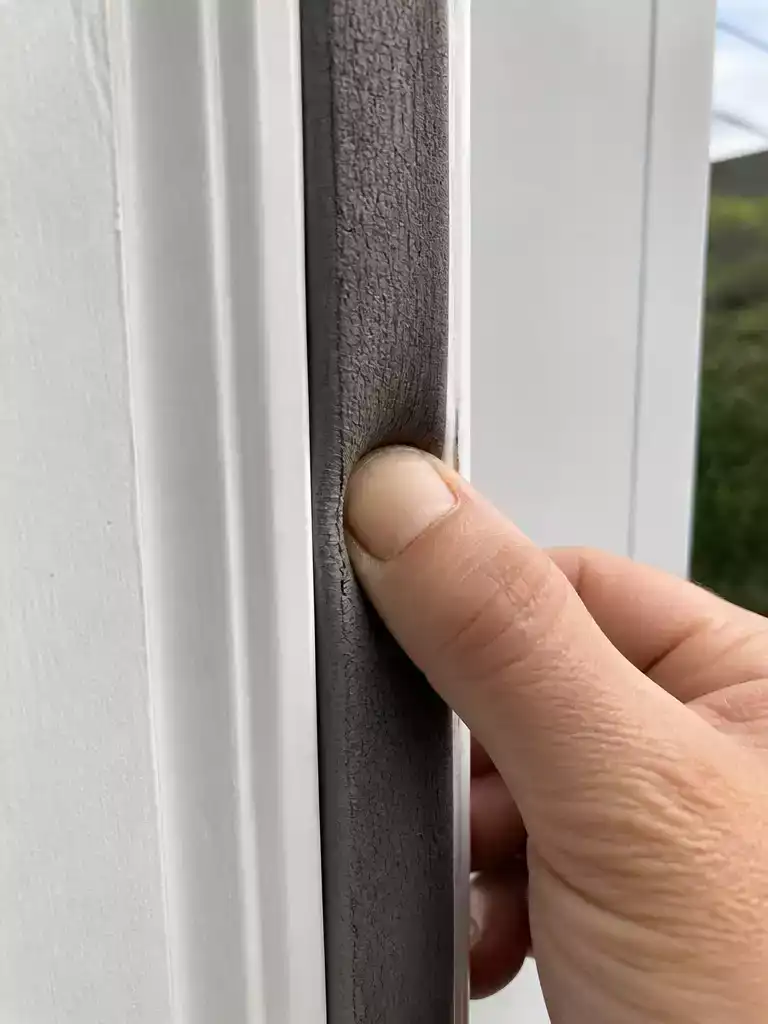
Check the Weatherstripping Condition
Identify failing seals early to keep your home cozy and your energy bills low.
Think of your weatherstripping as the gasket on a refrigerator; if it doesn’t create a tight seal, the “cold” is constantly working to get inside. Over time, the materials used to bridge the gap between your door and the frame lose their “memory”—that springy ability to bounce back every time the door opens.
If your seals stay flat or misshapen after the door is opened, they have reached what pros call a “compression set.” At this point, the material is no longer an active barrier; it is simply a piece of debris sitting in your door jamb.
The 3-Step Physical Diagnostic
- The Compression Test: Press your thumb firmly into the foam or rubber. If it doesn’t “snap” back to its original shape instantly, the internal cells have collapsed.
- The Paper Bill Test: Close the door on a five-dollar bill at various points along the frame. If you can pull it out with zero resistance, the weatherstripping isn’t making physical contact.
- The Brittleness Check: Look for hairline cracks or a yellowed, tea-stained color on vinyl V-strips. This indicates UV degradation, meaning the strip will snap rather than seal when the wind hits it.
You should also be on the lookout for a common DIY mishap known as “Paint-Lock.” Often, during a quick entryway refresh, previous owners paint right over the weatherstripping, which hardens the material and renders its insulating properties useless.
Whether it’s hardened by old paint or flattened by years of use, weatherstripping that fails these tactile tests needs to be stripped back. Fresh, flexible seals are the only way to ensure your heated air stays where it belongs.
Pro Tip: Inspect your door seals at least twice a year. Seasonal temperature swings can cause materials to expand and contract, leading to faster degradation than you might expect.
.
⭐ Top Products for Weatherstripping Inspection
Rubber Weather Stripping for Large Gaps
Multipurpose Foam Insulation Sealing Tape
Under Door Draft Stopper for Gaps
💰 What This Really Costs
- The repair range: A standard replacement seal typically costs between $10 and $30 for high-quality silicone or kerf-in materials.
- Hidden cost: Budget an extra $5 for a small bottle of rubbing alcohol to ensure the frame is surgically clean for adhesion.
- Worth it: Spending $20 now on fresh seals is far more efficient than losing $20 every month to heat escaping through gaps.
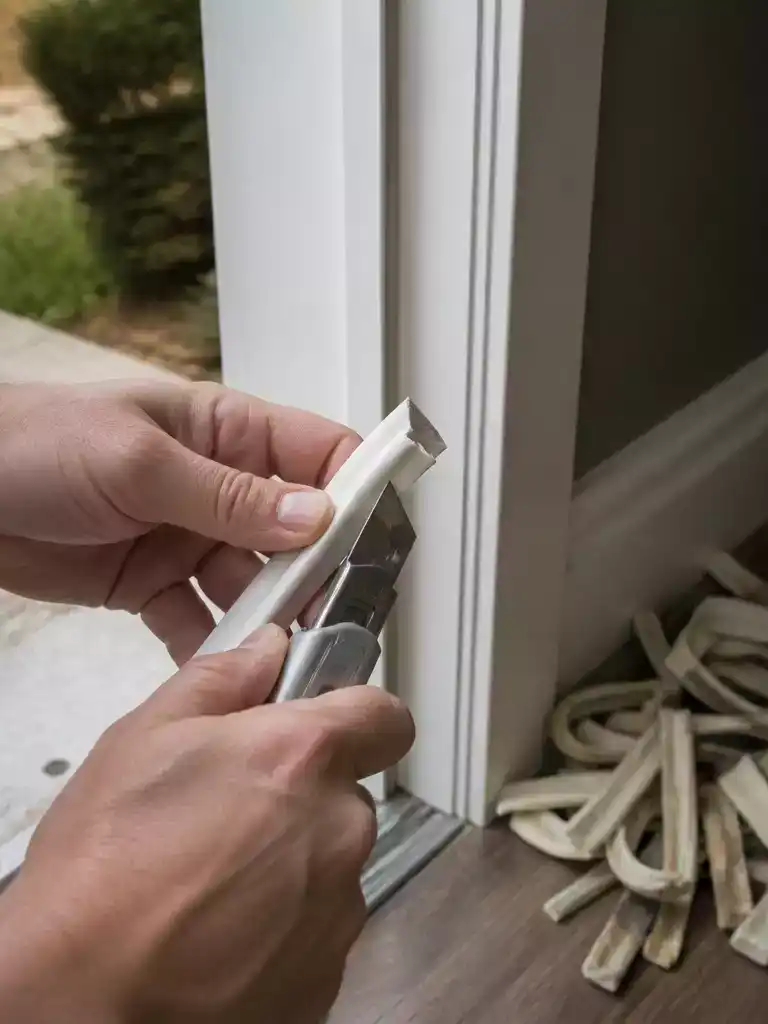
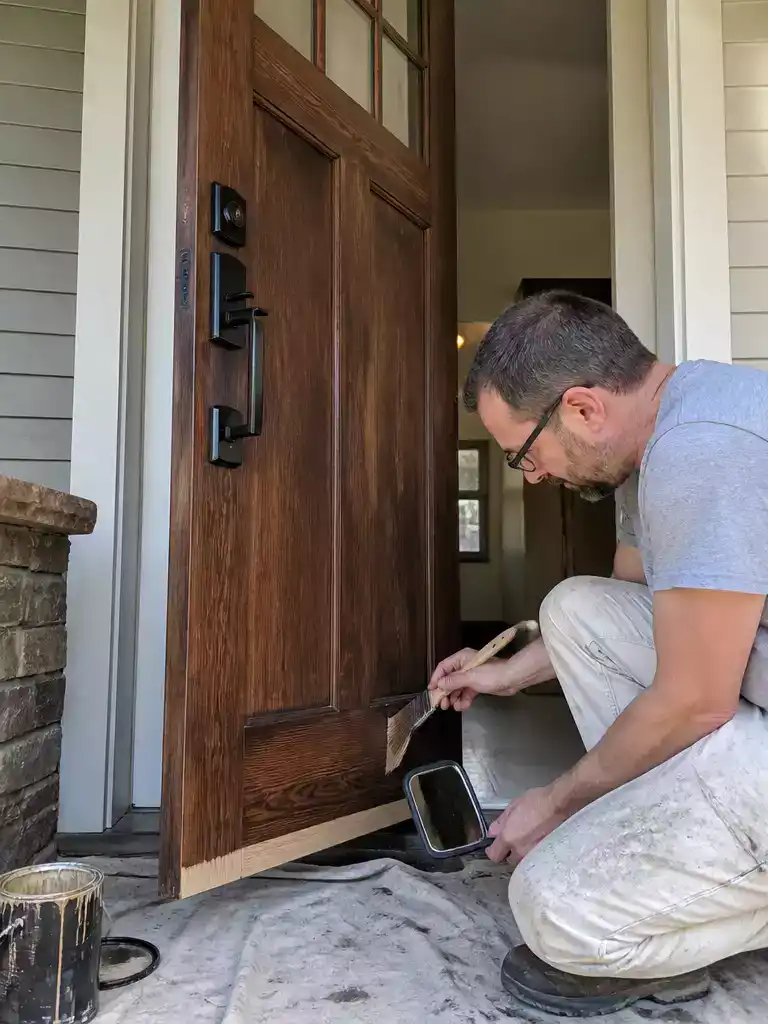
Replace Worn Weatherstripping
Achieve a professional, airtight seal that creates a satisfying thermal thud every time you close the door.
Think of new weatherstripping as a tailored suit for your entryway. The goal is a seamless perimeter that eliminates gaps while allowing the door to close with a soft, solid thud rather than a struggle.
Before you head to the hardware store, you need to identify which material profile your door requires. Most modern doors use “Kerf-in” stripping that slides into a pre-cut groove, while older frames may require adhesive-backed options.
When applying adhesive-backed strips, follow the “No-Stretch” Rule. Pulling the material taut during installation creates internal tension; eventually, the ends will peel back and shrink, leaving frustrating one-inch gaps at the corners.
Pro-Tip: The Alcohol Prep
Clean the door jamb thoroughly with rubbing alcohol before applying any adhesive. Even a microscopic layer of household dust or old furniture polish will cause a high-end seal to fail within 48 hours.
For a truly professional finish, pay attention to the corners. Use a sharp utility knife to miter the corners at 45-degree angles where the header and side strips meet.
This prevents “stacking” the material, which creates a thick lump that prevents the door from latching properly. A clean miter ensures the seal remains continuous and airtight around the entire frame.
Avoid This Common Mistake
Don’t eyeball your measurements. Use your old weatherstripping as a physical template for the new cuts to ensure you don’t end up short at the threshold.
With the sides and top now sealed against the wind, you can move your focus to the largest and most difficult gap in the assembly: the floor.
.
🔢 The Right Sequence for a Tight Seal
Rushing the installation often leads to peeling adhesive or missed gaps. Following this specific order ensures your materials bond perfectly and align without bunching.
- Strip every inch of old material and scrape away stubborn residue with a putty knife.
- Perform the alcohol wipe-down and allow the jamb to dry completely for five minutes.
- Install the top horizontal piece first, then fit vertical side strips snugly against it.
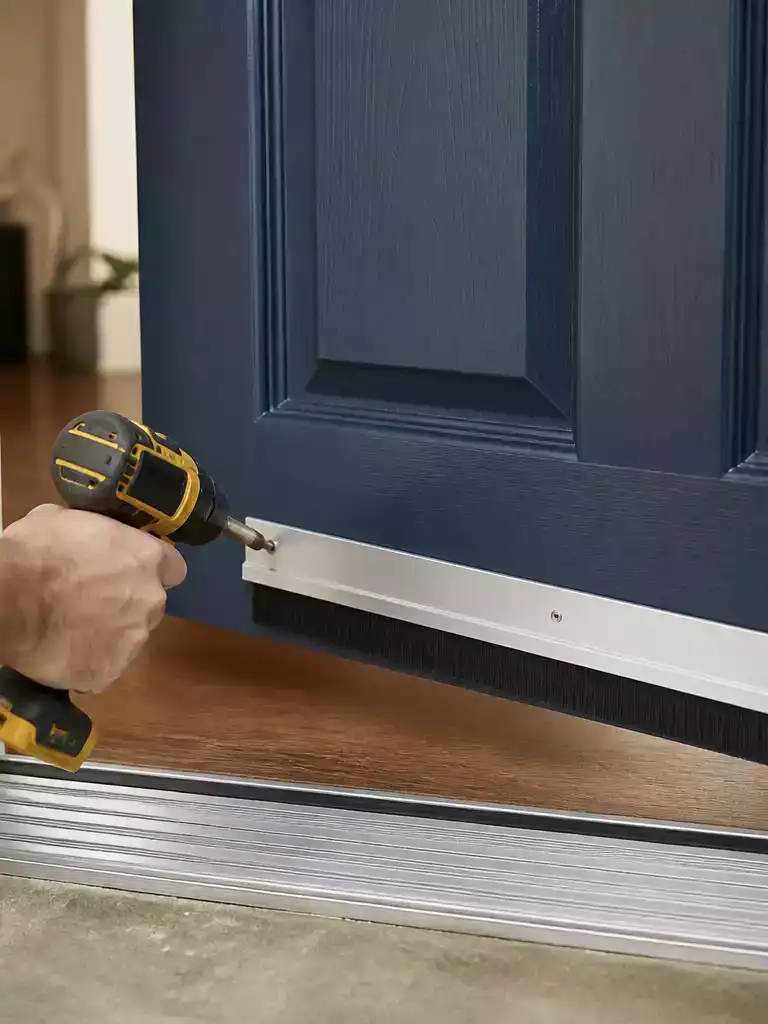
Install a New Door Sweep
Block sub-zero drafts and uninvited pests with a precision-fitted thermal barrier at your feet.
The gap at the bottom of your door is essentially a wide-open window for mice and sub-zero air to enter your home. Installing a high-quality sweep is your first line of defense against the heavy, cold air that settles at floor level.
When installing, aim for a “light touch” alignment where the sweep barely kisses the threshold surface. If you set it too low, you risk ruining your entryway rug and causing the vinyl fins to curl and tear within a month.
Adhesive-only sweeps rarely last a full winter because the constant friction of the door moving eventually peels them away. Always opt for the screw-mounted version for exterior doors to ensure the seal stays put when the temperatures drop.
For those with steel doors, preparation is the key to a professional finish that doesn’t slip. Use a center punch to mark your spots before drilling pilot holes; this prevents the drill bit from dancing across your door’s finish and creating unsightly scratches.
- Measure the door width and trim the metal frame with a hacksaw for a custom fit.
- Check that the door opens and closes smoothly without dragging on the floor.
- Tighten screws firmly but avoid over-tightening, which can warp thin aluminum frames.
A sweep is only half the battle in securing your home’s thermal envelope. The “landing pad” it hits—the threshold—often needs its own surgery to achieve a truly airtight result.
⭐ Best Door Sweeps for Energy Savings
Triple Seal Self Adhesive Door Sweeps
Aluminum U-Shaped Door Sweep with Seal
Rubber U-Shaped Door Bottom Weather Stripping
🔢 The Right Installation Sequence
Rushing the attachment often leads to a sweep that binds or leaves gaps; follow this order to ensure a smooth, long-lasting seal.
- Trim the metal carrier with a hacksaw first, then cut the vinyl or brush insert.
- Tape the sweep in place with painter’s tape to test the door’s swing and clearance.
- Mark and drill your pilot holes before removing the tape to drive the final screws.
The technical details of weatherproofing can start to feel like an all-or-nothing project, but your home’s efficiency doesn’t hinge on absolute perfection. Focus on the two or three primary failure points you identified during your initial inspection to see the most immediate ROI. A few high-impact adjustments will protect your investment and keep your entryway presentable without the need for an expensive overhaul.
🎯 The Calls Worth Getting Right:
- Prioritize a seamless seal on your front door first.
- Consider durable hardware if you’re upgrading your storm doors soon.
- Ensure mechanical alignment is solved before applying any permanent adhesives.
- Address the largest air gaps to see the quickest results.
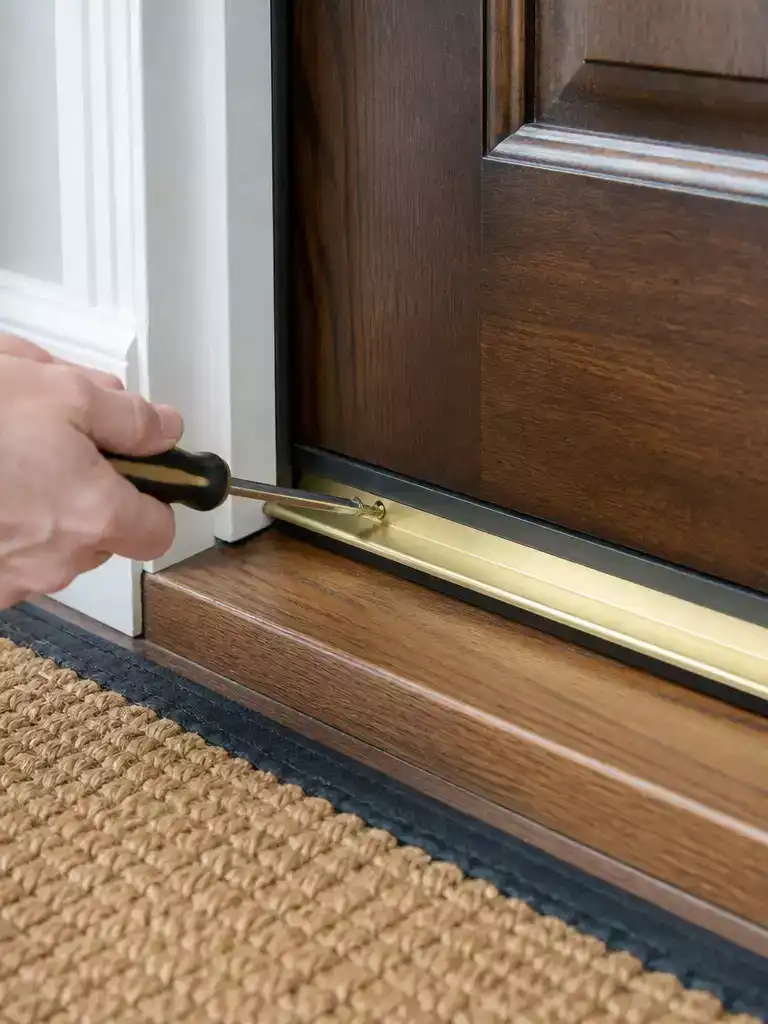
Seal the Threshold
A perfectly adjusted threshold creates a seamless thermal seal that blocks icy floor-level drafts.
Many homeowners overlook the fact that the threshold—the transition piece at the bottom of the door—is often a mechanical part designed for tuning. Those small brass screws spaced along the metal or wood strip aren’t just decorative fasteners; they control the height of the adjustable center bar.
By turning these screws counter-clockwise, you raise the oak or plastic insert to meet the bottom of the door. You want to raise it just enough so that you feel a slight, even resistance when the door closes, ensuring a snug fit without requiring you to slam the door to get it to latch.
If your threshold features a built-in rubber bulb that has flattened or cracked over time, you don’t necessarily need to rip out the entire metal unit. Most T-shaped or bulb gaskets can be pulled out with a pair of pliers and replaced with a fresh insert for under $10, which is a massive win for your budget.
To finish the job, address the “hidden” leak point where the metal threshold meets your concrete or wood porch. Running a continuous bead of clear silicone sealant along this exterior edge prevents water from wicking underneath the door frame and causing silent rot.
Pro Tip: The Symmetry Check
Always adjust both ends of the threshold equally to keep the surface level. An unlevel threshold causes your door sweep to drag and wear out prematurely on one side, ruining your new seal within weeks.
Once adjusted, verify that your deadbolt still throws smoothly into the strike plate. Significant changes to the threshold height can occasionally shift how the door sits, so a quick latch test ensures your home remains as secure as it is warm.
.
⭐ Our Picks for Inspecting Door Gaps
⚠️ Watch Out for These Threshold Pitfalls:
- Over-tightening screws: Driving adjustment screws too hard can strip the wooden substrate or snap the plastic housing entirely.
- Ignoring debris: Adjusting a threshold over trapped grit will grind down your new seal and scratch the door bottom.
- Excessive lift: Raising the bar too high creates upward pressure that can eventually bend your door’s hinges out of alignment.
Caulk Around the Frame
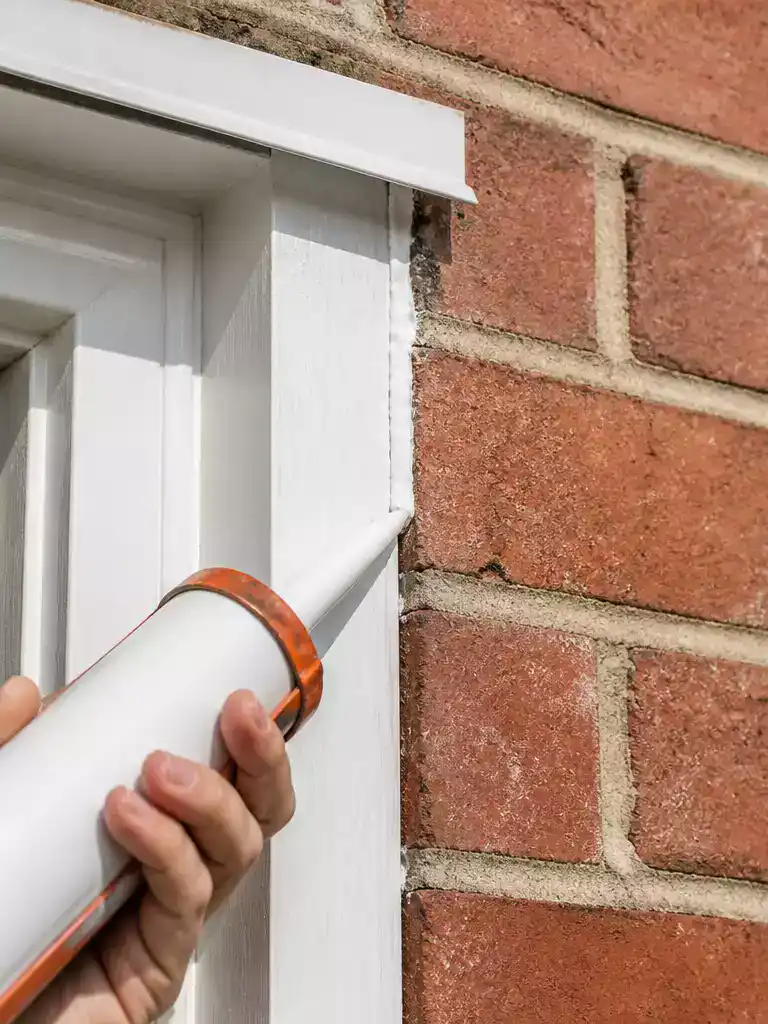
Seal the invisible gaps in your home envelope to stop heat from escaping through the walls.
If you can see even a hairline crack between your door trim and the siding, you’re losing heat through the “envelope” of your home. These static gaps allow cold air to bypass your door entirely, snaking behind the casing and into your wall cavities.
Choosing the Right Sealant
Don’t settle for cheap latex caulk, which often shrinks or cracks during the first deep freeze. Spend the extra $3 for 100% exterior-grade silicone or a high-end polyurethane “solar seal” to ensure it lasts 20+ years.
To get a professional finish, cut the nozzle of your caulk tube at a sharp 45-degree angle to create a bead no wider than the gap itself. As you move along the frame, focus on pushing the caulk into the crack rather than just laying a thin ribbon on top of the surface.
Once the bead is applied, use a gloved finger dipped in soapy water to tool the sealant immediately. This creates a smooth, concave seal that effectively sheds water away from the wood trim to prevent future rot.
Check the Drip Cap
Pay special attention to the very top of the door frame. Ensure the caulking around the drip cap is intact, as this is where 90% of door-frame rot begins from melting winter snow.
A continuous, flexible barrier around the entire perimeter keeps moisture out and expensive heated air in. It is one of the most cost-effective ways to protect the structural integrity of your entryway while improving your home’s thermal performance.
.
🔢 The Right Sequence
Caulking is your final exterior defense; doing it in this specific order ensures the bond doesn’t fail when the freeze hits.
- Scrape away loose paint and old, brittle debris so the surface is bone-dry.
- Apply the bead and tool it immediately before the material begins to “skin over.”
- Allow a full 24 hours of dry weather for the seal to cure completely.
Adjust the Hinges and Alignment
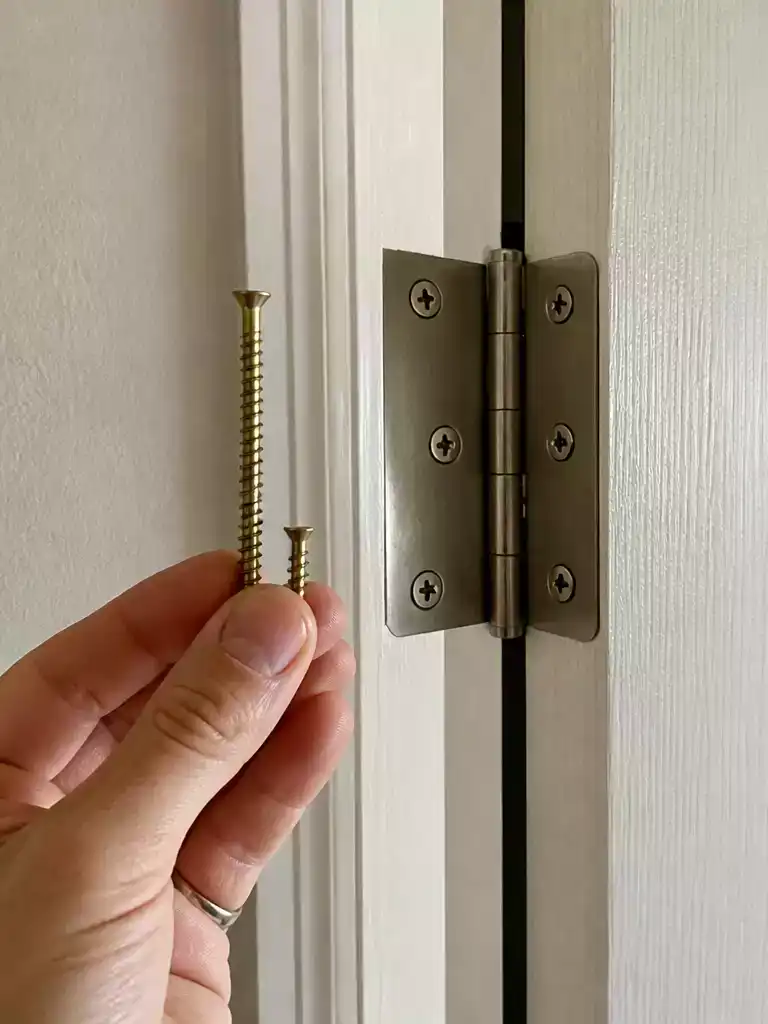
A perfectly squared door ensures your new weatherstripping seals tight against every winter draft.
A sagging door creates a wedge-shaped gap at the top that no weatherstripping can fix. You have to solve the gravity problem first to ensure your seals actually make contact with the frame.
Start by inspecting your door for uneven gaps or areas where the wood drags against the jamb. Often, the weight of the door pulls the top hinge loose over time, causing the entire unit to sit crooked in the opening.
If the door is hitting the strike side even after tightening, you can use shim logic to shift its position. Unscrew the bottom hinge and place a thin piece of cardboard, like a cereal box, behind the hinge leaf to “kick” the bottom of the door over slightly.
Sometimes new, thick seals make the door so tight it won’t latch properly. Instead of moving the entire strike plate, use a metal file to slightly enlarge the opening so the latch tongue clicks in cleanly.
Pro-Tip: The Toothpick Trick
If your hinge screws are spinning in stripped holes, jam two wooden toothpicks and a dab of wood glue into the hole. Snap them flush, and the screw will now bite into the hole like it’s brand new wood.
Once the door moves freely and sits square, your weatherstripping will finally be able to do its job without being pinched or bypassed. Proper alignment is the foundation of a truly weatherproof entryway.
⭐ Our Picks for Hinge Alignment
Permanent Repair Kit for Stripped Screws
⚠️ Watch Out for These Alignment Traps:
- Over-tightening Screws: Driving screws too hard into old wood can snap the heads off or crack the jamb entirely.
- Ignoring the Reveal: Only checking the latch side is a mistake; ensure the “reveal” (the gap) is uniform across the top.
- Skipping Pilot Holes: Forcing a 3-inch screw into a stud without a pilot hole often causes the wood to split.
Add a Storm Door if Needed
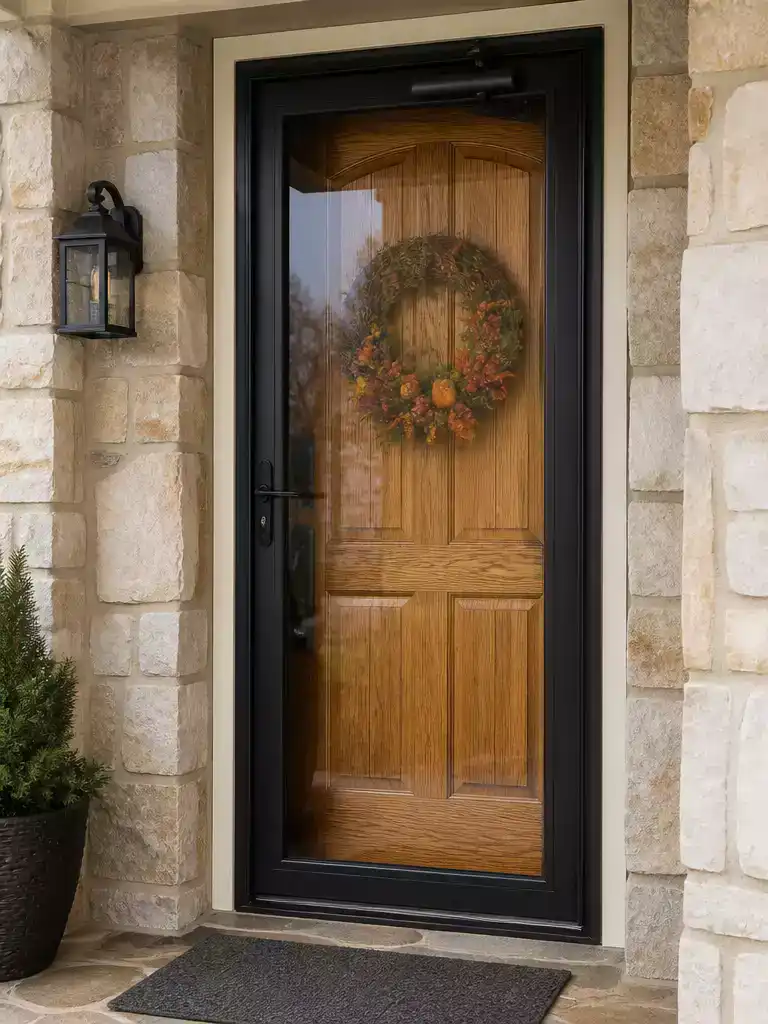
A secondary glass barrier creates a protective thermal pocket that shields your main door from winter winds.
Think of a storm door as a thermal air buffer for your home. By adding this second layer of glass, you create a pocket of “dead air” that serves as an extra shield of insulation for your primary entry door.
This air pocket is incredibly effective at preventing wind-chill from stripping heat directly away from your door’s surface. For homes facing North or West where winter gales hit hardest, a storm door is the only thing standing between your threshold and melting snow or driving ice.
The Winter Glass Rule
To get any insulation benefit during the cold months, you must swap out the screen for the glass insert. A screen provides zero thermal protection; only the glass can trap the air needed to create that protective temperature bridge.
While storm doors are usually a win, you need to be careful if you have a dark-colored steel door that receives direct, intense midday sun. In that specific scenario, the storm door can trap too much heat, potentially warping your primary door or damaging its finish.
If your entryway is prone to this heat buildup, look for a “vented” storm door model. These allow just enough airflow to prevent a greenhouse effect while still blocking the brunt of the freezing wind.
Check the Closer Speed
A storm door that slams or stays open for more than a few seconds completely defeats the purpose of the thermal buffer. Use a screwdriver to adjust the pneumatic screw on the closer arm for a 2-second soft close.
Ultimately, a well-fitted storm door doubles as a seasonal decor opportunity. It keeps your holiday wreaths and expensive entryway paint protected from the elements, ensuring your home looks just as good as it feels inside.
.
💰 What This Really Costs
- The real range: Expect to spend between $150 and $450 for a standard DIY-installed aluminum storm door kit.
- Hidden cost: Budget an extra $15 to $30 for a heavy-duty pneumatic closer if your kit includes a flimsy one.
- Worth it / not: The investment is worth it for North-facing entries where wind-chill significantly spikes your monthly heating demand.
Insulate the Door Core
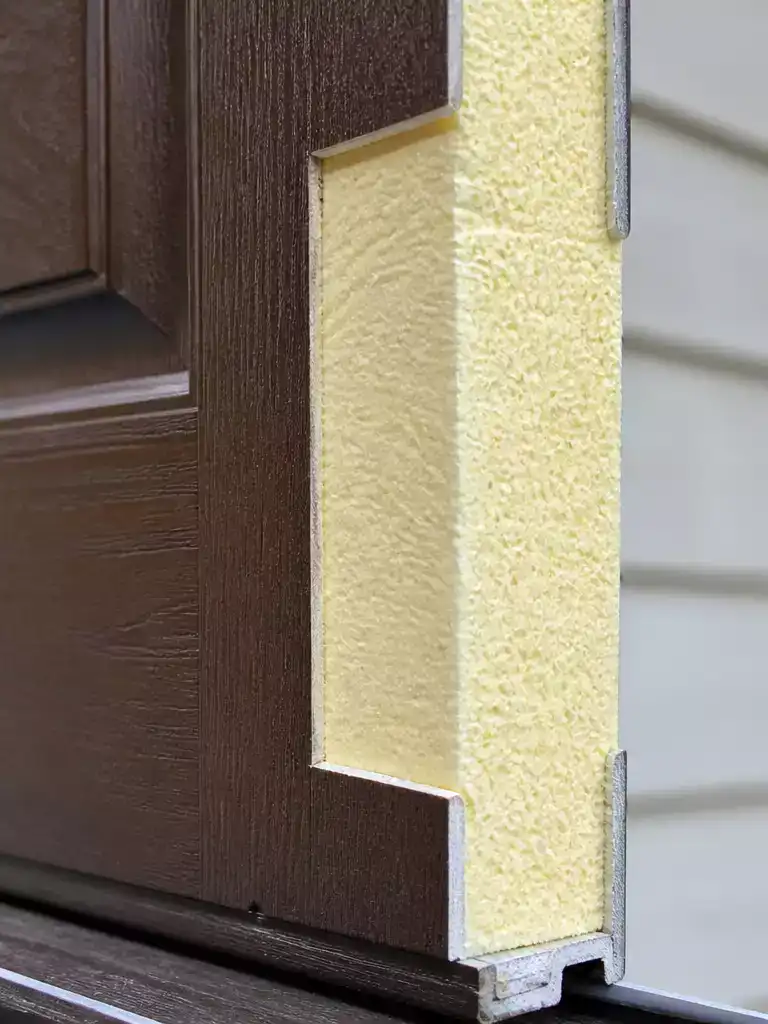
Boost your home thermal efficiency by upgrading the invisible barrier inside your entryway door.
Not all doors are created equal when it comes to keeping the frost out. While a solid wood door is undeniably beautiful and classic, a foam-core fiberglass door essentially acts as a giant cooler for your home, trapped between you and the elements.
The efficiency of your door is measured by its R-value, which tracks how well the material resists heat flow. Understanding these numbers helps you decide if your current door can be saved with simple retrofits or if it’s time to plan for an upgrade.
If your door has a large glass window, or “lite,” that glass is likely your biggest heat leak regardless of the core material. You can mitigate this by applying decorative cellular shades or using a temporary “shrink-wrap” window film specifically to the glass portion to add a layer of trapped air.
Don’t overlook the mail slot, which is effectively a 10-inch hole in your home’s insulation. To kill the draft without sealing it shut, install a brush-lined mail slot hood or an insulated internal flap that snaps shut after the mail delivery.
The Cold Touch Test
On a freezing day, touch the inside surface of your door. If it feels like ice, the core isn’t insulating; hanging a heavy, floor-to-ceiling thermal curtain (portière) inside can bridge the gap for the winter.
While factory-insulated cores are the primary efficiency driver, these small retrofits ensure that even an older door performs at its highest possible potential. By addressing the glass and hardware penetrations, you protect the thermal integrity of the entire entryway.
.
⚠️ Where Core Insulation Fails:
- The Conductive Trap: Steel doors have great foam cores, but the metal skin itself transfers cold efficiently around the edges.
- Film Over-Application: Applying heat-shrink film to the entire door face rather than just the glass can trap damaging condensation.
- Slot Obstructions: Installing an internal mail flap that prevents the exterior flap from closing fully, creating a permanent air gap.
Refinish or Seal the Exterior Surface
A fresh, protective seal keeps wood from swelling and preserves your home’s airtight integrity.
A cracked or peeling finish is more than just a curb appeal crisis; it is an open invitation for moisture to ruin your weatherproofing efforts. When wood absorbs humidity, it swells and warps, often shifting just enough to create new gaps or make the door “stick” against your fresh seals.
High-quality exterior paint or a marine-grade spar urethane acts like a protective shrink-wrap for your entryway. This barrier is essential for preventing the seasonal expansion that makes doors nearly impossible to latch during a damp, freezing winter.
To truly protect your door, you must seal all six sides: the front, the back, both vertical edges, and—most importantly—the top and bottom. These hidden horizontal edges are end-grain wood, which acts like a bundle of straws sucking up ground moisture and causing rot if left bare.
You don’t necessarily need to strip the entire door down to the bare grain to get a professional result. A light scuff with 120-grit sandpaper provides enough “tooth” for the new protective layer to bond properly so it won’t peel when the thermometer drops.
If you are worried about the state of those hard-to-see areas, use the “Mirror Trick” to save yourself the hassle of removing the door from its hinges. Hold a small hand mirror underneath the bottom edge to check for bare wood; if you see it, use a foam brush to dab on sealant until the grain is fully saturated.
Remember that wood is a living material that responds to its environment. By maintaining a continuous, waterproof skin, you ensure that the mechanical adjustments you’ve made to the hinges and sweeps actually stay effective all season long.
.
⚠️ Watch Out for These Refinishing Traps:
- Ignoring End Grain: Skipping the top and bottom edges allows moisture to wick upward, causing the wood to swell and rot.
- Trapping Mildew: Applying sealant over active mold or grime creates a pocket of decay that will eventually lift the finish.
- Skipping the Scuff: Failing to sand lightly with 120-grit paper prevents the new coat from bonding, leading to winter peeling.
Test for Remaining Air Leaks
Verify your hard work with a final check to ensure an airtight, cozy entryway.
Don’t take your hard work for granted once the tools are put away. Even a tiny oversight can lead to a high-pitched “whistle” when the winter wind picks up, signaling that your heat is still escaping.
The most effective way to find these hidden culprits is the Depressurization Test. By manipulating the air pressure inside your home, you can force outside air to reveal exactly where your seals are still weak.
The Exhaust Fan Hack
Close all windows and doors, then turn on every bathroom fan and the kitchen range hood. This creates negative pressure that pulls outside air through even the smallest remaining gaps for easy detection.
While the house is depressurized, use the Soapy Water Method for a visual confirmation of leaks around glass inserts or the outer frame. Simply spray a light mist of soapy water on suspected areas; if you see bubbles forming or the water moving, air is actively pushing through the joint.
You should also perform an audible check during a breezy afternoon. Listen closely for any “howling” sounds, which usually indicate a high-velocity leak that can be solved with a precise dab of clear silicone.
Pro Tip: The Dollar Bill Final Pass
- Close the door on a dollar bill at 6-inch intervals all the way around the perimeter.
- If the bill pulls out without resistance, you have a loose spot.
- Fix these specific gaps by adding a small foam corner wedge or “corner seal” to bridge the distance.
Once the paper test is consistent across every inch of the jamb and threshold, you can be confident your door is ready for the deep freeze. This final validation ensures you aren’t leaving your comfort to chance.
.
⚠️ Where Testing Can Go Wrong:
- Ignoring the Furnace: Always turn off the furnace or AC before smoke testing; blowing air will mask localized drafts.
- Over-Sealing: Avoid adding too many “corner seals” that force you to slam the door, which eventually warps the hinges.
- Surface Residue: Wipe away soapy water immediately after testing to prevent it from seeping into wood grain or causing rot.
Maintain the Seal Through the Season

Keep your home cozy all winter long with simple, high-impact maintenance habits.
Weatherproofing isn’t a “one and done” project that you can simply forget about once the first frost hits. Between the abrasive road salt tracked in on boots and the constant expansion of a house in freezing temperatures, your new seals face a hostile environment daily.
To prevent your hard work from degrading before February, you need to protect the materials from chemical and physical damage. A few minutes of upkeep can extend the lifespan of your weatherstripping by several seasons.
Winter Preservation Tactics
- Lubricate the Seals: Apply a light wipe of silicone spray to a microfiber cloth and run it along the rubber weatherstripping. This creates a moisture barrier that prevents the door from “freezing shut” on humid, sub-zero nights.
- De-Icing Care: Avoid using harsh rock salt directly on or near your aluminum threshold. The salt will corrode the metal and “dry out” rubber gaskets until they crack; stick to sand or pet-safe de-icers instead.
- Clear the Trench: Regularly sweep away frozen slush and grit from the area where the door sweep meets the threshold. If ice builds up in this “trench,” it can tear the sweep clean off the door the next time you force it open.
It is also wise to perform a “Mid-Winter Tighten” as the ground freezes and shifts. Houses are dynamic structures, and a 1/8th-inch shift in the soil can be enough to pull a door slightly out of alignment, creating a fresh draft that wasn’t there in November.
Check your hinge screws again in January to ensure they haven’t backed out from frequent use. By staying proactive, you ensure your entryway remains a solid thermal barrier rather than a source of frustration during the coldest months of the year.
Pro-Tip: The Friction Check
If you feel the door “grabbing” or sticking more than usual during a deep freeze, don’t force the handle. Check for ice buildup under the sweep first to avoid snapping the vinyl fins.
.
💰 Surprise Costs to Plan For:
- The maintenance range: Budget roughly $10–$25 annually for specialized cleaners, silicone lubricants, and minor mid-season hardware replacements.
- Corrosion costs: Using standard rock salt can lead to a $100+ threshold replacement if the metal pits and seals fail.
- Worth the spend: Investing $15 in high-quality silicone spray is significantly cheaper than replacing “frozen” weatherstripping that tears during a cold snap.
With all twelve tactical steps on the table, the path to a draft-free entry is clear and manageable. You do not need a complete overhaul to see a shift in performance; prioritizing the two or three largest gaps is what truly transforms how your home holds its heat.
Secure the perimeter first, and you will protect both your ROI and your winter comfort without the expense of a full replacement. If you are also considering aesthetic upgrades, learning how to refinish a front door can ensure your new seals sit against a perfectly restored exterior surface. Make the smart calls now to keep the cold out for good.