A door is the most underutilized canvas in your home for high-impact color. This guide rounds up 10 door ideas worth saving that refresh your space without replacing hardware. Find the perfect visual shift for your entry, starting with the front door’s first impression.
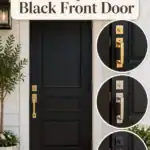
Bold Front Door Color

Create an instant focal point by choosing a high-contrast hue that demands attention from the street.
As an Amazon Associate I earn from qualifying purchases. Affiliate links may earn me a commission at no extra cost to you.
Replacing a standard white or brown entry with a saturated hue is the fastest way to add curb appeal without touching the architecture. Colors like deep plum, emerald, or navy break away from suburban trends and anchor the entire facade of your home.
Why High Saturation Wins: Muted, earthy tones often wash out under direct sunlight and disappear against siding in the afternoon. Saturated colors hold their visual weight, ensuring your home remains a “stop-and-look” destination for passersby.
You cannot use standard interior paint for this project if you want the color to last. Stick exclusively to exterior-rated enamel that includes UV-blocking additives to prevent the pigment from fading prematurely.
Warning: The Prep-or-Peel Reality
If you paint over an old finish without sanding, the sun’s UV rays will cause the new, bold color to blister and crack within months. Use 220-grit sandpaper to de-gloss the old surface so the new enamel has a structural base to grip.
This is a perfect weekend project for homeowners who want a high-impact change on a budget. If your door has significant surface damage or rot, however, it is better to consult a pro to ensure the substrate is sound before you commit to a high-pigment finish.
⭐ Top Products for Bold Front Door Color
Exterior Gloss Paint for Front Doors
Professional Painter Tape Roll for Edges
Large Canvas Drop Cloth for Painting
💡 Why This Works:
A bold entry door acts as a visual anchor that draws the eye toward your home’s main point of passage, instantly creating interest on otherwise flat facades. By choosing a saturated, UV-resistant pigment, you ensure the color remains vibrant rather than fading into a dull, washed-out shade under the intensity of natural sunlight.
Strategic Takeaway: High-saturation hues turn standard entries into deliberate design statements that significantly boost your home’s curb appeal.
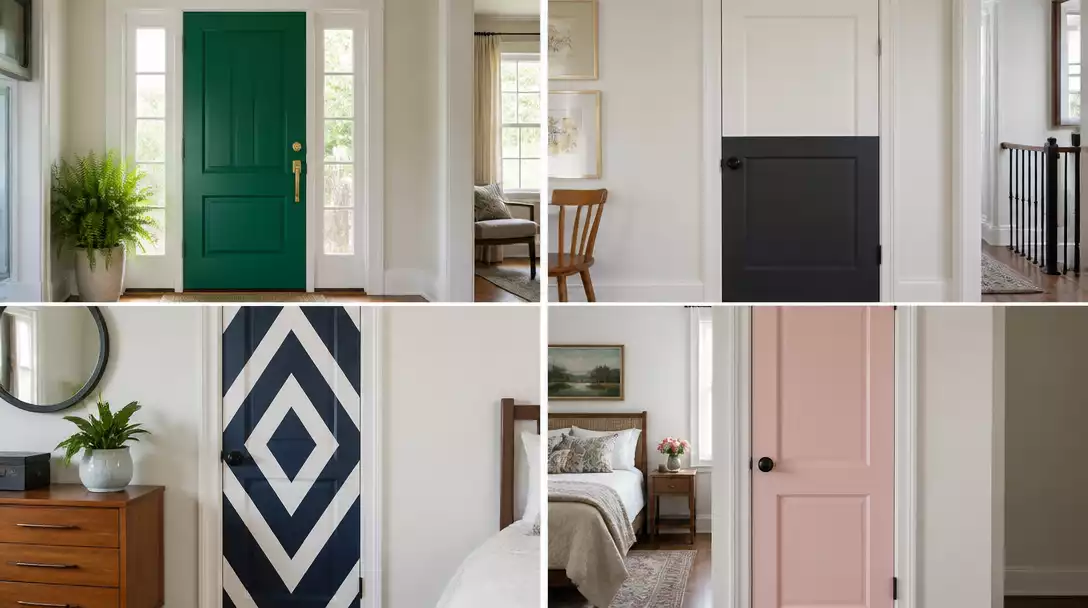
Two Tone Painted Door

Use architectural lines to ground your hallway and create a custom, high-end look.
A two-tone door acts as an architectural correction for spaces that feel disproportionate. By painting the bottom half of a door a darker, heavier shade, you effectively ground a narrow hallway without closing it off completely.
You do not need to guess where to make the color break. Simply use the door’s existing horizontal rails or molding as your guide to dictate where the transition happens.
Pro Tip: The Dry-Pull Technique
To achieve a factory-finish edge, remove your painter’s tape while the paint is still slightly tacky. Pulling the tape once the paint has fully cured often results in jagged, peeling edges that require tedious touch-ups.
Achieving crisp lines is the biggest hurdle for this project. Follow these steps to ensure your transition line remains perfectly straight:
- Clean the Surface: Use a degreaser to remove all dust, oils, and fingerprints before you begin.
- Seal the Tape: After applying your painter’s tape, press the edge down firmly with a credit card to prevent paint seepage.
- Light Coats: Apply thin, even layers of paint rather than one thick coat, which tends to pool at the tape line.
- Work in Stages: Paint the lighter section first, allow it to dry completely, then mask over it to paint the darker section.
This technique is perfect for anyone looking to add character to standard, builder-grade doors. If your hallway feels like a long, sterile tunnel, a dark-bottom, light-top color scheme is the fastest way to add visual weight and depth.
⭐ Recommended for Two Tone Painted Door
Angled Sash Brush for Precision Painting
Durable Enamel Paint for Wood Doors
Interior Wood Primer for Smooth Surfaces
🔢 The Right Sequence
Painting in the correct order prevents color bleed and ensures the crisp, clean transition lines required for a professional, two-tone finish.
- Apply the lighter color to the entire top section, extending slightly over the transition line.
- Allow the first coat to cure fully for at least 24 hours before applying painter’s tape.
- Mask off the dry top section and apply the darker color to the bottom half.
Geometric Pattern Door
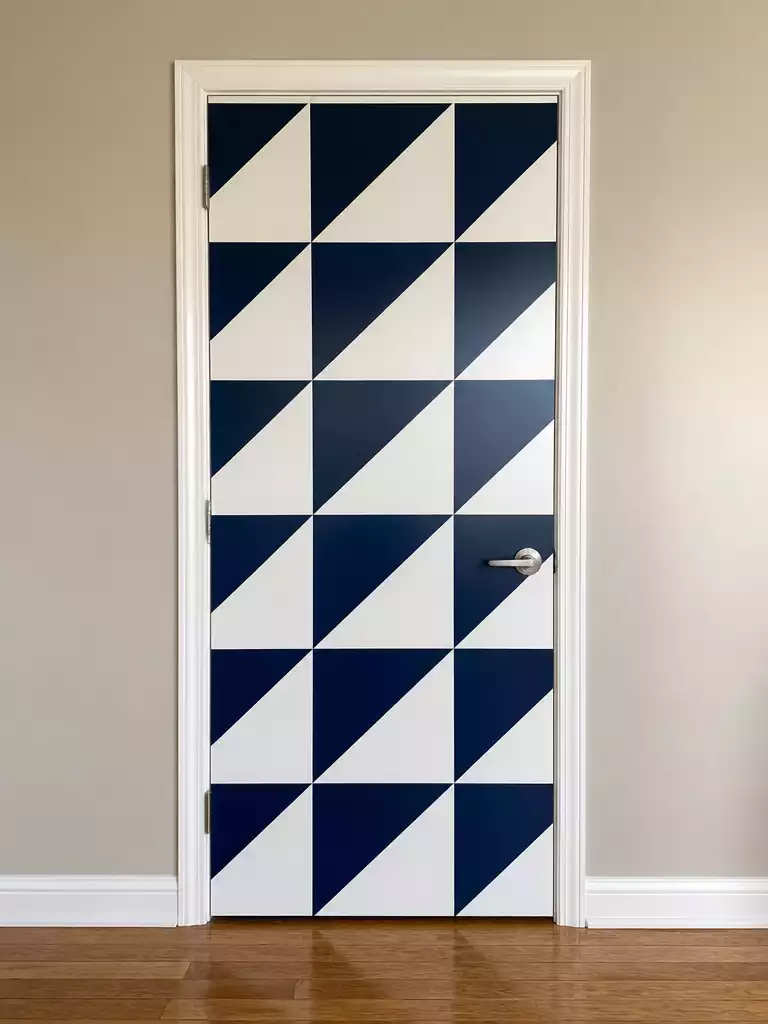
Turn a standard flat door into a modern graphic focal point with precise geometric lines.
This approach is perfect for flat-panel doors where there are no raised moldings to interrupt your design. If you have a traditional six-panel door, the existing trim will make it nearly impossible to achieve clean, crisp graphic shapes.
Pro Tip: Use a high-quality bubble level to mark your lines before applying any tape. This prevents “pattern drift” where your shapes gradually tilt as you work your way down the door.
The success of a geometric door relies entirely on your prep work and patience. You must measure and mark every shape with a pencil before touching a single strip of painter’s tape.
Required Steps for Success:
- Apply your base coat and allow it to cure for at least 24 hours.
- Measure your shapes carefully, ensuring consistent scale across the entire surface.
- Press the edges of your painter’s tape firmly with a credit card to seal them.
- Remove the tape while the final color coat is still slightly tacky to avoid pulling up dried paint.
Warning: Rushing the cure time is the most common mistake. If you apply tape to a base coat that has only dried for a few hours, the adhesive will lift the paint away, leaving you with jagged, uneven lines.
⭐ Our Picks for Geometric Pattern Door
Fine Tip Brush for Detailed Painting
Sanding Sponge for Smooth Door Prep
Precision Painter Tape Rolls for Patterns
📋 Before You Try This:
- Surface Smoothness: Geometric designs highlight every dent or scratch; thoroughly fill and sand the door face first.
- Symmetry Mapping: Use a level and a long straightedge to map your pattern before committing to any tape.
- Pattern Complexity: Stick to simple, repeating shapes like triangles or diamonds to avoid overwhelming the room’s visual balance.
Ombre Gradient Finish

Create a custom atmospheric fade that turns a simple interior door into a vertical focal point.
An ombre gradient finish utilizes a vertical fade to add depth and movement to an otherwise static interior door. This technique works best on flat-panel or shaker-style doors where there are no complex moldings to interrupt the flow of the color transition.
Important Limitation: This is strictly an interior-only project. Exterior elements like direct sun and moisture will cause the delicate, thin layers of blended paint to break down and look patchy within weeks.
To achieve a seamless look, you must work with a “wet-edge” technique where you blend the colors while they are still malleable. Keep a damp sponge or a soft bristle brush ready to feather the middle section where your two chosen colors meet.
Step-by-Step Blending Strategy:
- Apply your base color to the bottom third and your lighter color to the top third of the door.
- Use a third, mid-tone mixture in the center to bridge the two colors.
- Use a clean, damp brush to lightly cross-hatch the transition lines until the seam disappears.
- Once the gradient is dry, apply a clear, matte topcoat to lock in the finish and prevent the colors from appearing muddy or uneven.
If you are a beginner, practice your blending on a piece of scrap plywood before moving to the actual door surface. This technique requires patience, but it offers a high-impact, artistic result that store-bought paint colors simply cannot replicate.
⭐ Best Products for Ombre Gradient Finish
Satin Enamel Paint for Gradient Blending
Sponge Brush Set for Smooth Blending
Microfiber Roller Cover for Even Coats
💡 Why This Works:
Ombre finishes manipulate the eye by drawing focus toward the vertical height of a doorway, which creates an illusion of extra space. Because the colors shift gradually, they soften the transition between floor and ceiling, making a room feel more atmospheric and less rigid than a standard monochromatic paint job.
Design Takeaway: Keep your hardware finish simple to avoid competing with the dynamic color gradient on the door.
Renovating entryways often feels like a high-stakes test where every detail must be perfect to avoid regret. Assessing vibrant door colors is actually much less permanent than it seems, so you can test ideas without the weight of a lifetime commitment.
Only a few deliberate aesthetic choices define your space, so let the others be simple transitions that keep your home feeling balanced and cohesive.
Chalkboard Paint Door

Turn any basic pantry or office door into a functional, interactive family command center.
Applying chalkboard paint is the fastest way to turn an unused door surface into a living message board. It works perfectly for kitchen pantries, home office entries, or even the back of a mudroom door.
Because chalkboard paint has a unique, gritty composition designed to grab chalk dust, the application process differs from standard wall paint. You need to use a high-density foam roller to keep the texture smooth and avoid the heavy brush marks that often plague DIY projects.
The Seasoning Step: Never skip this. Once your final coat is fully dry, rub the entire surface of the door horizontally and vertically with the side of a piece of white chalk.
Wipe it clean with a dry cloth before writing your first note. This prevents “ghosting,” where your first few messages become permanently etched into the paint.
This project is strictly for interior use. Moisture and direct sunlight will break down the specialized binders in the paint, causing the surface to lose its ability to hold chalk over time.
- Choose the right location: Pantry doors are ideal because they are central to the home’s daily workflow.
- Prep the surface: Use a degreaser first to remove any kitchen oils; chalkboard paint will not adhere to a greasy or dusty surface.
- Mind the edges: Use high-quality painter’s tape to protect your door frame, as this paint can be difficult to touch up if it bleeds onto the trim.
If you have children or a busy family schedule, this is a low-cost, high-reward upgrade. If you prefer a perfectly clean, minimalist aesthetic, you should skip this finish, as chalk dust will eventually settle on the floor near the door.
⭐ Top Products for Chalkboard Paint Door
Liquid Chalk Markers for Vibrant Writing
Chalkboard Paint for Creative Door Surfaces
Foam Roller Set for Smooth Application
🏡 How This Works in a Real Home:
- Strategic placement: Keep the door away from high-traffic entryways where incidental bumping might smudge fresh chalk dust onto clothing.
- Daily maintenance: Use a microfiber cloth rather than a damp sponge to erase marks, as water can reactivate and smear old pigment.
- Lived-in styling: Hang a small linen pouch filled with extra chalk directly on the door handle to make the space feel intentionally interactive.
High Gloss Black Door
Create a sophisticated, mirror-like finish that brings an instant modern edge to any interior space.
A high gloss black door acts like a piece of furniture, adding depth and a high-end feel to otherwise plain hallways. The secret to this look isn’t just the paint; it is the absolute smoothness of the surface underneath.
Warning: High gloss is unforgiving and will magnify every single scratch, dent, or speck of dust on the door surface. If your door has deep gouges or existing damage, you must repair and sand them perfectly before applying the first coat.
To achieve that true mirror-like reflection, you must use a high-quality enamel paint designed for high-sheen applications. Use a high-density foam roller to apply thin, even coats, as traditional brushes often leave streaks that become glaringly obvious once the light hits the glossy surface.
This style is best suited for interior doors where you want to create a focal point, such as a home office or a bedroom entryway. If you are looking for a low-maintenance finish that hides daily wear, skip the high gloss; opt for a satin or semi-gloss finish instead.
⭐ Editor’s Picks for High Gloss Black Door
Sanding Block Set for Surface Prep
Tack Cloth Pack for Dust Removal
High Gloss Black Enamel for Doors
📈 The Long-Term Payoff
While a high-gloss black door makes a striking, sophisticated statement that draws the eye, it is effectively a high-maintenance trend. Because gloss finishes readily display every scuff and fingerprint, they require frequent cleaning. This choice is best viewed as a near-term design upgrade rather than a permanent, low-effort investment for your home’s resale appeal.
Maintenance Reality: Expect to wipe down these surfaces regularly to keep the mirror-like reflection looking intentionally crisp.
Color Blocked Panels

Add modern depth to traditional doors by highlighting recessed panels with high-contrast paint colors.
Color blocking is a high-impact way to turn a standard builder-grade door into a custom architectural feature. By painting the center panels a different color than the frame, you force the eye to notice the door as a piece of geometry rather than just a flat barrier.
This technique works best on doors with deep, defined recessed panels. If your door is completely flat, you will lose the depth needed to make the color shift feel deliberate.
Pro Tip: Use a high-quality angled sash brush to get into the tight corners of the panel grooves. If you try to use a roller for these areas, the paint will likely pool in the corners and cause unsightly drips.
Before you commit to a bold palette, consider your bridge color. A neutral shade that connects the panel color, the frame color, and the surrounding wall paint will prevent the door from feeling like it was painted at random.
If you are painting an exterior-facing door, be extra careful at the taped edges. Moisture can work its way under the tape line if it isn’t sealed perfectly, leading to paint failure within a single season.
⭐ Recommended for Color Blocked Panels
Painter Tape Set for Color Blocking
Trim Paint Brush for Detailed Edges
Putty Knife Set for Surface Repair
Designer Note: The Art of Layering
Color blocking succeeds when you treat the door like a canvas for depth. By choosing a panel color that is two shades deeper than your frame, you create a natural shadow effect that makes the door appear more substantial. Stick to low-sheen finishes for the panels to keep the focus on the color, rather than distracting reflections.
Pastel Bedroom Door
Refresh your sanctuary with soft, light-reflecting hues that turn a standard door into a calming focal point.
A muted, powdery pastel door instantly shifts the mood of a bedroom or nursery toward something lighter and more serene. This look works best when you choose a satin sheen, which offers the perfect balance between hiding minor surface imperfections and providing a wipeable, durable finish for high-traffic areas.
Pro Tip: Pastels require high-quality, heavily pigmented paint to avoid looking like chalky, unfinished wall color. Always test a sample on a board first to see how it reacts to your room’s specific natural lighting throughout the day.
While pastels feel right at home in interior spaces, they are strictly an indoor trend. Exposure to direct sunlight and outdoor grit causes these delicate pigments to fade quickly and show dirt within a single season.
Consider these key factors when selecting your shade:
- Light Reflection: Lighter pastels act as an extension of your wall color, making smaller bedrooms feel more spacious.
- Color Depth: Choose slightly desaturated tones—like dusty sage, pale lavender, or soft peach—to keep the aesthetic feeling adult and intentional rather than juvenile.
- Maintenance: Because satin finishes are easy to clean, you can easily wipe away fingerprints or scuffs that gather around the handle.
Warning: Avoid Exterior Use
Do not attempt this look on front or patio doors. Lighter pigments are highly susceptible to UV degradation and will show grime much faster than darker, saturated color choices.
⭐ Our Picks for Pastel Bedroom Door
Smooth Surface Roller for Even Paint
Pastel Interior Paint for Bedroom Doors
Synthetic Bristle Brush for Smooth Paint
⚖️ Choose the Right Version
- Choose this if: You want a light-filled, airy bedroom aesthetic that feels soft, peaceful, and intentionally curated.
- Skip this if: Your door faces a high-traffic hallway where scuffing is constant or if you prefer high-contrast, bold decor.
- Pair it with: Brushed brass hardware or matte black levers to ground the soft color and prevent a overly “nursery” look.
Faux Wood Grain Finish

Add the warmth and visual weight of natural timber to basic, builder-grade doors.
If you are stuck with hollow-core synthetic doors but crave the character of solid oak or walnut, faux graining is your best solution. This technique uses a two-step paint process to mimic the organic swirls and depth found in real lumber.
The Golden Rule of Realism: Randomness is the secret to success here. If every swirl or stroke looks identical, your door will look like a cheap printed laminate rather than a custom wood project.
The transformation relies on a lighter base coat followed by a darker, translucent glaze. You will use a wood-graining rocker tool to drag through the wet glaze, which physically displaces the paint to reveal the lighter base underneath.
Here is what you need to track during the process:
- Base Coat: Select a high-quality acrylic latex in a warm, light tan or cream tone.
- The Glaze: Use a tinted glazing medium that stays “open” (wet) long enough for you to work the pattern.
- Graining Tool: Drag this tool through the wet glaze in one continuous motion to create the knots and arches of natural wood.
Warning on Exterior Use: This technique is best suited for interior doors. Outdoor UV exposure and fluctuating humidity often cause the layered glaze to fade unevenly and can lead to the faux finish peeling away from the base coat.
Practice on a spare piece of plywood or a scrap board before attacking the door itself. Once you master the fluid motion of the rocker tool, you can create a high-end look on the most basic interior doors in your home.
⭐ Best Products for Faux Wood Grain Finish
Gel Wood Stain for Rich Color
Polyurethane Sealer for Wood Protection
Wood Graining Tool for Realistic Texture
🏡 How This Works in a Real Home
- Visual Weight: Use this on hollow-core doors to give them the substantial, grounded look of premium solid timber.
- High-Traffic Areas: Apply a durable satin topcoat to protect your handiwork from the inevitable scuffs of daily household life.
- Authentic Blending: Dab the glaze with a clean rag to soften sharp tool marks, making the grain appear naturally aged.
Stenciled Accent Design

Turn a plain interior door into a custom focal point with precise, repeating graphic motifs.
Stenciling transforms a standard flat door into a large-scale art canvas, perfect for homeowners who want a custom look without the high cost of wallpaper. This technique works best on doors with smooth, flat panels where the surface area allows for uninterrupted patterns like mandalas, vintage florals, or geometric vines.
The “Less is More” Rule: Use a stencil brush with very little paint, dabbing off the excess on a paper towel before touching the door. This prevents the paint from seeping under the edges, which is the most common cause of blurry, unprofessional lines.
For the cleanest results, follow these preparation steps before you start pressing your stencil to the wood.
- Spray Adhesive: Lightly coat the back of your stencil with repositionable spray adhesive to hold it perfectly flat against the door surface.
- Level and Align: Use a painter’s level to mark your starting point, ensuring your pattern doesn’t drift as you work your way down.
- Dabbing Motion: Always use a vertical dabbing or stippling motion with your brush rather than brushing back and forth.
This project is ideal for interior pantry, closet, or nursery doors where you want to add a layer of personality. Because stencils rely on precise application, we recommend skipping this for exterior doors, where outdoor moisture and temperature swings can cause the edges to lift and the paint to bleed over time.
⭐ Top Products for Stenciled Accent Design
Wall Stencil Template for Door Accents
Stencil Brush Set for Precise Painting
Adhesive Spray for Stencil Stability
⚠️ Common Mistakes to Avoid:
- Skipping Cure Time: Applying a stencil before the base coat fully cures will cause the paint to lift.
- Overloading Your Brush: Too much paint on the bristles leads to messy seepage under the stencil’s delicate edges.
- Ignoring Surface Texture: Rough or uneven doors make it impossible to achieve sharp lines with a flat stencil.
You now have ten distinct ways to refresh your home with color, from subtle pastels to high-gloss statements. Select the one or two techniques that align best with your existing architecture rather than trying to incorporate every style.
Simple paint-driven updates allow you to experiment with customizing your doors without the stress of permanent changes. Decide on the door that fits your room’s mood first, and the rest of your design will naturally fall into place.