Your front door is the most under-utilized asset for making a strong first impression on your home. This guide rounds up 10 door ideas worth saving to improve your entry’s security and appeal. Finding the right fit starts here with the modern standard for access.
Smart Door Lock
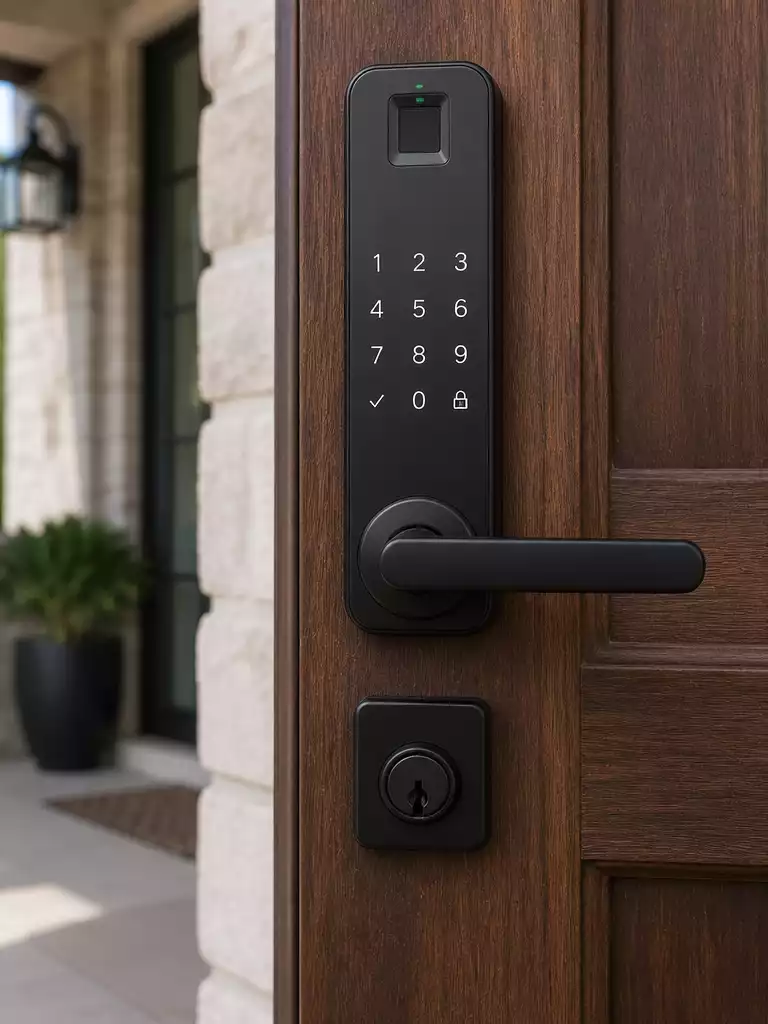
Upgrade your security system to eliminate lost keys and manage home access with ease.
As an Amazon Associate I earn from qualifying purchases. Affiliate links may earn me a commission at no extra cost to you.
Fumbling for your keys in a downpour is the quickest way to ruin a good mood. Replacing a standard deadbolt with a smart door lock removes that frustration entirely by moving your home access from physical keys to biometric scans or simple app commands.
These systems are perfect for households with frequent guests, dog walkers, or kids who have a habit of misplacing their house keys. You can grant temporary access codes that expire after a set time, removing the need for those risky spare keys hidden under a doormat.
Pro Tip: Before you buy, measure your door’s backset—the distance from the edge of the door to the center of the hole. Standard locks are usually 2-3/8 or 2-3/4 inches, and choosing the wrong size will prevent the deadbolt from engaging correctly.
Installation is surprisingly straightforward and rarely requires a professional locksmith. Most models use standard screw holes, meaning you only need a screwdriver to finish the upgrade in about twenty minutes.
The auto-lock feature is a game-changer for forgetful family members. It triggers the deadbolt to engage automatically seconds after the door closes, ensuring your home stays secure the moment you step out.
⭐ Top Products for Smart Door Lock
Reliable Wi-Fi Smart Touchscreen Deadbolt Lock
Grade One Certified Smart Biometric Deadbolt
Integrated Waterproof Smart Fingerprint Handle Set
📋 Quick Reality Check: Before You Buy
- Deadbolt alignment: Verify the deadbolt hole is perfectly centered with the strike plate; smart locks often struggle with misaligned frames.
- Door thickness: Check that your door is between 1-3/8 and 1-3/4 inches, as most smart locks require this specific range.
- Weather protection: Confirm the lock has an IP rating if your entry lacks a deep porch, ensuring internal electronics stay dry.
Brass Door Handle Set
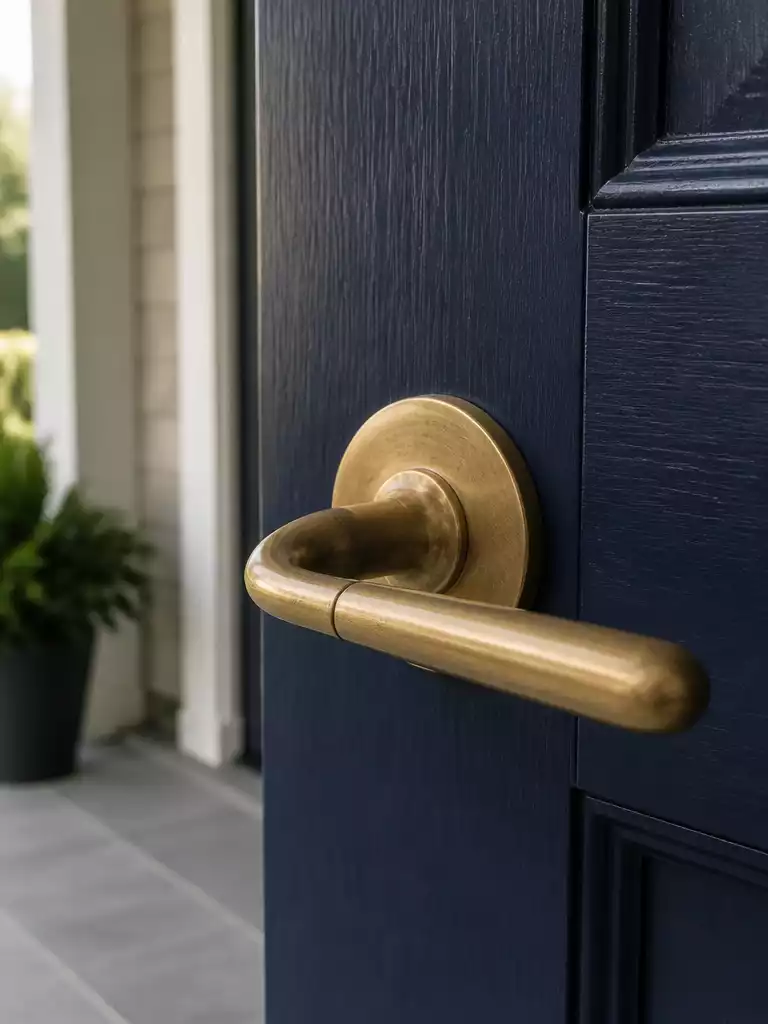
Upgrade your curb appeal instantly with the heavy, tactile experience of authentic solid brass hardware.
A dull, pitted handle instantly cheapens even a freshly painted door. If your current hardware feels hollow or lightweight, a solid brass set provides a noticeable physical upgrade the moment you reach for it.
When selecting your new set, consider the difference between solid brass and cheaper zinc alloy alternatives. Solid brass offers a substantial hand-feel and durability that won’t flake or peel over time.
Opting for an unlacquered brass finish is a great way to add character to your home. This type of hardware develops a unique, darkened patina over time rather than just wearing down like plated finishes.
Pro-Tip for a Cohesive Look
Match your handle finish to your existing exterior light fixtures to create a unified sightline across your entire porch.
This upgrade is perfect for traditional or mid-century homes where authentic materials define the architectural style. If your hardware is currently a mismatched mix of silver and brass, replacing the entire set is the fastest way to ground your entryway design.
.
📋 Quick Reality Check Before You Buy
- Check door thickness: Most standard sets fit 1-3/8″ to 1-3/4″ doors; measure yours to ensure the spindle length is sufficient.
- Verify bore holes: Confirm the distance between your deadbolt and handle centers matches the new set’s required spacing to avoid drilling.
- Assess latch throw: Measure the backset—usually 2-3/8″ or 2-3/4″—to guarantee the latch mechanism aligns perfectly with your existing frame strike plate.
Heavy Duty Door Hinges
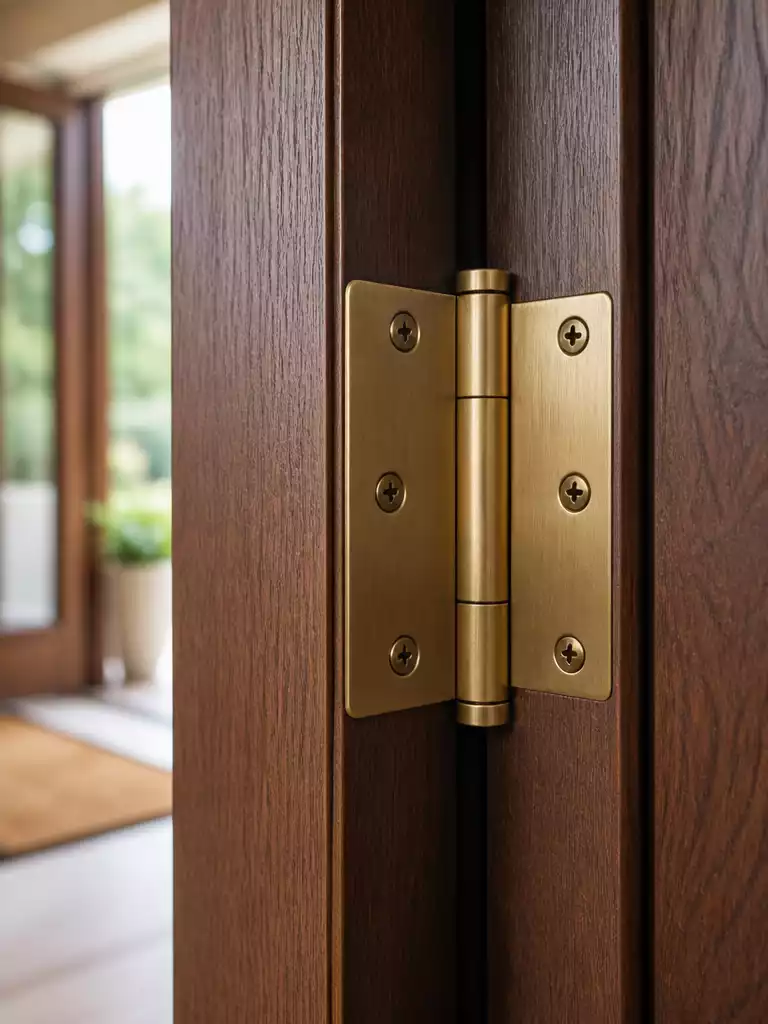
Eliminate door sag and secure your home with heavy-duty hardware that lasts a lifetime.
Does your front door scrape against the threshold or fail to latch properly? This is often the result of standard, builder-grade hinges fatiguing over time and allowing the heavy door to shift within its frame.
Upgrading to ball-bearing hinges is the most effective fix for this common issue. These hinges use internal bearings to distribute the weight of your door, ensuring it swings silently and smoothly every time you open it.
Professional Security Tip: Always look for hinges with non-removable pins. This simple feature prevents intruders from popping the pins out with a screwdriver to remove your door from the outside.
When selecting your new hardware, prioritize materials that can handle the weight of a solid-core or metal door. Plain-bearing hinges may look the same, but they lack the mechanical consistency required for heavy exterior entryways.
Replacing hinges is a two-person job that requires patience to get right. You should have one person hold the door firmly in place while the other swaps out the hardware, one hinge at a time.
This method prevents your door from dropping and helps you avoid stripping the screw holes in your door frame. Once the upgrade is complete, your door will feel substantial and latch with a satisfying, secure click.
.
🔢 The Right Sequence: Avoiding Door Damage
Swapping hinges one at a time is crucial because the entire weight of your door relies on them; doing all at once often causes the frame to strip or the door to drop.
- Support the door: Have one person hold the door steady while the other unscrews the top hinge.
- Swap and secure: Replace the old hardware with the new ball-bearing hinge and tighten all screws fully.
- Repeat downward: Move to the middle and bottom hinges one by one to keep the door perfectly aligned.
Weatherstripping Seal Kit
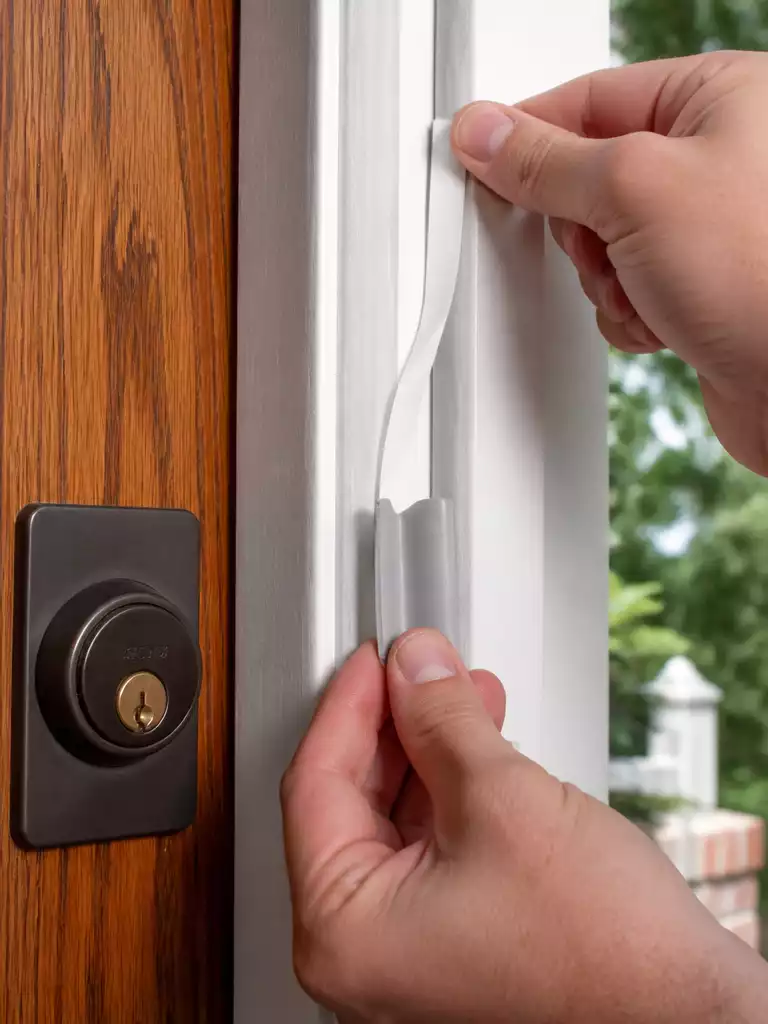
Stop drafts and silence street noise with a simple, high-performance seal for your entryway.
If you can see daylight peeking through the edges of your closed front door, you are losing money on every heating and cooling bill. That gap is also an open invitation for moisture, dust, and insects to settle in your entryway.
Replacing old, brittle foam strips with silicone V-strips or magnetic seals makes an immediate difference in home comfort. These modern materials hold their shape through seasonal temperature shifts, ensuring the door stays snug against the frame all year long.
Pro Tip for Longevity: Before you peel and stick your new weatherstripping, wipe your door frame down thoroughly with isopropyl alcohol. Skipping this cleaning step is the number one reason adhesives fail during the first hot summer week.
Beyond energy savings, a tight seal provides an unexpected acoustic upgrade. By closing those structural gaps, you effectively dampen the volume of passing traffic and neighborhood noise.
This upgrade is essential for anyone living in high-wind areas or homes with west-facing doors that bake in the afternoon sun. If you struggle with inconsistent room temperatures, installing a fresh kit is the most cost-effective way to stabilize your home’s climate.
Quick Win Checklist:
- Tighten all existing screws on your current hardware.
- Inspect the threshold for debris that prevents a tight seal.
- Test the latch operation to ensure it clicks firmly without pushing.
- Wipe away salt or dust buildup on exterior hinges.
.
🔢 The Right Sequence for Sealing
Applying weatherstripping correctly ensures your door swings freely without the seal bunching up or peeling away prematurely.
- Deep Clean: Scrub the frame with alcohol to remove old adhesive and oils for a perfect bond.
- Measure Twice: Cut your strips to fit the exact length of the door frame before peeling backing.
- Apply Firmly: Press the strip into place starting from the top corner, smoothing out air bubbles as you go.
Upgrading your entry isn’t about overhauling every detail at once; it is about keeping your existing hardware in top condition to support your new additions. Proactive maintenance often makes the biggest difference in how a finished upgrade performs, so consider checking your door refresh checklist before finalizing your next purchase.
Focusing on a few functional details ensures your entryway remains secure and polished, far outweighing the need for a total design replacement.
Door Knocker
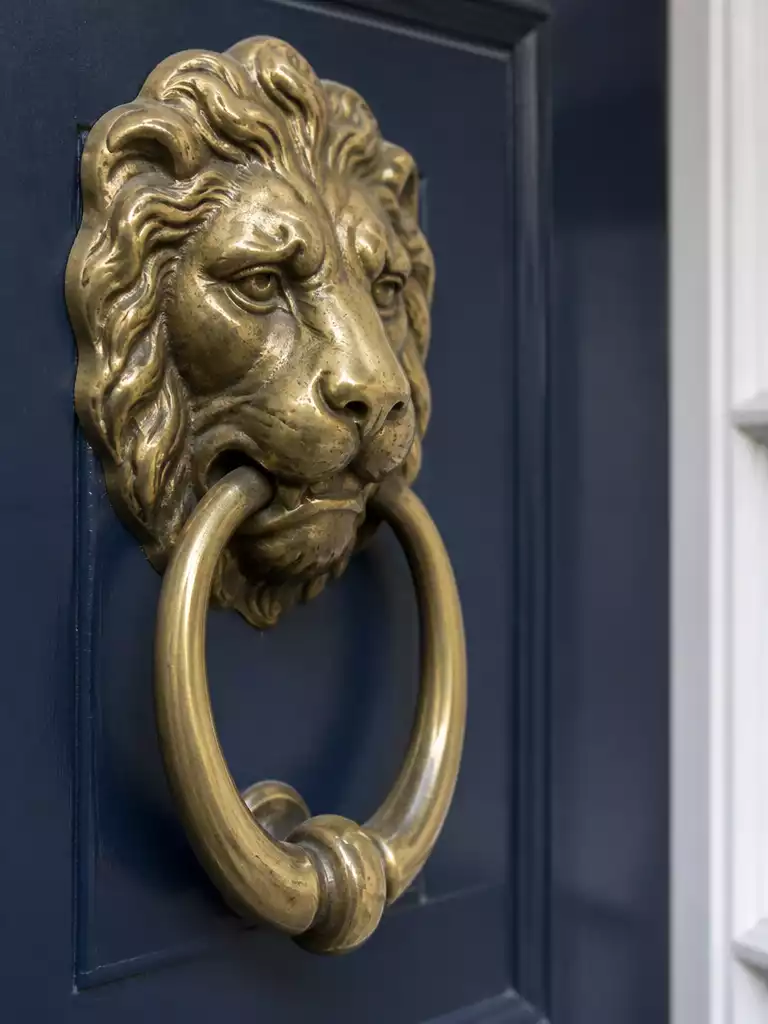
Add a tactile, character-filled greeting that lets your personality shine before the door even opens.
A physical door knocker brings a deliberate, human touch to your entryway that a standard plastic doorbell button simply cannot match. It serves as an immediate visual anchor, signaling the style of the home before a guest ever steps inside.
When selecting your hardware, consider the mounting style carefully. Face-mounted knockers attach with exterior screws and are the easiest to install, while bolt-through models require drilling all the way through the door for a more secure, permanent finish.
Pro Tip: Before you buy, measure the clearance between your storm door and your main door. You need enough space for the knocker to move freely without banging against the glass or metal frame of your storm door.
Choosing the right material helps define your home’s exterior aesthetic. Iron is naturally suited for farmhouse or rustic builds, while polished chrome provides a clean, sharp contrast against dark-painted doors.
This is an ideal upgrade for those who value traditional craftsmanship and want to move away from impersonal, tech-heavy entryways. If you prefer a completely minimalist look, you might want to skip the knocker entirely to keep the door face clean.
.
⚖️ Quick Decision Guide
- Choose bolt-through if: Your door is solid core and you want maximum security against intruders pulling hardware away.
- Skip this if: You have a narrow-stile glass door that lacks the structural wood depth for a secure bolt.
- Pair it with: A matching metal kickplate to create a balanced, high-end look that anchors the bottom and top visually.
Kickplate Cover
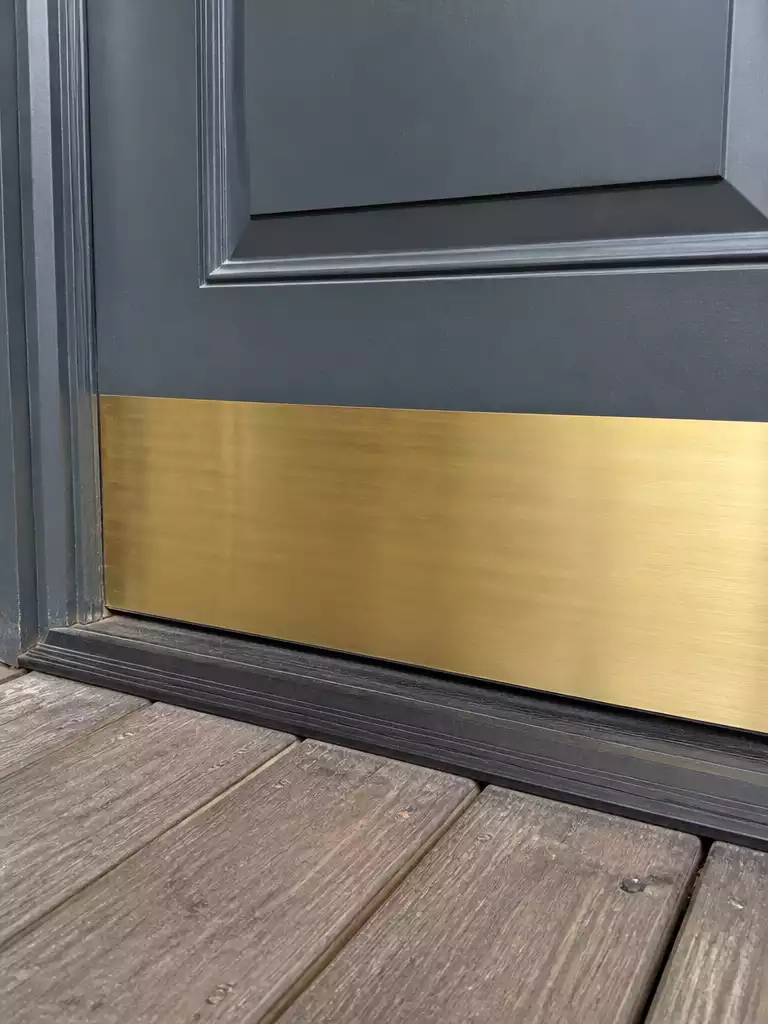
Protect your door from daily wear and tear while adding a polished, finished look.
Every front door eventually shows the battle scars of daily life, specifically those unsightly scuffs and scratches near the bottom. Whether it is from heavy boots, clumsy grocery bags, or enthusiastic pets, the lower third of your door often takes the brunt of the abuse.
A kickplate cover acts as a literal shield for your door’s finish while simultaneously hiding existing damage. Beyond the utility, it provides a grounded, high-shine contrast that makes the entire entryway feel more intentional.
Pro-Tip: Always measure the width of your door slab before buying. You want the plate to sit comfortably within the door face, avoiding the molding or frame to ensure the door closes without catching.
When selecting your finish, look for materials that complement your existing hardware. A brushed nickel plate against a cool-toned door offers a modern update, while antique brass brings instant warmth to traditional entryways.
This upgrade is perfect for households with dogs or active children who don’t always use their hands to open the door. If your entryway sees frequent foot traffic and you are tired of repainting the base of your door, this is the most effective long-term solution.
.
Designer Note: The Cohesive Entryway
To make a kickplate look like a deliberate design choice rather than an afterthought, treat it as a “bookend” to your door hardware. By matching the metal finish and texture—such as brushed nickel or antique brass—to your handle set and hinges, you create a visual frame that anchors the door and brings a sense of high-end, intentional harmony to your home’s entry.
Peephole Viewer
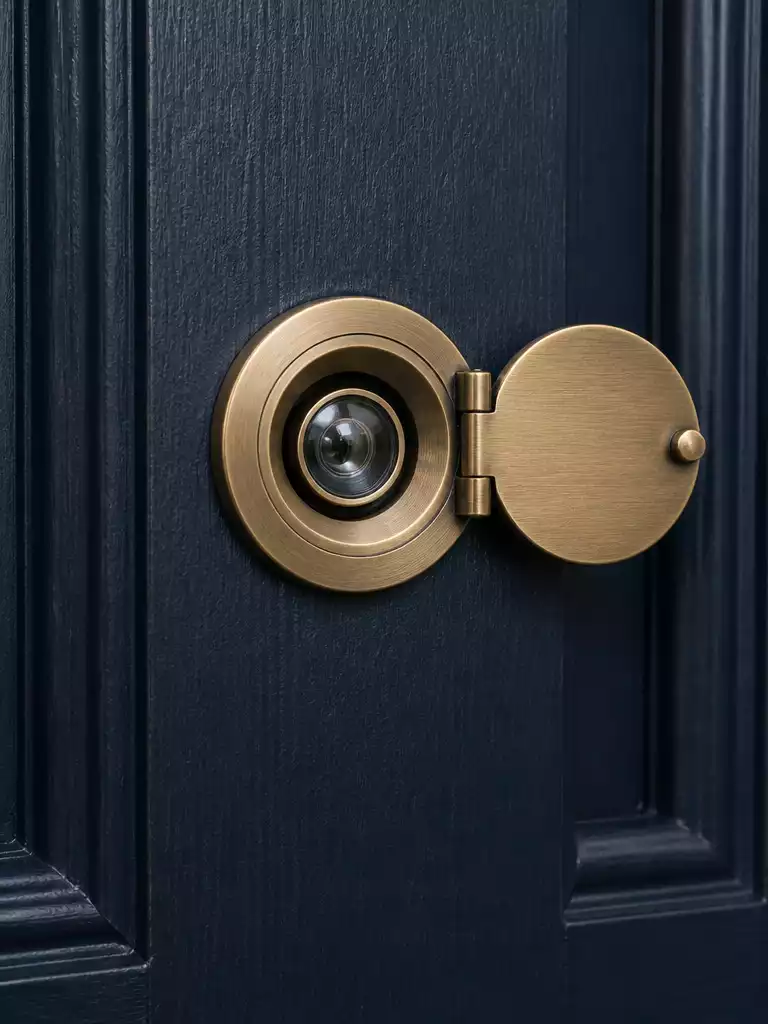
Check your porch and verify visitors instantly without ever opening your front door.
Most standard builders-grade doors come with basic glass viewers that offer a blurry, narrow sliver of the outside world. A high-quality wide-angle viewer changes that by providing a clear 180 to 200-degree field of vision, letting you see people standing even slightly to the side of your porch.
Security Tip: Always look for a viewer that includes an interior privacy cover. This small metal flap prevents light from leaking out at night and stops intruders from using a reverse peephole lens to peek into your home.
If you are deciding between a traditional optical lens and a new digital version, consider your primary goal. Optical viewers require no batteries and offer a crystal-clear, lag-free image, while digital versions act more like a camera, recording clips or displaying a large image on a screen.
Replacing an existing viewer is a straightforward DIY task that takes less than fifteen minutes. You simply unscrew the current unit, slide the new one into the hole, and twist the internal and external pieces together until they are flush against the door.
If your door lacks a viewer entirely, you will need to drill a clean hole. Use a spade bit or a hole saw specifically sized to the manufacturer’s recommendation to avoid splintering the door finish.
.
✨ Finishing Touches
The right placement and aesthetic finish ensure your new viewer feels like a permanent, polished part of your entryway hardware.
- Height alignment: Install the viewer at your eye level—typically 57 to 60 inches from the floor—to ensure easy, comfortable viewing for most adults.
- Finish coordination: Select a viewer finish that matches your handle set and hinges to avoid creating a disjointed, “patchwork” look on your door’s surface.
Door Sweep
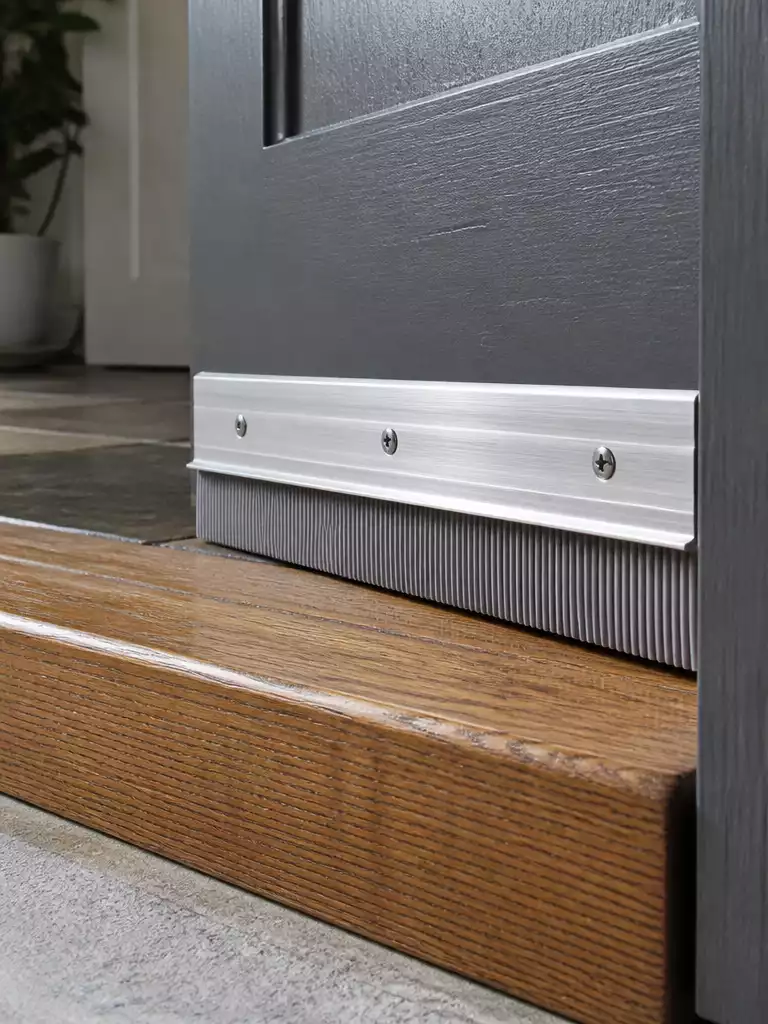
Block drafts, stop pests, and protect your interior flooring with one simple hardware upgrade.
That gap between your front door and the threshold is the primary entry point for insects, dust, and cold air. If you can see daylight peeking through when the door is closed, you are losing money on your energy bills every single month.
A door sweep acts as a physical barrier that bridges this gap without requiring you to change the door itself. Unlike clumsy fabric draft snakes that shift every time you open the door, a mounted sweep stays fixed to the frame for consistent performance.
If you have an older home where the floors aren’t perfectly level, look for an automatic door sweep. These clever devices feature a spring-loaded mechanism that lifts the sweep when the door opens and drops it firmly into place when closed.
Pro-Tip: Installation matters.
Before buying, measure the exact thickness of your door slab and the gap height. Choose a screw-on model for a permanent, high-traffic solution rather than relying on adhesive strips which often peel in extreme humidity.
.
Decorative House Numbers
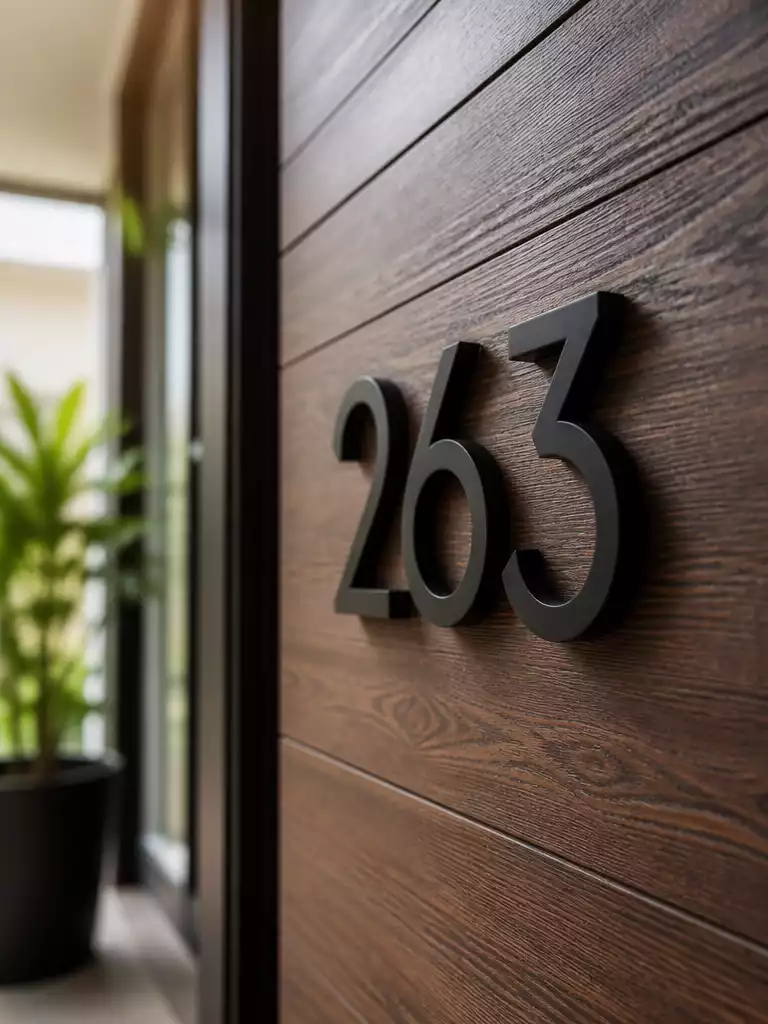
Boost your home’s curb appeal while ensuring delivery drivers never miss your address again.
Delivery drivers and guests often cruise past houses because the address is either missing or blended into the siding. Installing high-contrast house numbers is the simplest way to fix this while sharpening your home’s exterior profile.
Pro Tip: Opt for “floating mount” hardware if you want to add depth. These numbers sit about an inch off the door surface, creating a crisp shadow that makes your address pop, even from the curb.
Before you commit to a set, consider how the font choice dictates the architectural vibe of your entryway. You should choose a style that mirrors your home’s construction era.
-
✔
Sans-Serif: Best for mid-century or modern builds; these offer clean lines and maximum readability. -
✔
Serif: Ideal for traditional or colonial homes; these feature small decorative strokes that feel classic and established.
If your door is dark, pick a metallic or white finish to ensure the numbers stand out. If your door is painted a bright or light color, matte black numbers provide the necessary visual weight to be seen clearly by visitors.
.
✨ Finishing Touches
The way you space and align your numbers is just as critical to the final look as the font style you choose.
- Uniform Spacing: Use a simple paper template to ensure consistent gaps between digits, which prevents a cluttered look.
- Lighting Alignment: Position numbers near your porch light to ensure they remain visible and legible after the sun sets.
Welcome Mat
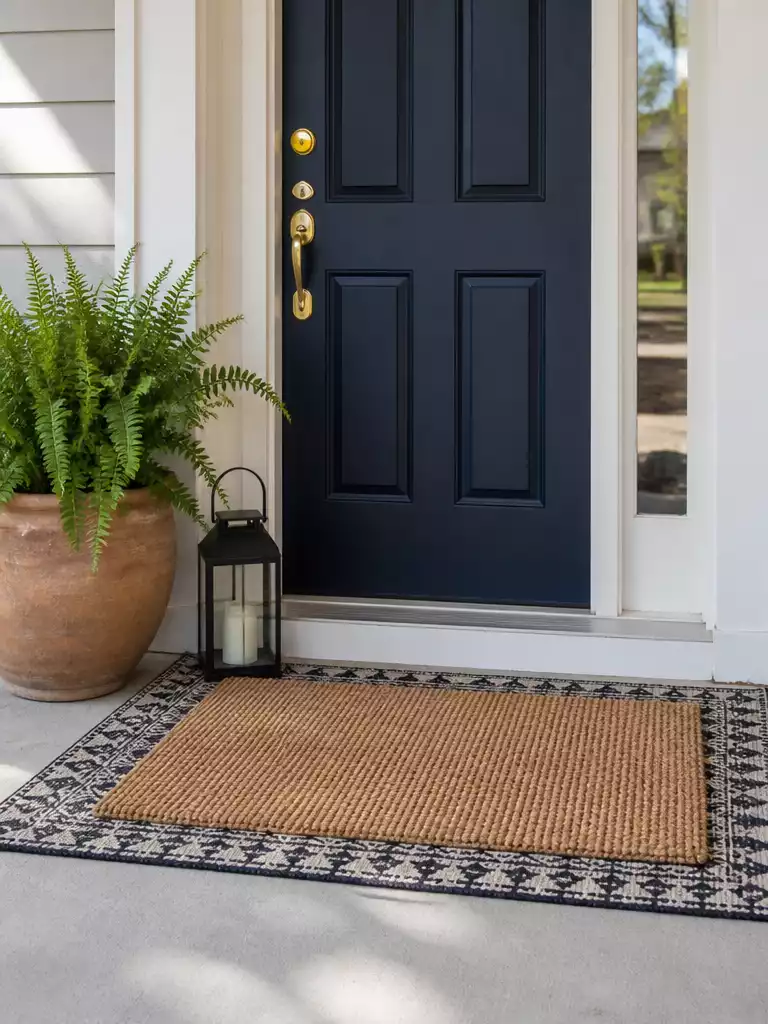
The perfect finishing touch that keeps your floors clean while adding instant personality.
A welcome mat acts as the final gatekeeper for your home, catching debris before it ever touches your entryway floor. It is the most low-maintenance way to inject color or texture into your front porch without picking up a paintbrush.
Pro Tip: To achieve that high-end designer look, try “layering” your doormat. Place a patterned outdoor rug underneath your standard coir mat to add visual depth and extra coverage.
When selecting your material, consider the specific climate and traffic patterns of your home. You want a mat that balances durability with function.
Size matters more than you might think when styling your porch. A mat that is too small for the doorway frame will look awkward and out of scale.
Aim for a width that spans at least the width of your door. If your threshold is low, measure the clearance first to ensure the mat won’t scrape or block the door from opening freely.
.
💡 The Detail That Pulls It Together
Creating a high-end look is all about scale and intentionality. By layering a larger, patterned outdoor rug beneath your primary mat, you create a visual “anchor” that frames the doorway, making your entryway feel wider and more welcoming. Balance the patterns by pairing a bold, oversized rug print with a simple, solid-colored coir mat on top.
With all ten product directions for your entry now in front of you, the path forward becomes much more manageable. Focusing on the one or two updates that solve your most immediate needs is far more effective than trying to overhaul every detail at once.
A cohesive look stems from a few deliberate choices rather than checking every box on a list. By selecting hardware and functional pieces that align with your home’s architecture, you ensure your front door remains both secure and welcoming for years to come.