Standard doors often waste floor space and disrupt clean lines, but hidden door concepts offer a smarter alternative for reclaiming storage. This guide rounds up 10 door ideas worth saving to help you find the perfect fit for your home. Let’s start with the classic bookcase approach.
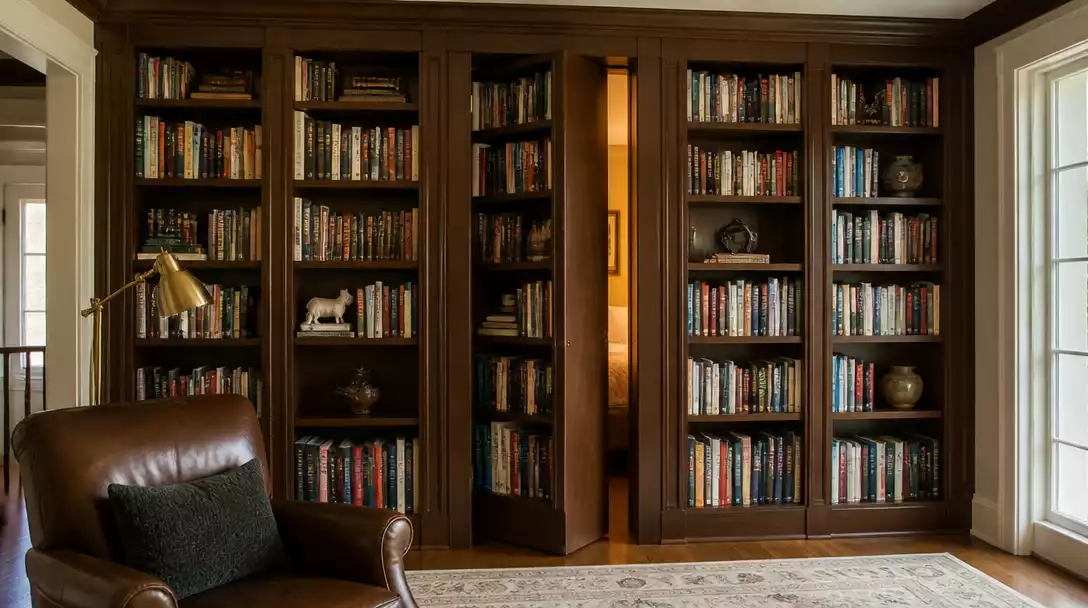
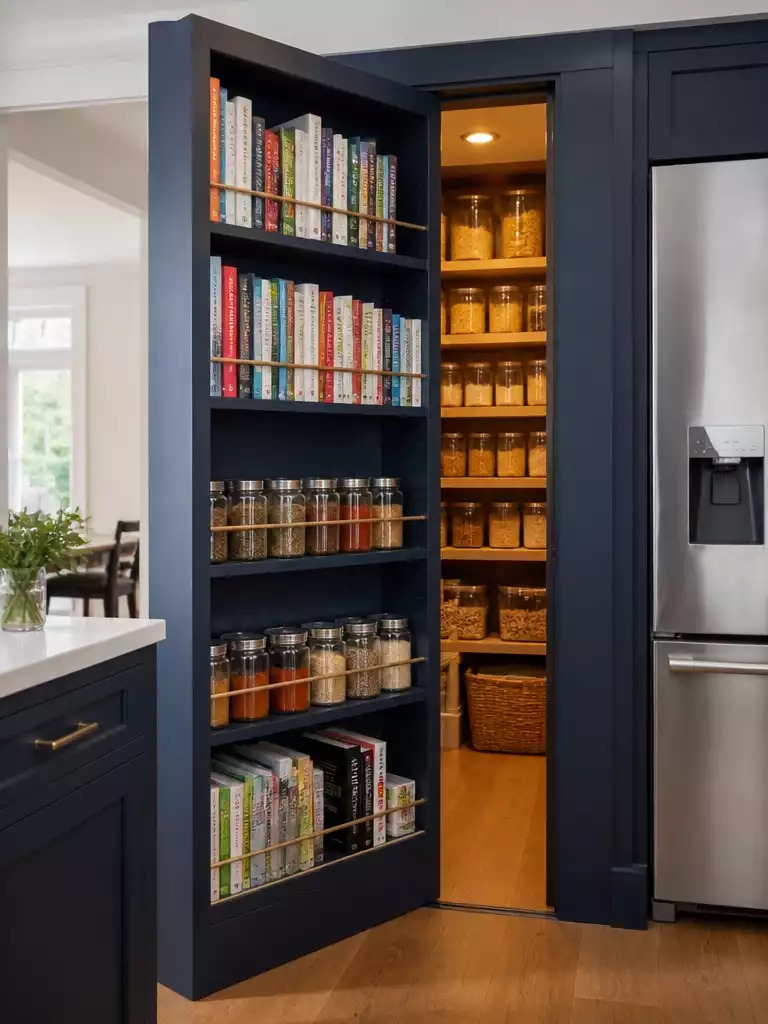
Bookcase Hidden Door

Transform your home office into a private sanctuary with a secret, library-inspired entry point.
As an Amazon Associate I earn from qualifying purchases. Affiliate links may earn me a commission at no extra cost to you.
The classic appeal of a bookcase door lies in its ability to turn a standard wall into a private gateway. It is the ultimate choice for homeowners who want to hide a home office or a panic room behind a familiar, functional piece of furniture.
When planning your build, the mechanism is everything. You must choose between a swing-out hinge or a slide-out hinge based on your floor clearance.
- Pivot Hinges: These are mandatory for heavy units. Standard door hinges will sag under the weight of books, so invest in industrial-grade steel pivot hardware.
- Trim Masking: Use your existing crown molding and baseboards to overlap the door seams. This creates an intentional look that prevents the eye from spotting the break in the wall.
- Visual Depth: Keep your shelves filled with a consistent color palette of books. This visual rhythm acts as camouflage, making it difficult for guests to notice where the shelves end and the door begins.
Pro Tip: Master the Reveal
Don’t leave the door frame bare. Install a thin piece of molding attached to the stationary wall that slightly overlaps the edge of the bookcase to eliminate the vertical gap entirely.
.
🔢 The Right Sequence for Success
Installing a heavy bookcase door requires a specific order of operations to ensure the frame stays square and the mechanism functions smoothly under load.
- Frame reinforcement: Secure the door opening with structural lumber before attempting any hinge installation.
- Hinge alignment: Test the pivot hinge movement with the empty unit first to prevent binding.
- Trim integration: Attach your final crown and baseboard molding only after the door movement is verified.
Mirror Disguised Doors

Double your hallway space while keeping your guest bathroom or storage stash completely out of sight.
A floor-to-ceiling mirror is the most effective way to trick the eye into seeing more square footage in a cramped hallway. By treating the door as a reflective surface rather than a barrier, you turn a functional entry into a design feature that brightens dark corners.
To pull this off effectively, you must commit to a frameless design that eliminates any visual frame that would scream “door” to a guest. The secret is removing all hardware; install a heavy-duty magnetic touch-latch so the panel pops open with a simple press.
Crucial Safety Requirement: Because this door will be moving daily, you cannot use standard hardware store glass.
Always specify anti-shatter backing during the custom glass order to ensure that if the door is bumped or closed too firmly, the glass stays intact rather than posing a danger.
This solution is perfect for anyone living in a home with tight, windowless corridors that feel claustrophobic. If your hallway is already flooded with natural light, however, you might prefer a wood panel or art-based concealment to avoid unwanted glare.
When measuring for this project, account for the thickness of the mirror glass plus the mounting backing. Ensure your hinges are rated for the extra weight, as high-quality mirror glass is significantly heavier than a standard hollow-core door.
.
💡 Why This Works:
Mirror doors leverage the psychological trick of “infinite space” by reflecting light and depth back into the room. This effectively erases the visual footprint of a door, transforming a heavy barrier into a seamless extension of your wall, which helps minimize the “chopped up” feel common in narrow hallways.
Visual Expansion: This approach turns a necessary hallway entry into a bright, architectural focal point.
Wall Panel Flush Doors
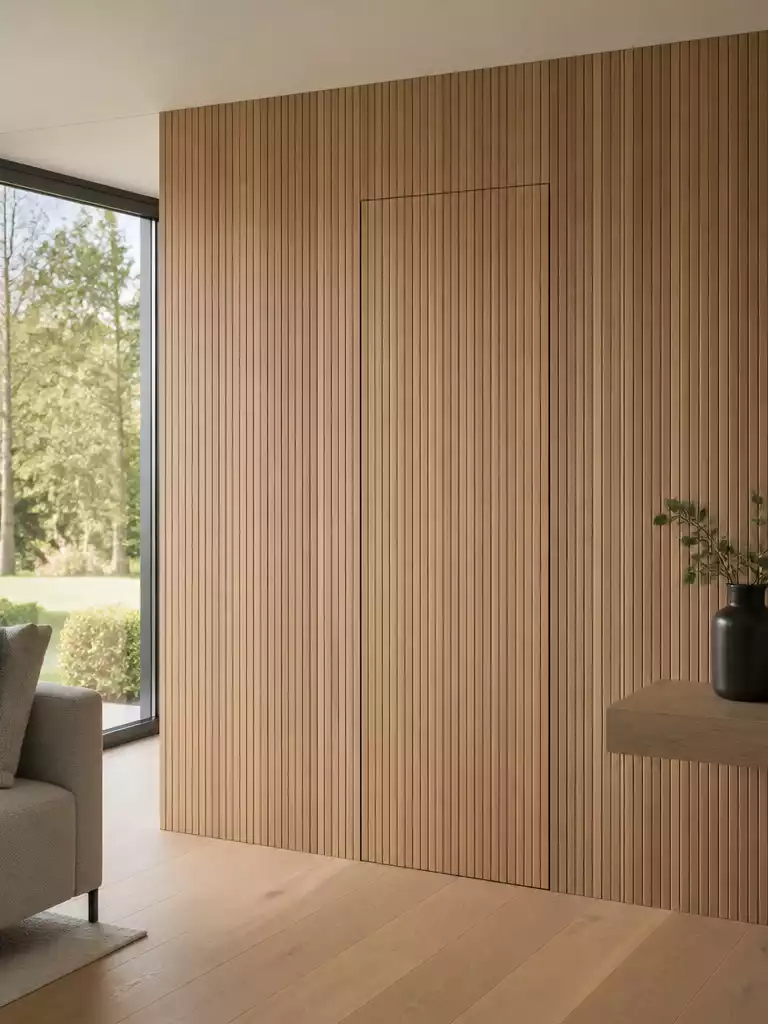
Achieve a clean, uninterrupted aesthetic by making your doors disappear into the wall structure.
If you feel like your home layout is constantly being interrupted by intrusive door frames and clashing trim, a flush door installation is your best path forward. These doors work by sitting perfectly level with your surrounding drywall or wood paneling, effectively erasing the “chopped up” feel of a standard room.
The magic happens with invisible Soss-style hinges. Unlike traditional hinges that bulge out, these hardware pieces are fully mortised into the door and the frame, allowing for a completely flat transition.
Pro-Tip: The Shadow Line Technique
To prevent the dreaded “paint crack” where the door meets the wall, avoid trying to seal the gap flush with caulk. Instead, create a deliberate, thin shadow line. This tiny gap allows the door to move slightly during temperature changes without chipping the finish.
Achieving the true “invisible” look requires a commitment to a continuous finish. You must run your wallpaper, wood slats, or paint color across both the wall and the door simultaneously.
- Preparation: Ensure your door slab is perfectly plumb before installing the hinges to avoid uneven gaps.
- Finishing: Apply your wallpaper or paint while the door is hung to ensure the pattern or texture lines up perfectly across the seam.
- Hardware: Use touch-latches or integrated magnetic catches to keep the face of the door free of handles.
This design is ideal if you are aiming for a gallery-style or high-end minimalist interior. It is less practical for high-traffic areas where frequent, heavy usage might cause the finish at the seams to wear down faster than on standard door frames.
.
📋 Quick Reality Check: Before You Install
- Verify wall thickness: Ensure your interior partition is thick enough to house recessed hinge hardware without compromising structural studs.
- Test for squareness: Flush doors are unforgiving; check that your door opening is perfectly plumb and square to avoid uneven gaps.
- Confirm finish weight: If applying heavy wall treatments like wood slats, account for the added weight and adjust hinge tension accordingly.
Bookshelf Pantry Door
Transform your cluttered kitchen pantry into a discreet, functional extension of your living space.
Is your kitchen pantry the most chaotic zone in your entire home? A bookshelf pantry door swaps a standard, flimsy door for a sturdy, storage-heavy unit that blends right into your kitchen or dining room wall.
Unlike a standard door, this design serves a dual purpose by providing extra shelving for spices, cookbooks, or decorative dry goods. You will need to decide between a shallow, library-style shelf for display or a deep-reach design if you want to store bulkier items inside the door frame itself.
Pro Tip: Install a motion-activated LED strip inside the pantry cavity to illuminate your supplies the moment the door swings open. This simple addition creates a high-end, custom reveal effect that makes the kitchen feel instantly more organized.
Because these doors carry significant weight, you cannot rely on standard hardware. A floor-level guide track is essential to keep the unit from sagging and to ensure the heavy shelves do not shift or scrape the floor during operation.
This solution is perfect for homeowners who want to hide food storage without sacrificing square footage. If your pantry entrance is located in a high-traffic area, ensure your floor is perfectly level to prevent the door from drifting open on its own.
.
🏡 How This Works in a Real Home:
- Daily Weight Management: Keep heavy canned goods on lower shelves to lower the center of gravity, preventing the door from feeling front-heavy or “swingy” when you open it.
- Seamless Kitchen Flow: Use the same cabinet-door handle style or matching hardware as your nearby kitchen cabinetry so the bookshelf pantry doesn’t look like an obvious outlier.
- Lived-In Styling: Avoid perfectly staged, sparse shelves; mix functional food storage with a few decorative cookbooks to make the transition look like an intentional, permanent piece of furniture.
Hidden doors demand more daily upkeep than standard hardware, as hinges and latches eventually require minor adjustments to stay flush. While keeping everything perfectly aligned feels like a heavy lift, it helps to remember that a few high-quality strategic design choices carry the entire aesthetic long-term.
Focus your energy on precise hinge installation and material matching, as these two factors alone determine if your secret storage remains truly invisible and low-maintenance for years to come.
Under Stairs Secret Doors
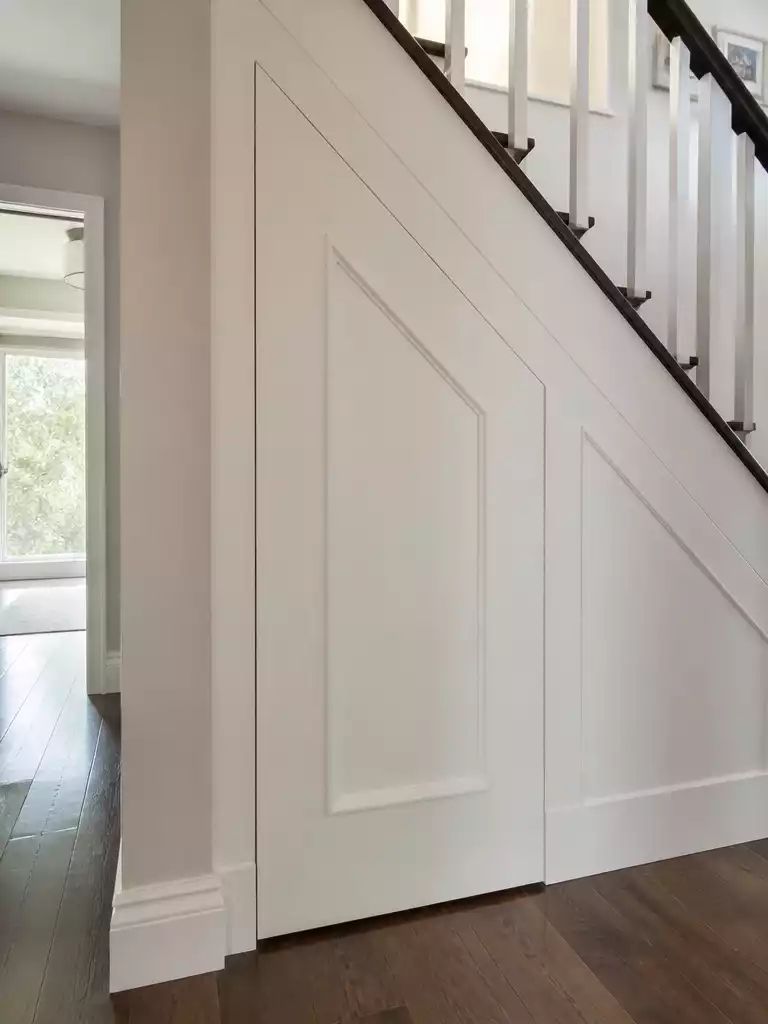
Transform awkward, triangular dead zones into a seamless, high-capacity storage passage.
Most homes suffer from the dead zone beneath the staircase, often wasted on small, triangular cabinets that barely hold a vacuum. An under-stairs secret door turns this awkward architectural void into a large-scale storage unit or a hidden playroom.
The key to making this look intentional is the transition between the door and the fixed wall. You must have your carpenter custom-cut the door’s top edge to follow the exact angle of the stair stringer.
Pro-Tip for Concealment: Avoid traditional knobs or lever handles at all costs. Install a hidden trigger-latch that requires you to press a specific, non-obvious spot on the wood trim to pop the door open.
To truly camouflage the entrance, match your door surface to the existing architecture of the stairwell. If you have wainscoting or beadboard, ensure the vertical lines of the boards align perfectly with the surrounding wall so the door seam vanishes into the pattern.
This project is ideal for homeowners who want to hide bulky items like out-of-season gear or cleaning equipment. Skip this if your staircase is narrow, as the door swing can easily block the hallway if you don’t plan the hinge placement carefully.
.
🏡 Real-Home Application
- Organize by depth: Use the deepest sections of the triangular void for heavy, seldom-used items like holiday decor.
- Manage door weight: Add a small swivel caster to the bottom corner of the door to prevent sag.
- Maintain visual flow: Use the same wall-matching hardware or touch-release latches so the door stays truly invisible when closed.
Fireplace Hidden Passage
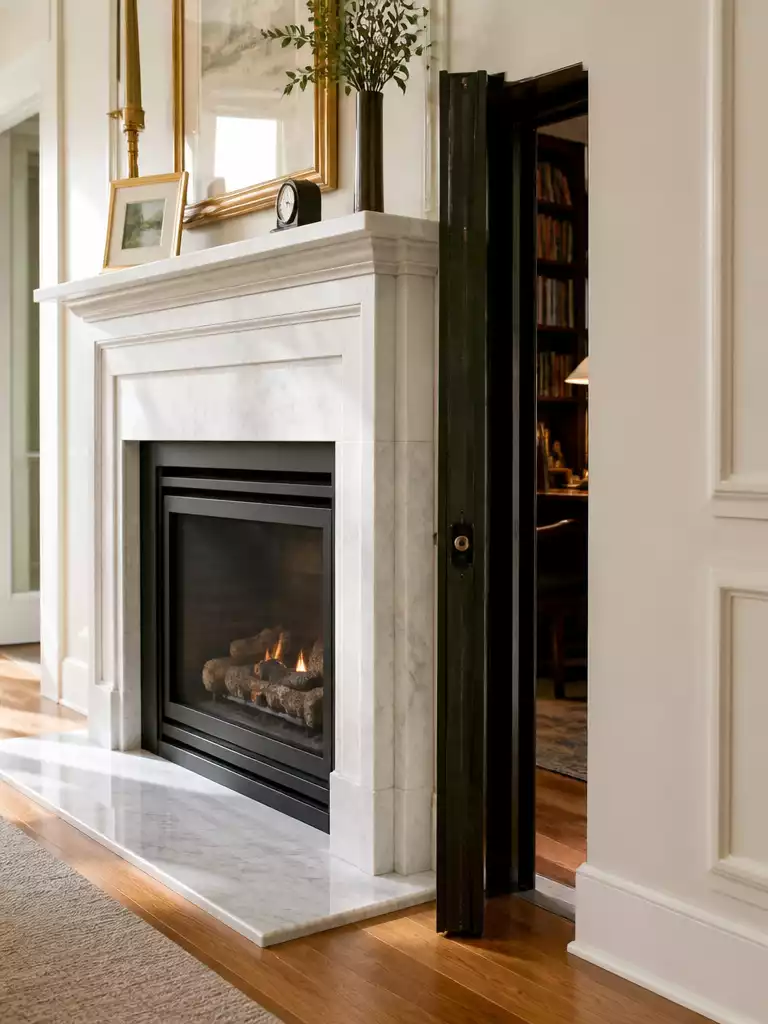
Transform your home with a sophisticated, historical-inspired passage hidden behind a functioning fireplace insert.
A fireplace hidden passage is an architectural power move that feels pulled straight from a classic estate. This setup uses a non-functional or gas insert fireplace that swings out on a reinforced steel frame to reveal a private study or safe room.
Critical Safety Warning: Never attempt this without consulting local building codes regarding fire-rated materials and clearance requirements. Even if the fireplace is for design purposes only, the structure must meet safety standards to prevent heat transfer to the hidden room.
The secret to this build is the two-part construction technique. The mantel and hearth remain static, while the insert itself acts as the door.
Consider these essential components before finalizing your plans:
- Steel Frame Reinforcement: A wooden frame will sag over time under the weight of the mantel and insert; steel is mandatory for smooth operation.
- Static vs. Moving Parts: Ensure your masonry or heavy stonework is attached only to the static hearth, not the swinging door.
- Hidden Latch Placement: Use a push-to-release mechanism near the top of the mantel to keep the face of the fireplace clear of handles.
This project is best suited for homeowners undergoing a major renovation or those comfortable with structural framing. If you are looking for a weekend DIY, this is likely not the right choice for your skill level.
.
🧰 Questions for Your Installer:
- Load-bearing capacity: Ask exactly how the steel frame attaches to your wall studs to prevent long-term sagging.
- Heat safety clearance: Request a review of local fire codes for gas inserts to ensure zero heat transfer risk.
- Latch longevity: Inquire about the rated cycle count of the magnetic or push-trigger hardware to ensure consistent performance.
Sliding Wall Panel Door
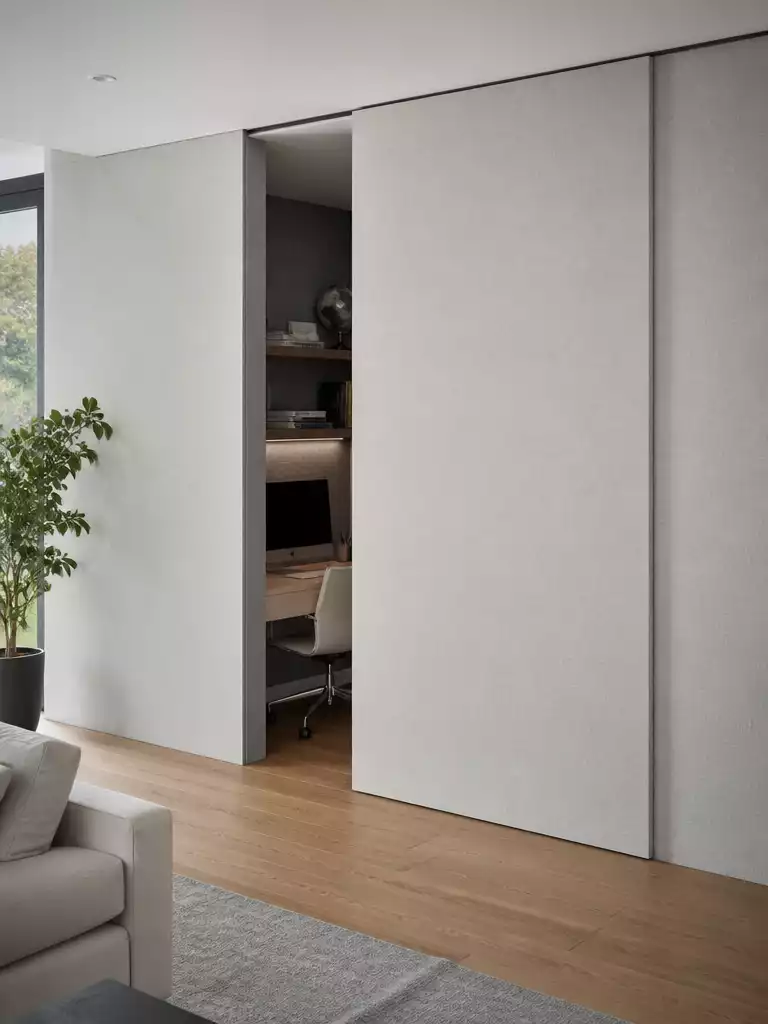
Create flexible, multi-purpose living zones by using oversized sliding panels that disappear into your walls.
A sliding wall panel is the best way to handle large openings where a swinging door would simply take up too much floor space. Instead of a traditional door frame, these panels use a ceiling-mounted track system that keeps the floor completely clear of hardware or guide rails.
This design is ideal for homeowners who need to toggle between an open-concept living area and a private, quiet space. If you are converting a section of your floor plan into a dedicated home office, consider wrapping your panels in acoustic fabric to minimize noise transfer and keep your work calls private.
Always opt for top-hung rollers over floor-based tracks to ensure your hidden transition remains smooth for years. Top-hung systems prevent dust and debris from gettings stuck in the track, which is a common failure point for floor-mounted rollers.
While these panels provide a sleek look, they require structural planning to install the heavy-duty track in the ceiling. If your home has standard drywall, you will need to reinforce the header above the opening to support the weight of the sliding panel.
.
🔢 The Right Sequence: Installing Sliding Panels
Installing these systems out of order often leads to sagging panels or a track that binds, so follow this professional flow to ensure a smooth, silent glide.
- Reinforce the header: Install structural blocking behind your drywall to anchor the heavy track securely.
- Level the track: Mount the top rail with extreme precision, as even slight slopes cause drift.
- Hang and adjust: Attach the panel rollers and fine-tune the height to ensure a perfect, gap-free seal.
Hidden Closet Behind Art
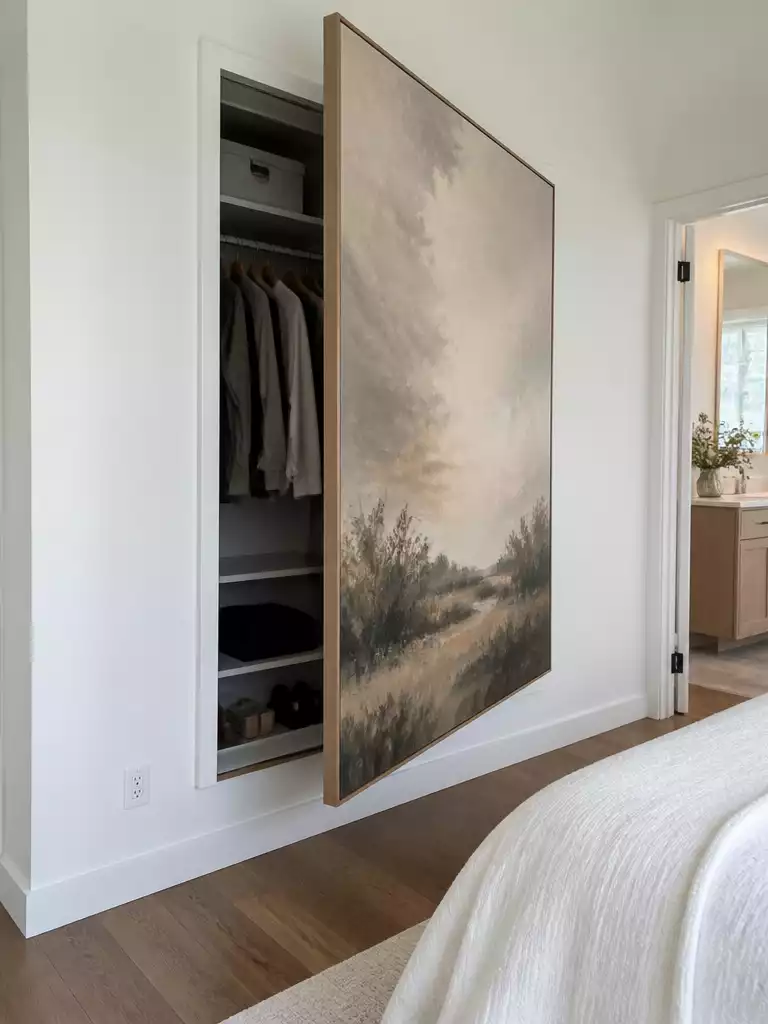
Transform your bedroom into a private gallery that conceals your entire wardrobe in plain sight.
Turning a reach-in closet into a hidden retreat is perfect for primary bedrooms where you want to emphasize wall space over functional storage clutter. By mounting your favorite large-scale art directly onto the closet opening, you reclaim a wall that would otherwise be dominated by a standard slab door.
Hardware Selection: The success of this design depends entirely on your hinges. You must use low-profile pivot hinges that allow the canvas frame to sit flush against the wall surface without a noticeable gap.
When selecting your art, prioritize lightweight canvas prints or thin-framed pieces to avoid unnecessary stress on the door frame. A heavy frame will eventually warp or cause the door to sag, creating a visible seam that gives away the secret immediately.
Consider these essential factors before starting your build:
- Dual-Hinge System: Use a secondary support hinge if your art piece exceeds 30 inches in width to prevent frame distortion.
- Latch Choice: Install a touch-latch mechanism so the art piece requires no visible hardware or knobs to open.
- Wall Clearance: Ensure the interior of the closet has enough depth to accommodate the “swing-in” or “swing-out” clearance of the frame.
Common Mistake: Many homeowners use a standard door frame, which creates a thick, obvious shadow line around the art. Always recess the frame slightly or use a custom-trimmed casing to make the art appear as if it is floating perfectly on the wall.
This design is ideal for minimalists who want to eliminate visual noise in the bedroom. If you have a collection of large, lightweight prints, this is significantly more effective than traditional closet doors at maintaining a clean, gallery-like finish.
.
💡 Designer Note: Achieving the Perfect Scale
To make this illusion convincing, your art must occupy the same visual footprint as a standard closet door. A small canvas will look like a decorative accent rather than a hidden passage. Aim for an oversized, floor-to-ceiling piece that anchors the wall, ensuring the width matches the closet opening to maintain clean, uninterrupted lines across your bedroom.
Toe Kick Floor Door

Transform that ignored sliver of kitchen space into a clever, low-profile storage stash.
Most kitchens waste the four inches of space directly beneath the base cabinets. A toe kick floor door captures this forgotten zone, turning a surface you usually ignore into a slide-out drawer for items you reach for daily.
Best For: Small kitchens where every square inch of vertical wall space is already spoken for.
Skip If: You have a deeply recessed toe kick that would make standard hardware difficult to install or reach.
The secret is using a spring-loaded, push-to-release mechanism that eliminates the need for an external handle. This keeps the cabinet front completely flush, ensuring the door remains invisible to anyone standing in the room.
Because this area sits right against the floor, moisture is your biggest enemy. Follow these essential protection steps to keep your hidden storage clean and functional:
- Seal the underside: Use a high-quality sealant on the bottom edge of the door to prevent floor cleaning liquids from seeping inside.
- Choose the right contents: Reserve this space for flat, non-perishable items like baking sheets, cutting boards, or wine bottles.
- Avoid spills: Never store loose food items or ingredients that could attract pests or be ruined by accidental kitchen floor splashes.
Warning: Always test your flooring clearance before installation. Ensure the drawer mechanism won’t scrape against your tile or hardwood when it pops open.
.
🔢 The Right Sequence for Installation
Installing a toe kick drawer requires precise ordering to ensure the mechanism operates smoothly without binding against your flooring.
- Measure vertical clearance between your finished floor and the cabinet base plate.
- Dry-fit the hardware tracks before attaching your custom-cut front panel.
- Install the push-to-release magnetic latch once the drawer front is perfectly level.
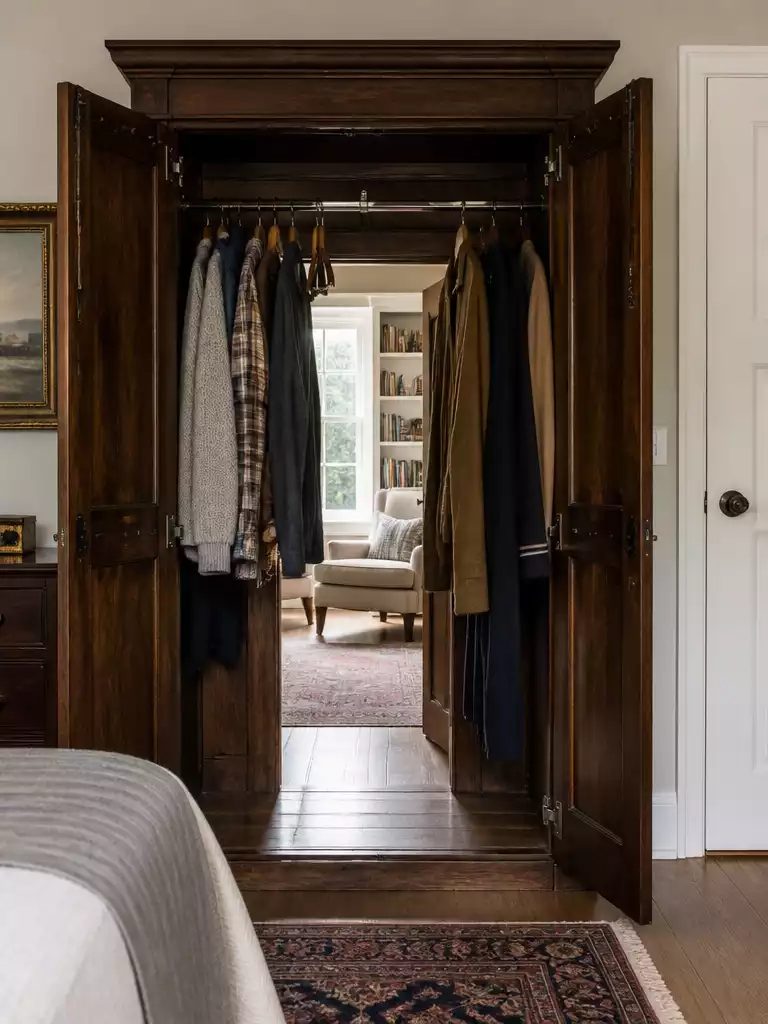
Wardrobe Entry to Hidden Room
 .
.
🏡 Make It Feel Natural in Your Home:
- Clothing barrier: Arrange hanging clothes so they are slightly spaced; this prevents them from getting caught in the door hinge as you pull the unit open.
- Daily accessibility: Use a magnetic push-latch instead of a handle to keep the wardrobe exterior looking like a standard, solid furniture piece.
- Internal depth: Ensure your wardrobe frame is at least 24 inches deep to allow a person to pass through comfortably while accommodating standard closet hangers.
You have now reviewed ten distinct ways to integrate hidden storage and surprise into your home. It is unnecessary to implement every concept; instead, focus on the one or two applications that align with your specific floor plan. A few deliberate selections will provide more architectural impact than attempting to force every idea into your living space.
Once you identify a door that solves your storage headache, you can move forward with confidence. The right choice is the one that functions seamlessly with your existing layout, so evaluate your wall space and finalize your decision based on what truly fits your home’s flow. If you are also considering your entrance, explore additional door choices to complete your design.