Stopping that phantom draft means weatherproofing an exterior door before winter locks in. These 12 tactical steps narrow the project to the high-ROI fixes that actually hold heat. Grab your flashlight and painter’s tape; here is the definitive sequence to secure your entryway.
Inspect the Door for Gaps and Drafts
Identify hidden leaks early to transform your drafty entrance into a cozy, energy-efficient barrier.
As an Amazon Associate I earn from qualifying purchases. Affiliate links may earn me a commission at no extra cost to you.
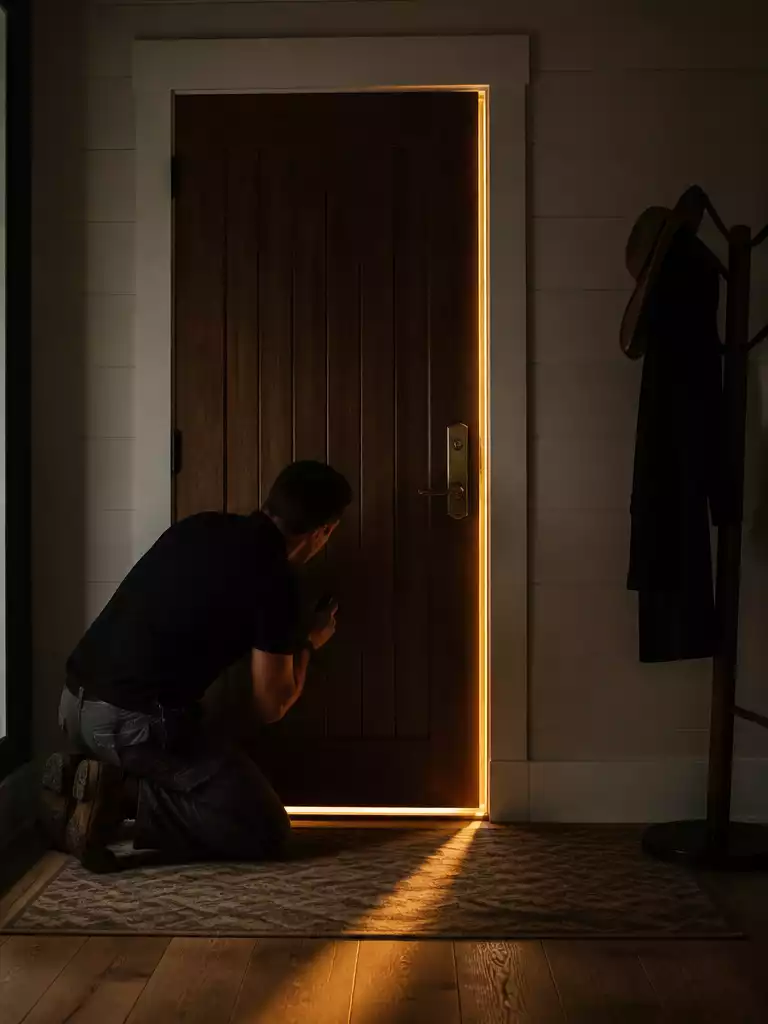
Before you spend a dime at the hardware store, you need to know exactly where your home is losing its fight against the cold. The most visual way to start is the Nighttime Light Test, which reveals the literal gaps where your money is leaking out of the house.
Wait until the sun goes down and have a partner stand outside with a bright flashlight, tracing the entire perimeter of the door. From the inside, you’ll see slivers of light peeking through the frame or threshold, marking the exact spots where air—and your expensive heat—is escaping.
Draft Detection Checklist
- Incense or Smoke Test: Move a lit incense stick around the frame; if the smoke wafts horizontally, you have a high-velocity leak.
- Physical Feel Method: Use the back of your hand—which is far more sensitive to temperature than your palm—to trace the threshold and hinge side.
- The Visual Check: Look for daylight at the corners or uneven gaps where the door meets the jamb.
As you work your way around the door, don’t rely on your memory to guide your repairs later. Use low-tack painter’s tape to mark every single leak you find during the inspection.
This creates a tactical “leak map” that ensures no spot is missed once the tools come out. With your trouble spots clearly flagged, you can accurately diagnose which piece of hardware is failing to do its job.
“Marking leaks with blue tape turns a vague feeling of a ‘drafty house’ into a concrete weekend project with a clear finish line.”
.
💰 What the Inspection Reveals for Your Budget
- The real range: Expect to spend under $100 for DIY sealing materials like weatherstripping and sweeps versus $2,000+ for replacement.
- Hidden cost: Cheap adhesive foam often fails mid-season; investing in silicone or V-strips now prevents buying materials twice.
- Worth it: Stopping air leaks accounts for 11% of home heat loss, offering an immediate return through lower utility bills.
Check the Weatherstripping Condition
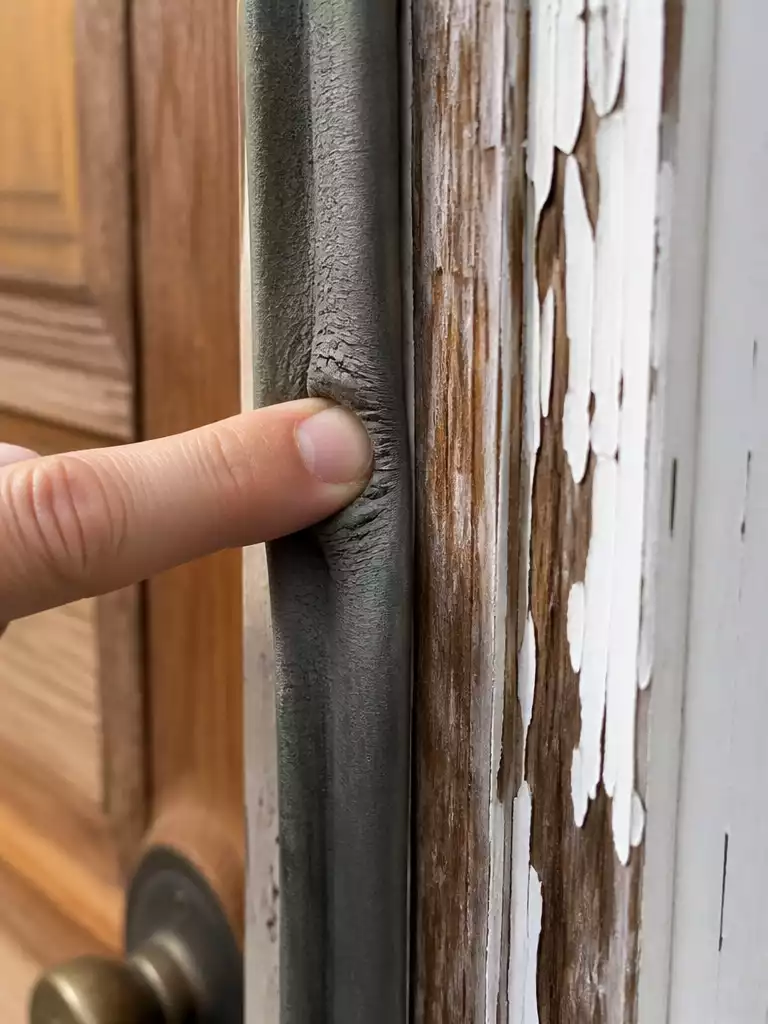
Restoring your door seal ensures every bit of expensive heat stays exactly where it belongs.
Before you run to the hardware store, you need to know if your current seals are actually pulling their weight. Over time, weatherstripping loses its “compression memory,” meaning it stays flattened after the door opens rather than springing back to fill the gap.
Start with the simple Compression Test: press your finger into the foam or rubber seal along the frame. If the material feels brittle, cracks under pressure, or remains indented like a piece of old playdough, its R-value has effectively dropped to zero.
The Paper Tug Test
Open your door, place a single sheet of notebook paper across the jamb, and close the door firmly. Try to pull the paper out; if it slides out with zero resistance, your weatherstripping isn’t making physical contact with the door slab.
You should also look for signs of adhesive failure, which often looks like peeling corners or “waves” in the strip where air can bypass the seal entirely. Check the bottom corners especially, as these are high-friction areas where bags or shoes often catch and tear the material away.
Keep in mind that wear and tear isn’t always uniform around the entire frame. South-facing doors often suffer from UV rot that turns rubber brittle on the latch side, while the hinge side might remain perfectly intact because it’s shielded from the sun.
Once you’ve identified the flattened or sun-damaged sections, you have your roadmap. If the seals are brittle or the paper test failed, it is time to strip them back and prepare for a fresh, airtight start.
.
Replace Worn Weatherstripping
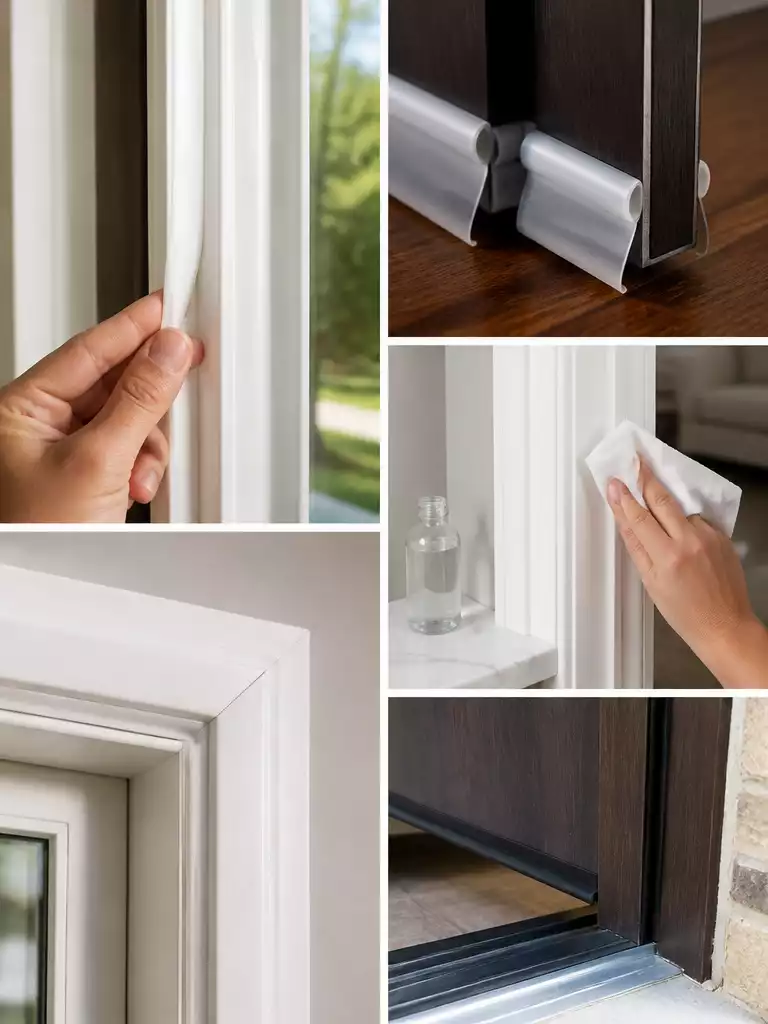
Create an airtight seal that holds back the winter chill while keeping your entryway looking polished.
Think of weatherstripping as the gasket of the home. It is the single most critical barrier standing between your cozy living room and the biting arctic air outside.
When the old seal fails, you aren’t just losing comfort—you are essentially heating the entire neighborhood. Choosing the right replacement material is the difference between a one-season patch and a decade-long solution.
Before you peel the backing off your new stripping, you must follow the Clean Surface Rule. Use a cloth dampened with rubbing alcohol to meticulously remove any leftover adhesive, oils, or sawdust from the door jamb.
If you skip this step, even the most expensive silicone seal will likely peel away within 48 hours. A clean bond ensures the adhesive cures properly against the frame rather than sitting on a layer of invisible dust.
Pro-Tip: The Miter-Cut Secret
To prevent “pinhole” leaks at the corners, use a sharp utility knife to miter-cut the ends of your weatherstripping at a 45-degree angle. This allows the vertical and horizontal strips to meet flush, creating a continuous thermal bridge that won’t whistle when the wind picks up.
For those living in historic homes where the door tends to shrink in winter and swell in summer, I highly recommend bronze or plastic V-Strips. This “tension seal” maintains constant pressure against the door edge even as the gap width changes, providing a reliable seal through every season.
With the perimeter of the frame now securely sealed, your focus should shift to the largest potential opening of all: the threshold at the very bottom of the door.
.
⚠️ Where This Can Go Wrong:
- The Latch Failure: Using weatherstripping that is too thick can prevent the door from latching or locking securely without force.
- Dust Contamination: Applying adhesive backing over sawdust or old residue ensures the strip will peel off within days.
- Corner Gaps: Failing to miter-cut the joints leaves “pinhole” leaks where cold air whistles through the meeting points.
Install a New Door Sweep
Stop the bottom-of-the-door tunnel from letting freezing arctic air into your cozy living space.
Think of the gap at the bottom of your door as a “thermal tunnel” where the heaviest, coldest air enters your home like an open vent. Even if your side seals are perfect, a failing sweep acts as a vacuum for drafts that chill your floors and spike your heating bills.
Choosing the right hardware depends on your living situation and the floor’s surface. While heavy-duty rubber sweeps that screw directly into the door face offer the most permanent seal, slide-on U-shaped versions are a brilliant, tool-free alternative for renters or those with standard-thickness doors.
When installing, aiming for the “Friction-Free” height is the secret to a long-lasting seal. The sweep should just graze the threshold; if it sits too low, it creates drag that ruins your flooring, but too high and it is essentially a decorative strip.
Pro Tip: The Drip Guard Advantage
Opt for an exterior-mounted sweep with a built-in “drip guard” fin. This angled piece of metal or plastic deflects driving rain away from the vulnerable wooden bottom of your door, preventing rot before it starts.
If you have slate or tile floors that aren’t perfectly level, stay away from solid rubber flaps which will leave gaps in the low spots. A nylon brush sweep uses thousands of flexible bristles to fill those micro-dips while still gliding effortlessly over the floor.
.
⚠️ Common Installation Mistakes to Avoid:
- The Floor Drag: Installing the sweep while the door is closed without testing the swing over high-pile rugs.
- Overtightening Screws: Stripping the pilot holes in wooden doors, which causes the sweep to sag or rattle over time.
- Ignoring Level: Forgetting that floors often slope; a rigid rubber sweep will bind on one side and leak on the other.
The technical details of sealing a frame can feel like a lot to manage, but the heavy lifting is usually concentrated in just one or two problem areas. You don’t need a total overhaul to see a massive drop in your heating costs or an increase in your home’s value. Real efficiency comes from identifying the specific gaps that waste the most energy rather than trying to achieve a laboratory-perfect seal on everything.
🎯 The Calls Worth Getting Right:
- Prioritize durable materials when you refinish a weathered front door for winter.
- Consider how aesthetic upgrades like functional storm doors protect your ROI.
- Focus on bottom seals first as they endure the most wear.
- Address visible light gaps before worrying about microscopic drafts.
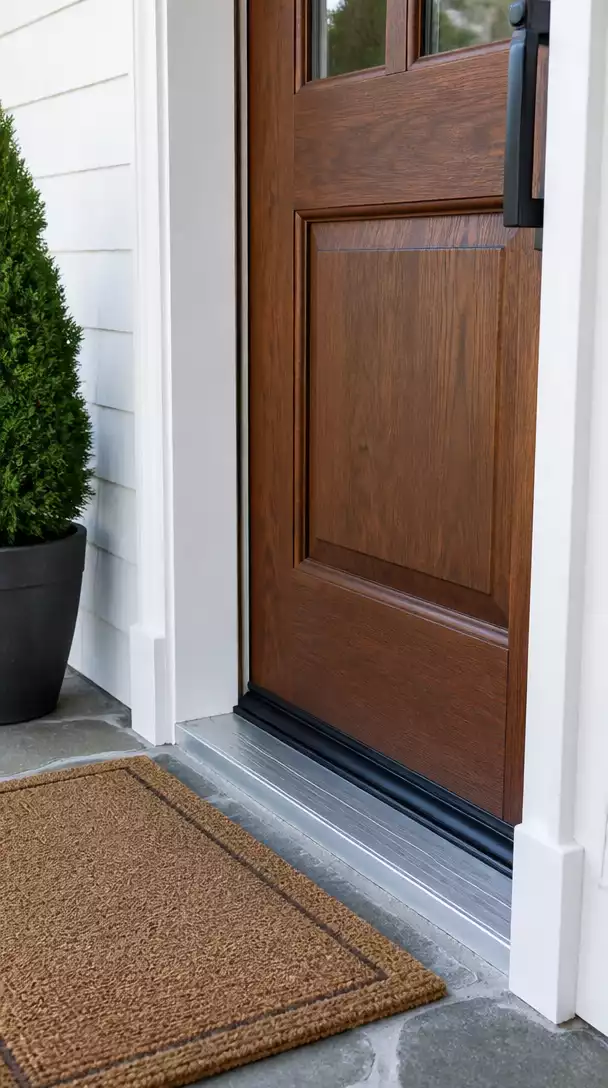
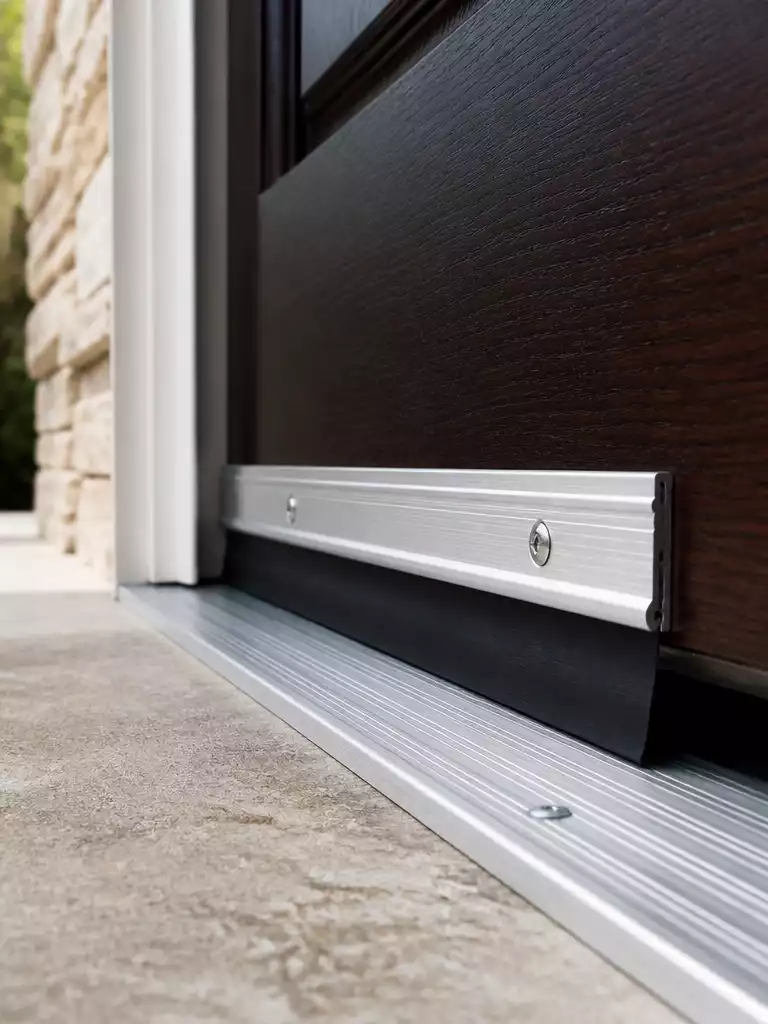
Seal the Threshold
A perfectly adjusted threshold creates an airtight bridge between your sanctuary and the winter chill.
Most homeowners look at the metal plate under their door and see a permanent fixture, but it is actually a mechanical seal. If you can see light under the door or feel a breeze hitting your ankles, those hidden screws are your first line of defense.
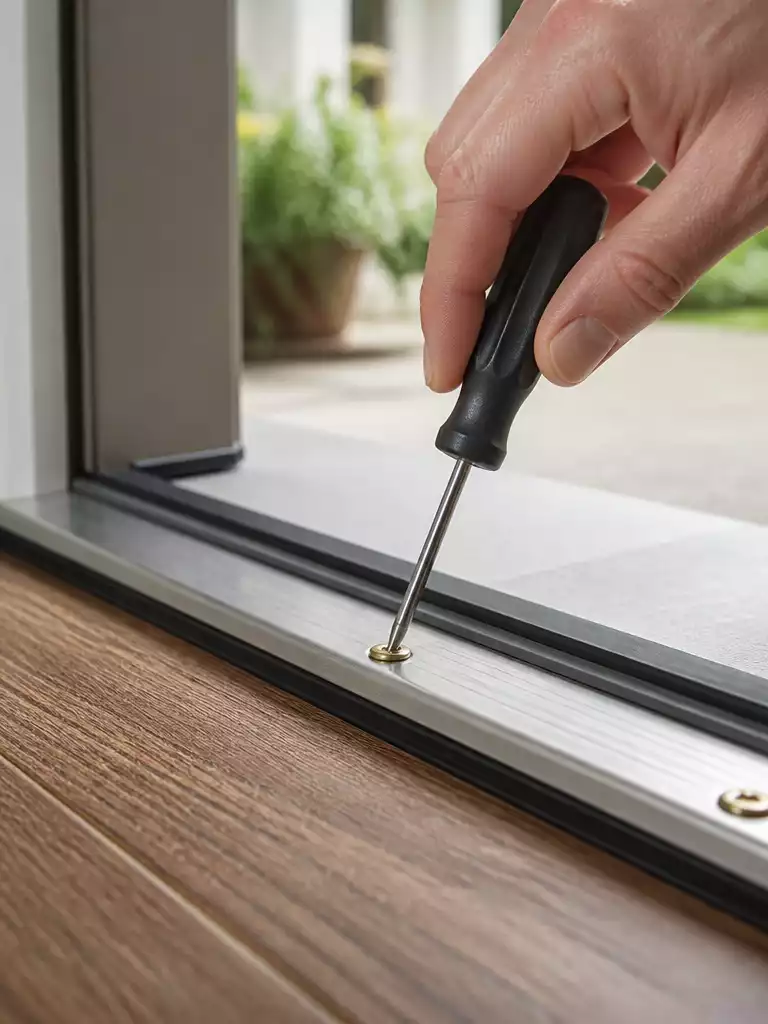
Most modern thresholds feature four or five screws along the top of the metal cap. By turning these screws counter-clockwise, you can “rise to the occasion” and lift the threshold to meet the bottom of the door sweep for a snug fit.
The Thermal Break Check
Check if your threshold has a plastic strip running down the center. This is a thermal break, which stops the exterior metal from conducting freezing temperatures directly into your interior flooring.
If the draft isn’t coming from the top of the plate but from underneath it, you have a structural gap. You will need to run a steady bead of exterior-grade silicone caulk along the edge where the metal meets the exterior porch or step.
Do not assume a worn-out threshold requires a full replacement of the metal assembly. Often, the soft rubber threshold insert becomes brittle or flattened from years of foot traffic; these can be slid out and replaced for about $5 at any hardware store.
Take your time with the adjustment screws. Turning them too far can cause the door to bind, making it difficult to lock or causing premature wear on your brand-new door sweep.
.
⚠️ Watch Out for These Threshold Pitfalls:
- Over-tightening Screws: Forcing screws past their natural stop can strip the wood or aluminum threads, making height adjustments impossible later.
- Ignoring Debris: Failing to vacuum the channel before adjusting screws often traps grit, which grinds down the metal and prevents a level lift.
- The Binding Trap: Raising the plate too high creates excessive friction that tears your rubber sweep and puts strain on the door hinges.
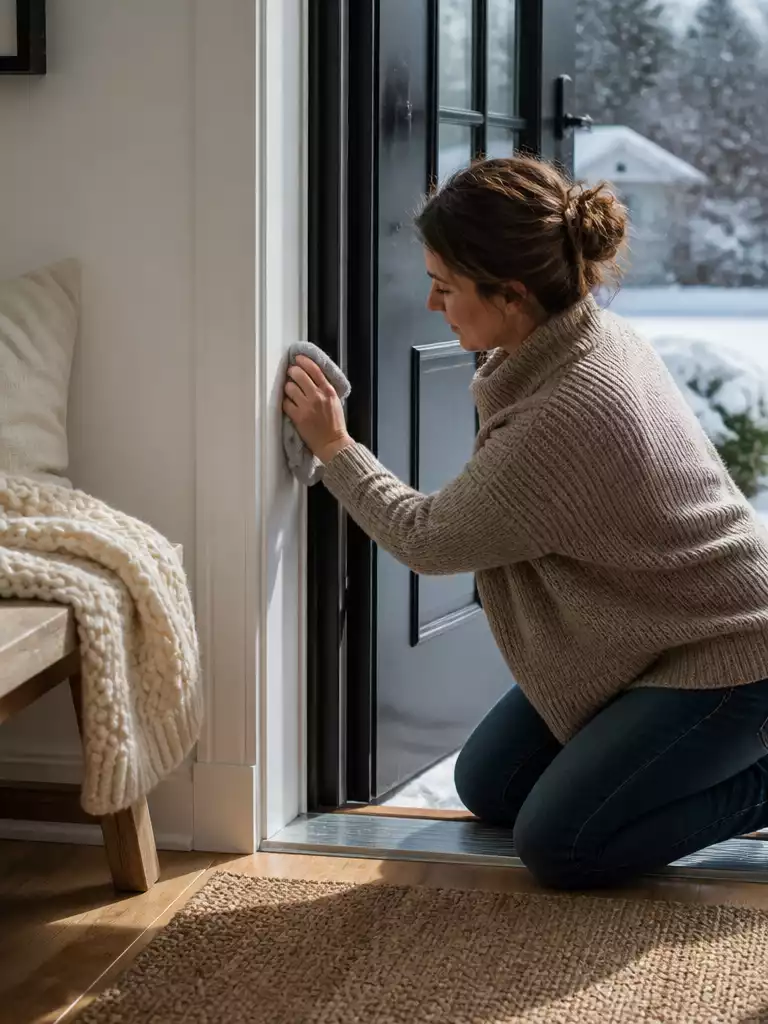
Caulk Around the Frame
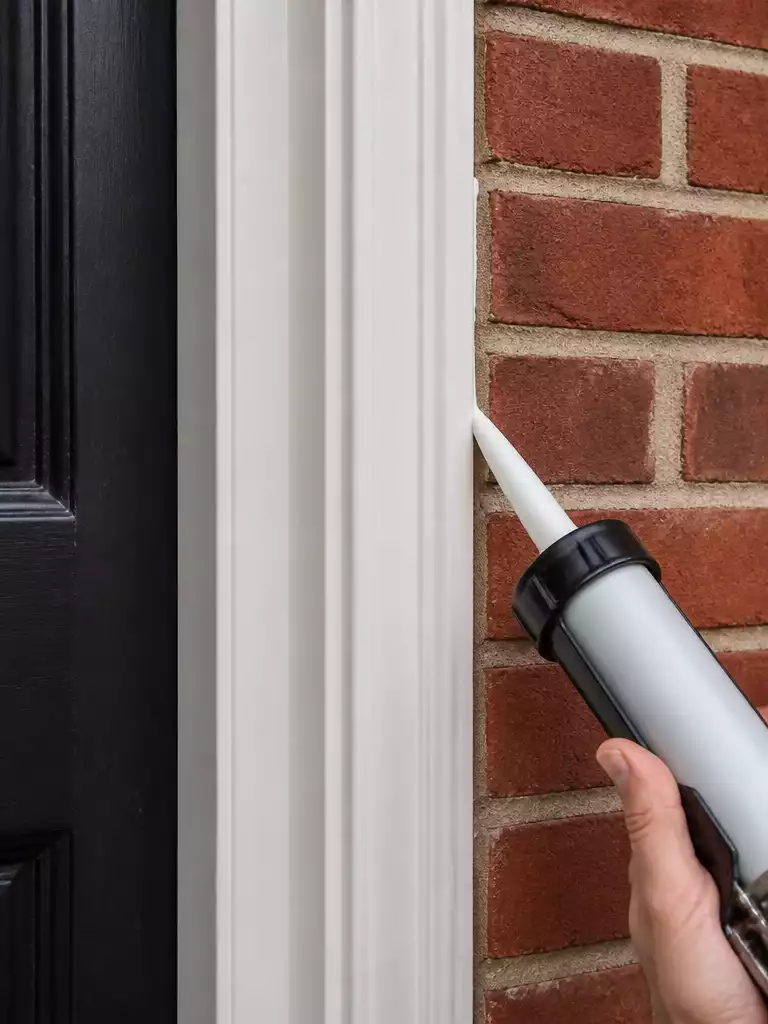
A fresh bead of high-quality caulk creates a seamless, airtight barrier against winter winds.
If you have lived in your home for more than a few years, you are likely dealing with “Settling House” syndrome. As your home shifts and the seasons change, the tiny gaps between your door trim and the exterior siding can expand and crack, creating invisible highways for cold air.
To fix this, you need a material that can move as your house breathes. Skip the cheap interior stuff and reach for Exterior-Grade Silicone or “Sili-flex” caulk, which is specifically designed to handle extreme temperature swings without becoming brittle.
The Professional Bead Technique
- Cut at a 45-Degree Angle: Snip the nozzle of your caulk tube at a sharp angle to create a tip that fits perfectly into the corner of the trim.
- The Dripless Gun: Invest in a dripless caulk gun; it stops the flow the moment you let go of the trigger, preventing messy globs on your siding.
- The Critical Junction: Pay extra attention to where the side jambs meet the threshold—this is a prime spot for water to sit and cause frame rot.
When you encounter a gap wider than 1/4 inch, don’t try to fill the entire void with caulk alone. It will eventually shrink, pull away from the edges, and fall out, leaving you right back where you started.
Mistake to Avoid: Over-Filling Large Gaps
Never use caulk as a structural filler for deep holes. Instead, tuck a Backer Rod (a flexible foam rope) into the gap first, then apply your caulk over the top for a durable, professional finish.
Once the bead is laid, smooth it with a damp finger or a caulking tool for that clean, factory-finish look. This simple step ensures that the stationary parts of your door are just as airtight as the moving ones.
.
🔢 The Right Sequence
Caulking is your final stationary defense; following this specific order prevents trapping debris or moisture behind your fresh seals.
- Scrape away old, brittle caulk and wipe the area with rubbing alcohol to ensure a bond.
- Insert backer rod into gaps larger than 1/4 inch so the caulk has a surface to sit on.
- Apply the bead and smooth it immediately before the silicone begins to “skin over” and harden.
Adjust the Hinges and Alignment

A perfectly aligned door squares the frame to eliminate stubborn gaps and drafty corners.
If you notice a top-corner sag, your weatherproofing efforts will likely fail because the door isn’t sitting square in its frame. This misalignment creates a wedge-shaped gap at the top latch side that no standard foam strip can fully bridge.
Before you buy more adhesive, check your hinge pins and screws for any signs of “wobble.” If the pins vibrate or the door shifts when you move it, the hardware is allowing the door to sag out of its intended seal.
The Long Screw Trick
Replace the center screw of your top hinge with a 3-inch deck screw. This reaches past the door jamb into the structural wall stud, pulling the entire frame “up and in” to correct the sag.
When the sag is at the bottom, you may need to try hinge shimming. By placing a thin piece of cardboard or plastic behind the bottom hinge leaf, you push the bottom of the door slightly upward and inward to tighten the perimeter contact.
Finally, inspect your strike plate; a door is only as good as the tension it holds against the seals. If the door “rattles” when locked, move the strike plate 1/8-inch toward the weatherstripping to ensure a snug, airtight close every time.
Don’t Over-Tighten
If you have to “shoulder” the door to get the deadbolt to turn, your alignment or weatherstripping is too thick. This puts excessive pressure on the lock mechanism and can lead to hardware failure mid-winter.
.
🔢 The Right Sequence
Adjusting your door in the wrong order can lead to hinge bind or a latch that won’t catch properly.
- Tighten all existing hinge screws to see if the door squares itself naturally.
- Drive the 3-inch long screw into the top hinge to pull the sag.
- Relocate the strike plate last only after the door hangs perfectly level and square.
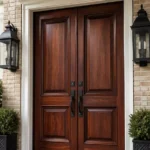
Add a Storm Door if Needed
Create a protective thermal buffer that shields your main entrance from the harshest winter elements.
Think of a storm door as a sacrificial barrier for your home. It takes the direct hit from freezing rain, sleet, and howling winds so your primary entry door doesn’t have to.
The real magic happens in the three to four inches of space between the two doors. This air buffer acts as a natural insulator, much like the gas between panes in a double-glazed window, significantly slowing down heat transfer.
The “Heat Trap” Warning
If your front door faces south and receives direct, intense sunlight, a full-glass storm door can actually work too well. The trapped heat can reach temperatures high enough to warp wood or melt the paint on your main door, so consider a screen-vented option for these sunny spots.
When selecting your door, look for high-performance features that go beyond a simple aluminum frame. Modern options offer Low-E glass, which features a microscopic coating designed to reflect thermal energy back into your home during the winter months.
-
✔
Hidden Closers: These are built into the frame for a cleaner look and ensure the door never accidentally stays ajar. -
✔
Interchangeable Panels: Allows you to swap glass for screens in the summer without removing the entire door unit. -
✔
Multi-Fin Sweeps: Look for models with four or more rubber fins at the base to prevent snow from drifting into the gap.
While a storm door provides excellent protection against moisture and wind, it is often viewed as a secondary fix. If your primary door is already high-quality and well-insulated, the ROI on a storm door is more about longevity and protection than pure energy savings.
.
💰 Surprise Costs to Plan For:
- The real range: Expect to spend between $150 and $450 for mid-range aluminum models with basic tempered glass.
- Hidden cost: Budget an extra $50 for specialized hardware or Z-bar extenders if your exterior trim is unusually deep.
- Worth it / not: Skip the $800+ high-end models unless you specifically need impact-rated glass for extreme coastal wind zones.
Insulate the Door Core
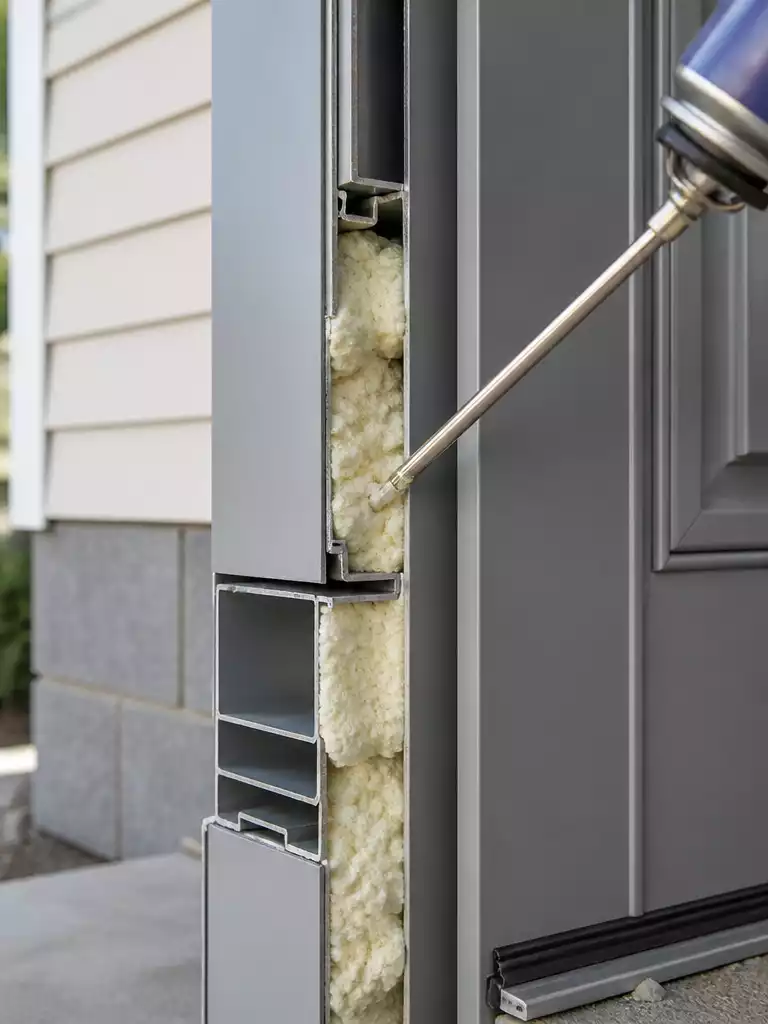
Stop heat transfer through thin panels to keep your entryway warm to the touch.
If your door feels like a block of ice even after you’ve sealed every perimeter gap, the issue is likely the internal density of the door itself. Many budget-friendly exterior doors are essentially hollow shells that offer almost no thermal resistance against the winter chill.
You can identify these “cold bridge” spots by simply running your hand across the center of the door on a freezing day. If the surface temperature feels significantly lower than the surrounding walls, your door core is failing to hold the heat.
Never use “High Expansion” spray foam inside a door cavity. The intense pressure of high-expansion products can actually bow the metal or wood skin, permanently warping the door and making it impossible to close or lock.
For steel or fiberglass doors, you can often perform a “surgical” insulation strike by using the injection method. Most of these doors have small weep holes or pluggable access points at the very top or bottom edge.
- Low-Expansion Foam: Use a product specifically labeled for “Windows and Doors” to fill the internal hollows without risking structural damage.
- Decorative Insulation: For thin wood doors, consider applying 3M Thinsulate or decorative cork panels to the interior face to add an extra layer of R-value.
- Felt Buffers: Adding heavy felt or quilted fabric panels to the interior side can dampen sound and provide a surprising amount of thermal buffering.
This internal upgrade is a strategic way to mimic the performance of a high-end solid-core door without the thousand-dollar price tag. Once the core is dense and the air pockets are filled, the door acts as a true thermal barrier rather than a radiator for the cold.
Pro-Tip: If you’re unsure if your door is hollow, give it a “knock test.” A sharp, echoing ring indicates a hollow core, while a dull thud suggests it’s already insulated or solid wood.
.
10. Refinish or Seal the Exterior Surface
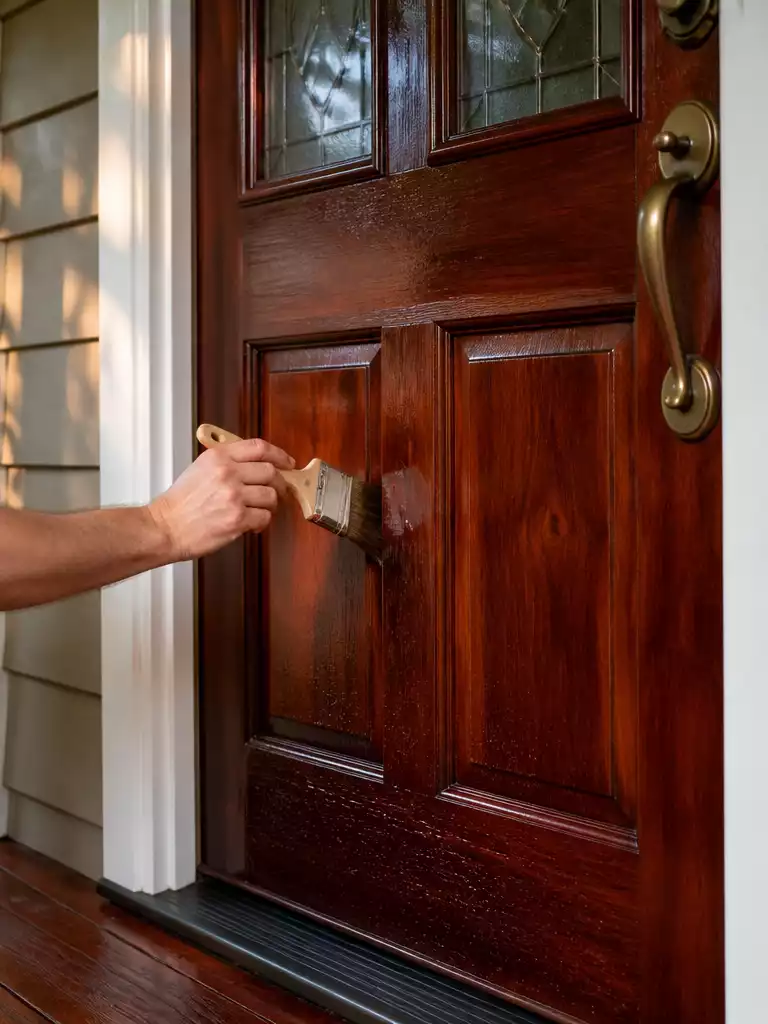
A fresh, water-repellent seal prevents wood warping and keeps your weatherstripping perfectly aligned all winter.
Think of your door’s exterior finish as more than just a style choice; it is a structural shield. A “thirsty” wood door that has lost its protective coating will absorb moisture from winter sleet and snow, causing the organic fibers to swell and warp.
When a door loses its shape, even the most expensive weatherstripping won’t be able to maintain a seal against the frame. By refinishing the surface before the first freeze, you ensure the door remains dimensionally stable and your thermal barriers stay intact.
Pro-Seal Tip: The Invisible Edges
Don’t just paint the face of the door. The top and bottom “end-grain” edges are the most porous areas; failing to seal these hidden spots allows moisture to wick upward, leading to rot and catastrophic warping.
The choice of material depends entirely on your door type. For natural wood, Marine-Grade Spar Urethane is the industry standard because it contains UV blockers and remains flexible enough to expand and contract with extreme temperature shifts.
If you have a steel or fiberglass door, look for a high-gloss enamel. This creates a hard, non-porous shell that allows ice and snow to slide off instantly rather than clinging to the surface and leaching heat from your entryway.
Timing is everything when it comes to a long-lasting finish. Aim for a dry day when the temperature is at least 50 degrees and humidity is low.
Applying a sealant on a humid day can actually “lock in” moisture that is already inside the wood. This leads to internal rot and peeling paint by spring, undoing all of your hard work.
⭐ Top Products for Inspecting Door Gaps
⚠️ Watch Out for These Refinishing Risks:
- Trapping Internal Moisture: Sealing a door immediately after a rainstorm locks dampness inside, causing the wood to rot from within.
- Incompatible Overcoats: Applying oil-based urethane over a water-based stain without a proper cure time leads to “alligatoring” and peeling.
- Skipping the Sand: Failing to lightly scuff the old finish prevents the new seal from bonding, causing winter sleet to chip it away.
Test for Remaining Air Leaks
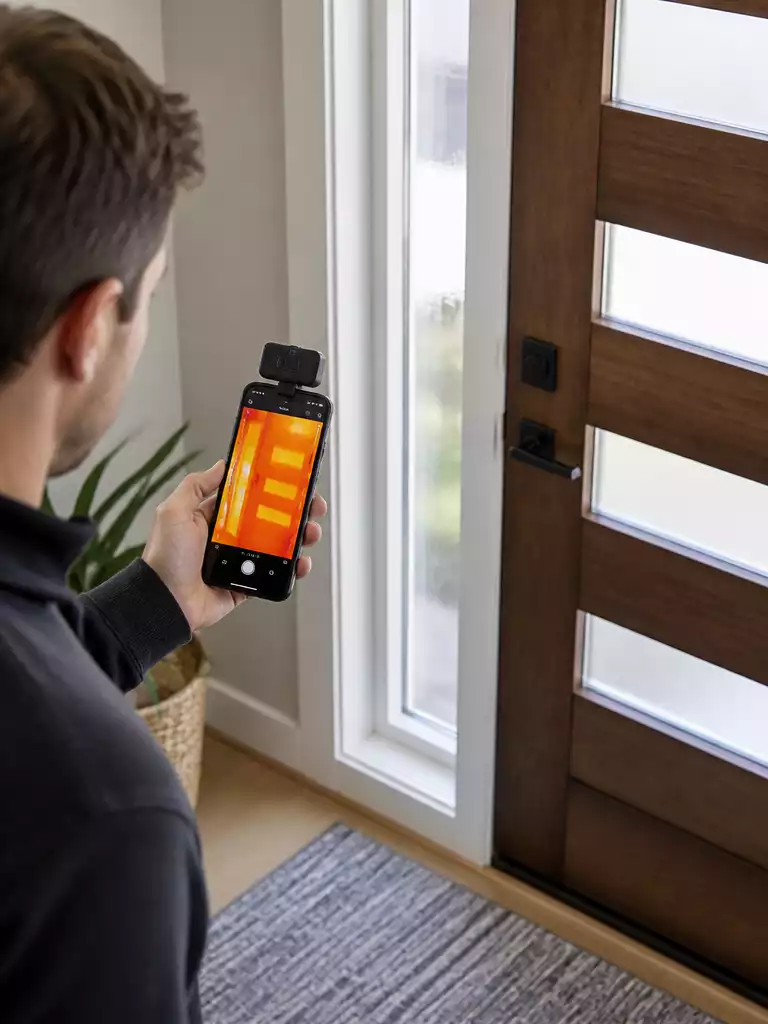
Experience the quiet satisfaction of a perfectly sealed home with a final professional leak check.
After you have spent the afternoon measuring and installing, it is time to verify that your entryway is actually airtight. You can revisit the Paper Tug Test from earlier, but this time, you should feel significant resistance along every inch of the door frame.
If the paper slides through anywhere without a fight, your weatherstripping isn’t compressed enough to block the wind. For a more high-tech approach, consider renting a FLIR thermal camera or buying a smartphone attachment to visualize “blue” cold spots in real-time.
The Hair Dryer Partner Test
Have a partner stand outside and run a hair dryer on its highest heat setting along the door’s exterior seams. Inside, move your hand slowly along the corresponding joints; if you feel a “jet” of warm air, you have a bypass that needs a thicker seal or a bit more caulk.
On a particularly gusty afternoon, you should also perform a “sound check” by listening for an audible leak. A whistling or howling sound indicates a high-pressure gap where air is being forced through a tiny opening, which is usually a sign you missed a spot with the silicone caulk.
-
✔
Thermal Imaging: Use a FLIR camera to spot cold air plumes that are invisible to the naked eye. -
✔
Light Check: Turn off all interior lights at night and look for slivers of streetlamp light peeking through. -
✔
Smoke Trace: Hold a lit incense stick near the hinges; if the smoke wafts horizontally, the seal is broken.
Expert Insight: The “Lungs” Rule
While we want a tight seal, do not strive for 100% molecular airtightness if your HVAC system lacks a dedicated fresh air intake. Your home needs to breathe, but it should do so through its “lungs” (vents) rather than its “skin” (door gaps).
Once you’ve confirmed the perimeter is solid, you can rest easy knowing your heater won’t be working overtime for the rest of the season. These final checks turn a simple DIY project into a high-performance thermal barrier.
.
⚠️ Where This Can Go Wrong:
- The False Negative: Testing on a calm day might hide gaps that only open when high wind pressure hits.
- Ignoring Hardware Leaks: Many focus only on the frame while ignoring drafts whistling through the keyhole or deadbolt plate.
- Over-sealing Friction: Adding too much material to “fix” a leak can prevent the latch from fully engaging, compromising security.
Maintain the Seal Through the Season
Keep your entryway airtight and efficient all winter long with these simple monthly habits.
Weatherproofing isn’t a “one and done” task because winter is a marathon, not a sprint. The constant expansion and contraction of your door frame during freeze-thaw cycles can shift your seals just enough to let a draft back in by January.
One of the most effective ways to protect your hard work is the silicone spray hack. Applying a light coat of silicone lubricant to the weatherstripping prevents the rubber from sticking to the door and tearing when you pull it open after an ice storm.
Pro-Tip: Defeat the “Sticky” Seal
Spray the lubricant onto a clean rag first, then wipe it onto the seals. This prevents overspray from staining your door’s finish or making the floor slippery.
You also need to be vigilant about threshold ice dams. When snow piles up against the bottom of the door, it can melt slightly from home heat loss and then refreeze, creating an ice wedge that physically lifts or damages your door sweep.
Make it a habit to sweep snow entirely away from the threshold after every flurry. This prevents moisture from seeping into the grain of a wood door or freezing the sweep to the metal plate, which is the leading cause of winter hardware failure.
The Winter Maintenance Checklist
- Check Screw Tightness: High winds and heavy door usage can vibrate hinge and sweep screws loose over 3-4 months.
- Monitor Indoor Humidity: If you see frost forming on the inside handle or hinges, turn down your humidifier to prevent moisture from warping the door.
- Clear Debris: Ensure no salt or grit from the sidewalk is trapped under the sweep, as it acts like sandpaper on your finish.
By spending five minutes once a month checking these mechanical points, you ensure your 80% increase in energy efficiency lasts until the spring thaw. Your door is now a high-performance thermal barrier that looks as good as it functions.
.
💰 Surprise Costs to Plan For
- The real range: Budget under $100 for all materials to achieve 80% of the efficiency of a brand-new door.
- Hidden cost: Over-tightening threshold screws can strip the wood underneath, requiring unexpected wood filler or longer replacement screws.
- Worth it / not: Investing in silicone lubricant is well spent to prevent mid-season weatherstripping tears that force a total redo.
You now have a complete technical roadmap to transform your entryway into a high-performance thermal barrier. Selective, high-impact fixes like replacing a flattened seal or adjusting a sagging hinge often provide the most significant ROI for your home’s efficiency.
Identify the most aggressive drafts tonight and prioritize those specific repairs to see an immediate change in how your home holds heat. Once the air leaks are gone, you might even consider how to refinish a weathered front door to ensure the exterior looks as solid as it performs.