

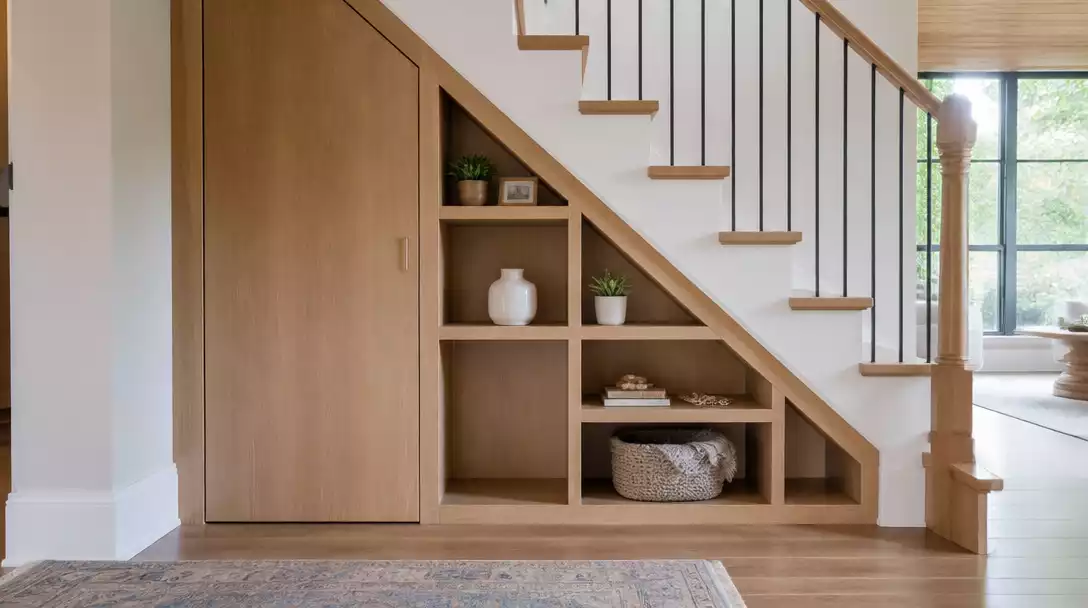
The staircase void is often the most wasted square footage in a home. This guide rounds up 10 storage ideas worth saving to help you reclaim that dead space. Find the configuration that works for your home and start clearing the clutter today.
Pull Out Drawer Bank
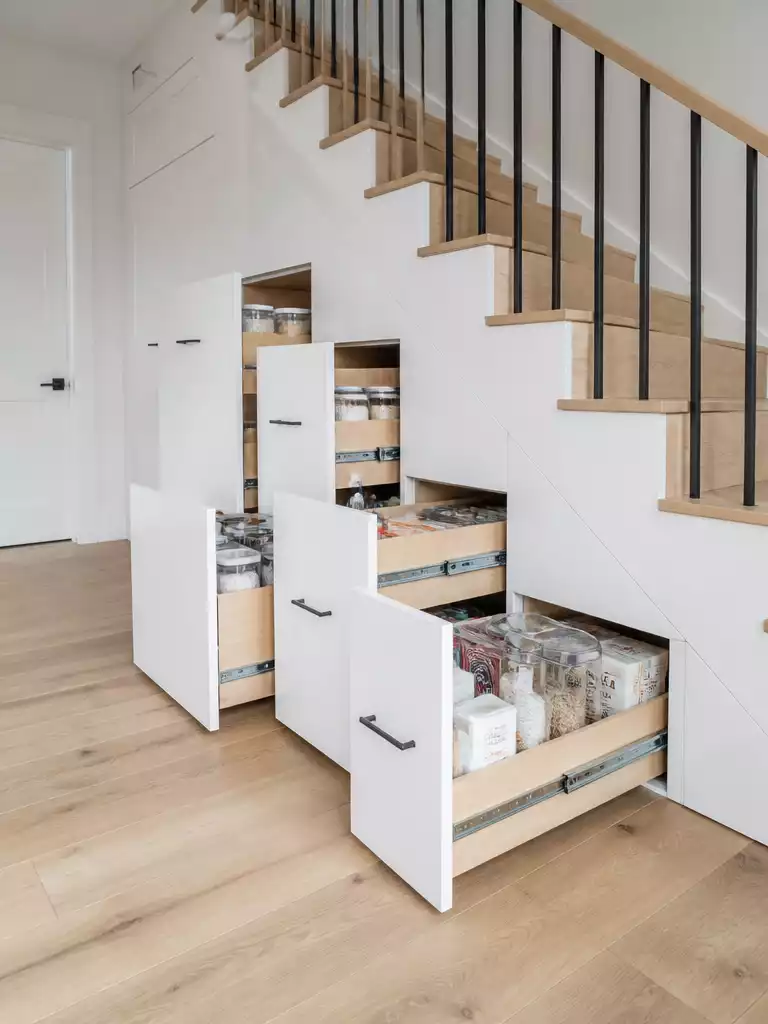
Reclaim unreachable deep storage by bringing the contents out to you with heavy-duty glides.
As an Amazon Associate I earn from qualifying purchases. Affiliate links may earn me a commission at no extra cost to you.
Most under-stair voids suffer from “black hole” syndrome, where items pushed to the back are never seen again. A pull-out drawer bank solves this by using the full depth of your cavity while keeping your overflow items within arm’s reach.
This solution isn’t a simple weekend project; it requires constructing a rigid internal carcass to support the weight of your stored goods. Because the drawer needs to travel smoothly, your floor surface must be perfectly level or shimmed to ensure the base doesn’t bind against your stair trim.
What to Watch For
- Runner Capacity: Do not guess your load. Calculate the weight of your intended items—like heavy toolboxes versus lightweight linens—before buying slides to prevent sagging.
- Clearance Check: Ensure your drawer faces align with the surrounding drywall to achieve that “hidden wall” effect when closed.
- Precision Framing: Any minor deviation in your floor level will cause the drawer to rack and catch, so take the time to build a solid leveled base.
This is the perfect choice for deep, narrow voids where you cannot physically crawl into the space. If you are not comfortable with advanced finish carpentry or reframing a wall opening, this is one project best left to a professional to avoid mechanical failure.
The visual payoff is significant, as a well-executed drawer bank looks like a solid, seamless wall until you need to access your gear. Once you have these installed, you will find that the dead space beneath your stairs becomes the most organized zone in the entire house.
⭐ Top Drawer Slides for Under Stairs
Heavy Duty Steel Pull Out Drawer Slides
Wall Mounted Jewelry Cabinet With Mirror
Clear Silicone Bumper Pads For Drawers
💰 What This Really Costs
- Professional Installation: Custom pull-out systems require skilled finish carpentry to frame the void, which significantly increases labor costs.
- Hardware Investment: High-capacity, full-extension runners that can support heavy pantry items or tools come with a premium price tag.
- Maintenance Reality: Budgeting for future adjustments is wise, as mechanical components may require tightening or alignment after the initial installation.
Built In Bookshelf Face
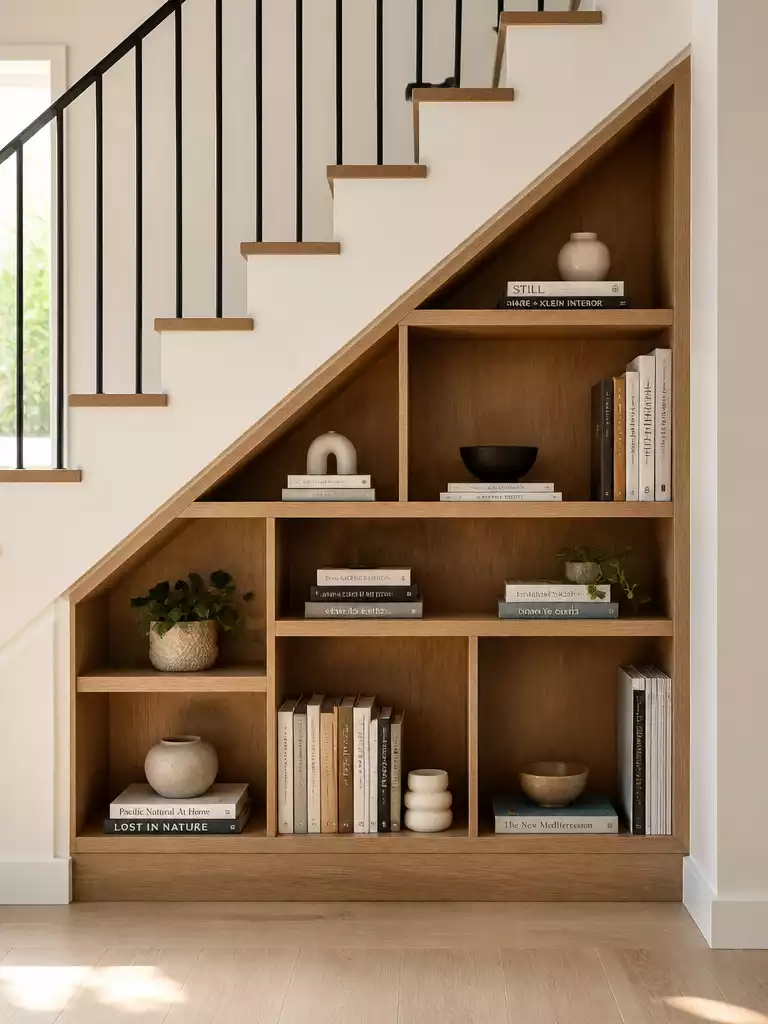
Turn your staircase into a functional library feature while reclaiming lost vertical storage space.
Turning the void beneath your stairs into a bookshelf face shifts the focus from hiding clutter to displaying your favorite collection. This approach works best on the taller, more gradual segments of the staircase where you have enough height to make the shelves feel like a purposeful piece of architecture.
To keep the unit from looking like a dark, swallowed hole, keep your shelf depths between 200mm and 300mm. Anything deeper than that tends to lose items in the back, while shallower shelves keep your books front and center.
Pro Tip: Use adjustable shelf pins rather than permanent dividers. This allows you to reconfigure the heights for larger coffee table books or small decorative objects as your collection evolves.
The biggest challenge is the “dead corner” at the very bottom of the slope. We recommend treating this lowest section as a fixed, triangular display area for items you rarely touch, rather than trying to force a standard rectangular shelf into that tight, awkward pitch.
This solution is perfect for homeowners who want to improve their home’s aesthetic without engaging in complex, mechanical cabinetry work. If you prefer to keep your storage completely concealed, however, you might want to look at a hidden door closet instead.
⭐ Best Bookshelf Units for Dead Space
Solid Wood Floor To Ceiling Bookcase
Closed Back Glass Door Storage Cabinet
Wall Mount Spice Rack With Jars
💡 Why This Works:
By following the staircase stringer with a stepped bookshelf, you convert a structural liability into a deliberate, architectural feature. This design eliminates the visual “dead zone” of the stair skirt while adding much-needed vertical storage that feels like a natural extension of the home’s existing walls rather than a cluttered afterthought.
Visual payoff: A custom-fitted profile draws the eye upward, making the staircase feel like a curated gallery.
Hidden Door Closet
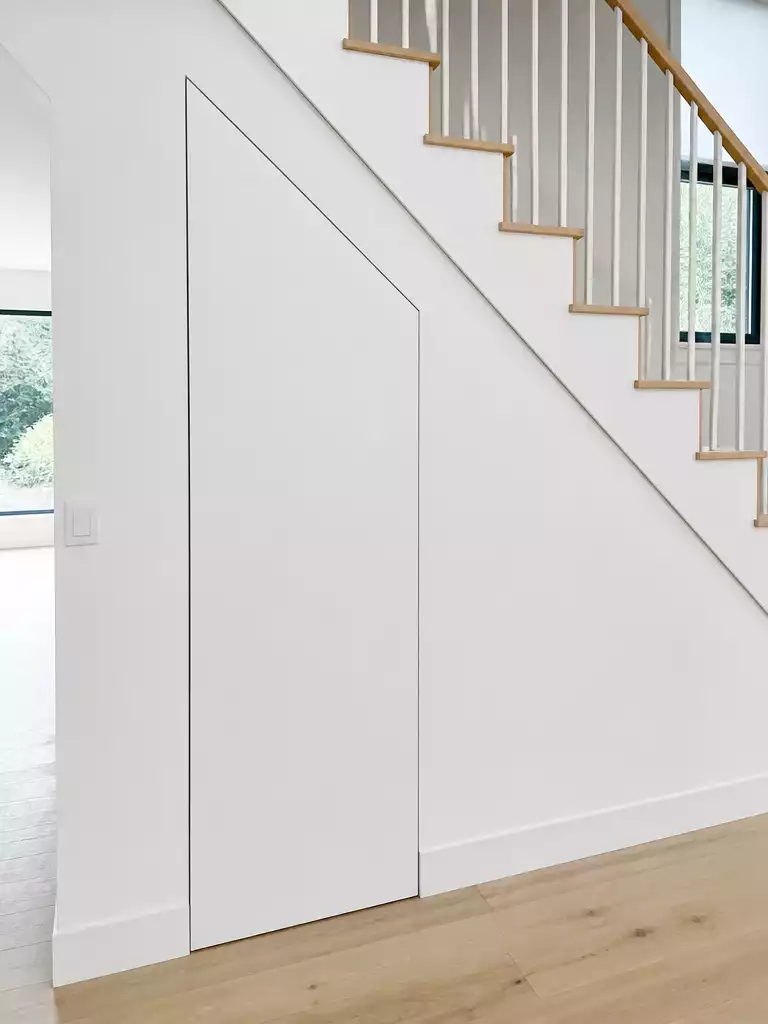
Hide your most unsightly clutter behind a seamless wall that blends perfectly into your home.
A hidden door closet turns the most awkward stairwell void into a secret storage room that guests won’t even notice. Unlike a standard door that disrupts your hallway flow, this build relies on a flush-mounted panel that sits perfectly level with your existing drywall.
To pull this off without it looking like a DIY disaster, you need to master the gap tolerance. The space between the door panel and the wall frame must be razor-thin to keep the illusion of a solid wall intact.
Technical Warning: Before you cut into that drywall, you must check for hidden structural beams or plumbing vents. Cutting into a load-bearing stringer or a main waste pipe will turn a simple storage project into a major structural repair.
The hardware you choose determines whether the door stays shut or swings open unexpectedly. You will need a reliable push-latch system paired with magnetic plates to ensure the panel doesn’t sag or creep out of alignment over time.
This solution is perfect for hiding bulky, unattractive items like vacuum cleaners, high chairs, or bins of craft supplies. If you prefer a clean, minimalist aesthetic, choose this option over open shelves, which can quickly become dust collectors.
⭐ Hidden Closet Solutions We Love
Modern Wooden Wardrobe Closet With Drawers
Arched Rattan Door Wardrobe With Drawers
Spacious Hidden Storage Wardrobe Armoire
📋 Quick Reality Check Before You Cut
- Map internal obstacles: Use a stud finder and inspect for hidden electrical lines or plumbing vents behind the wall surface.
- Verify stair stringers: Locate the heavy structural board supporting your stairs so you avoid cutting into critical load-bearing framing.
- Test swing clearance: Confirm there is enough floor space for the door to move freely without hitting nearby furniture or trim.
Open Cubby Row
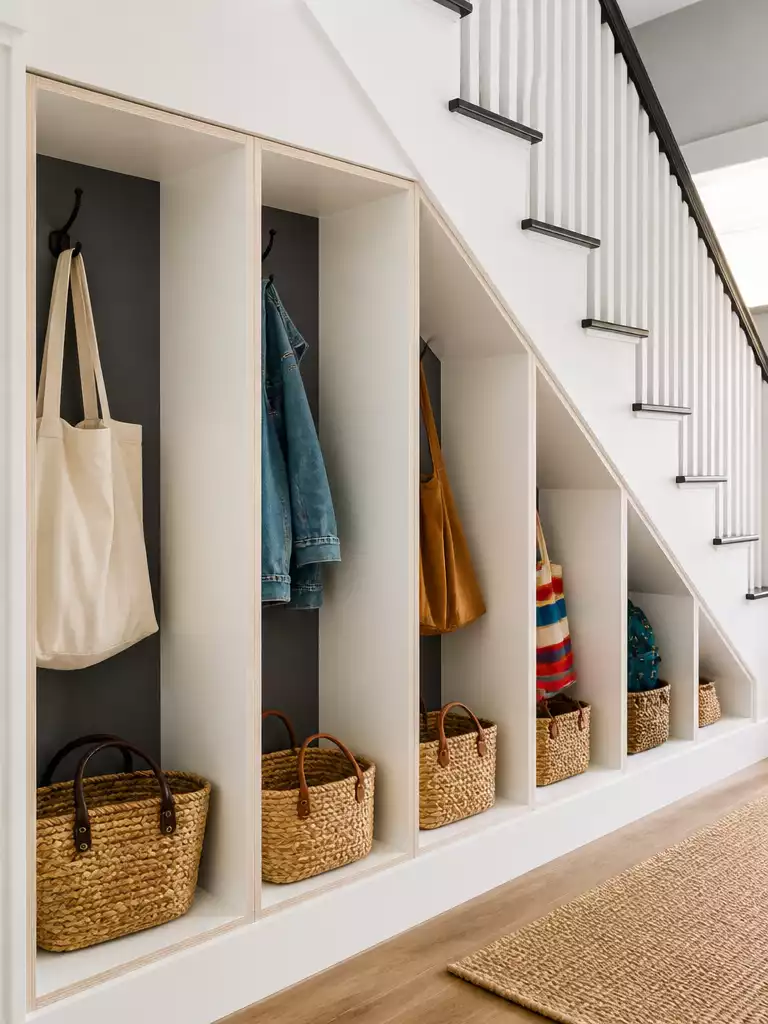
Create an instant drop zone for school bags and gear by using vertical dividers.
When you have a household that treats the entryway like a landing strip for backpacks, shoes, and umbrellas, you need a system that doesn’t require opening a door to work. An open cubby row turns the awkward, descending height of your stairwell into a series of dedicated lockers.
This setup works best when you install vertical dividers at regular intervals, effectively “stepping” the storage to match the pitch of the stairs. By keeping these compartments open, you eliminate the friction of hardware and latches, making it easier for children to get gear put away without a struggle.
Pro Tip: Paint the interior back panel of each cubby a bold, contrasting color against your main wall. This visual cue helps family members quickly identify “their” specific zone, reducing that messy pile-up look.
For construction, opt for high-quality plywood or MDF, as these cubbies will endure daily impact from heavy bags and rough handling. You must apply iron-on edge banding to every exposed surface to prevent the material from splintering or showing wear over time.
This is the ideal solution for high-traffic zones where you want to prioritize speed over total concealment. If you prefer a completely “invisible” look where all clutter is hidden from view, you should look toward a hidden door closet instead.
⭐ Open Cubby Rows for Easy Access
Collapsible Hanging Closet Organizer With Shelves
Foldable Shoe Storage Bins With Dividers
Adhesive Wall Organizer Bin With Drain
✨ Small Details That Matter
Elevating your cubby row from a makeshift drop zone to a professional-grade feature relies entirely on how you treat the visible connections and edges.
- Hidden Fasteners: Use pocket-hole joinery or finished trim nails to secure dividers, ensuring no ugly screw heads disrupt the clean architectural lines of your new shelving.
- Tactile Finish: Apply a high-durability, scuff-resistant paint or clear polyurethane coat over the edge banding; this prevents the most common “nicking” damage caused by everyday traffic.
Transforming a void under your stairs creates an immediate visual impact that elevates the entire hallway. You do not need to overhaul every inch of your home to see a substantial return, as a single well-executed custom storage upgrade provides the polish you are looking for.
The most effective renovation results come from choosing one high-impact feature rather than attempting to implement every single complex design idea you encounter.
Wine Rack Insert
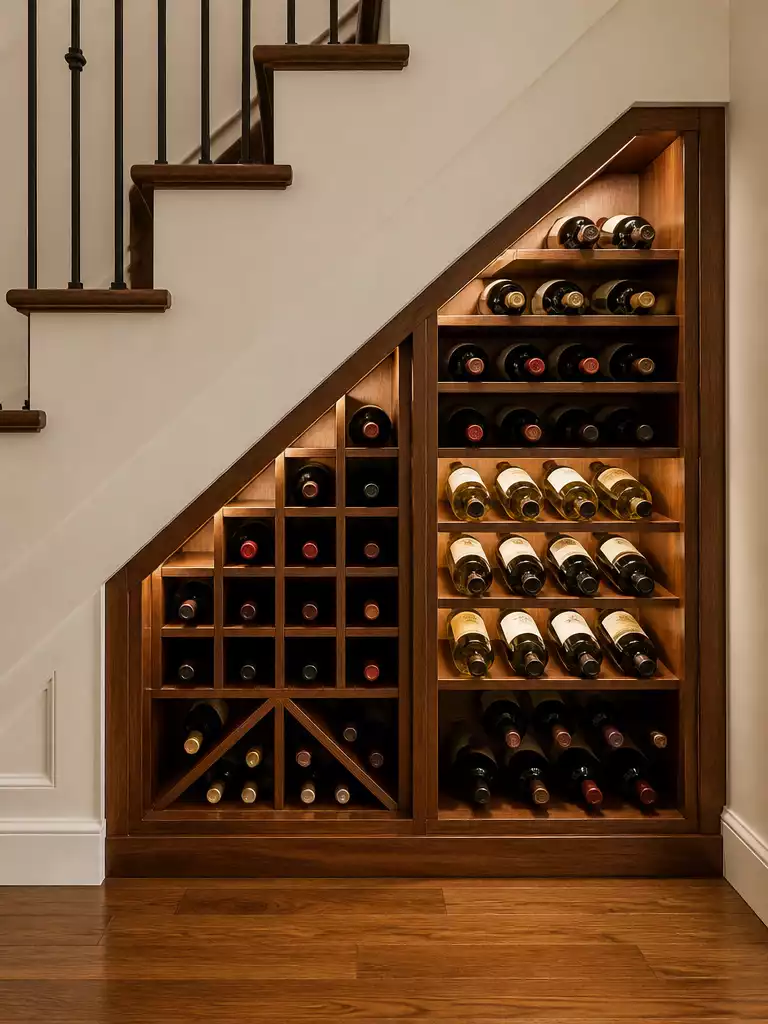
Transform your lowest, most unusable floor space into a sophisticated home cellar display.
The space beneath a staircase is naturally cool, dark, and sheltered, making it an ideal micro-climate for a small wine collection. By installing a custom wine rack insert, you turn that awkward, low-clearance void into a functional feature rather than a dust-collecting dead zone.
Construction requires precise alignment of individual bottle cradles to ensure each bottle remains secure. Use moisture-resistant hardwoods like cedar or mahogany, as the air quality in these enclosed under-stair pockets can sometimes be slightly more humid than the rest of the home.
Before you begin building, consider the bottle layout to ensure consistency. Your goal is to maintain a uniform tilt so that the corks remain submerged at all times, preventing them from drying out.
This solution is best for homeowners who have a very low, shallow segment of the void that wouldn’t fit a standard storage box or person. If your under-stair space is deep and full-height, you might prefer a more versatile pull-out drawer system instead.
⭐ Wine Rack Inserts for Cabinets
Adjustable Five Tier Wall Spice Rack
Solid Wood Double Door Wall Cabinet
Round Sliding Door Finger Pull Inserts
💰 Where the Budget Goes
- Material quality: Opting for rot-resistant hardwoods like mahogany significantly increases upfront costs but prevents mold in damp voids.
- Professional labor: Complex, custom-fitted cradles that account for irregular stair slopes often require specialized finish carpentry fees.
- Structural investment: Anchoring systems for vibration control are essential; don’t skip high-quality hardware to ensure long-term bottle stability.
Shoe Rack Slot
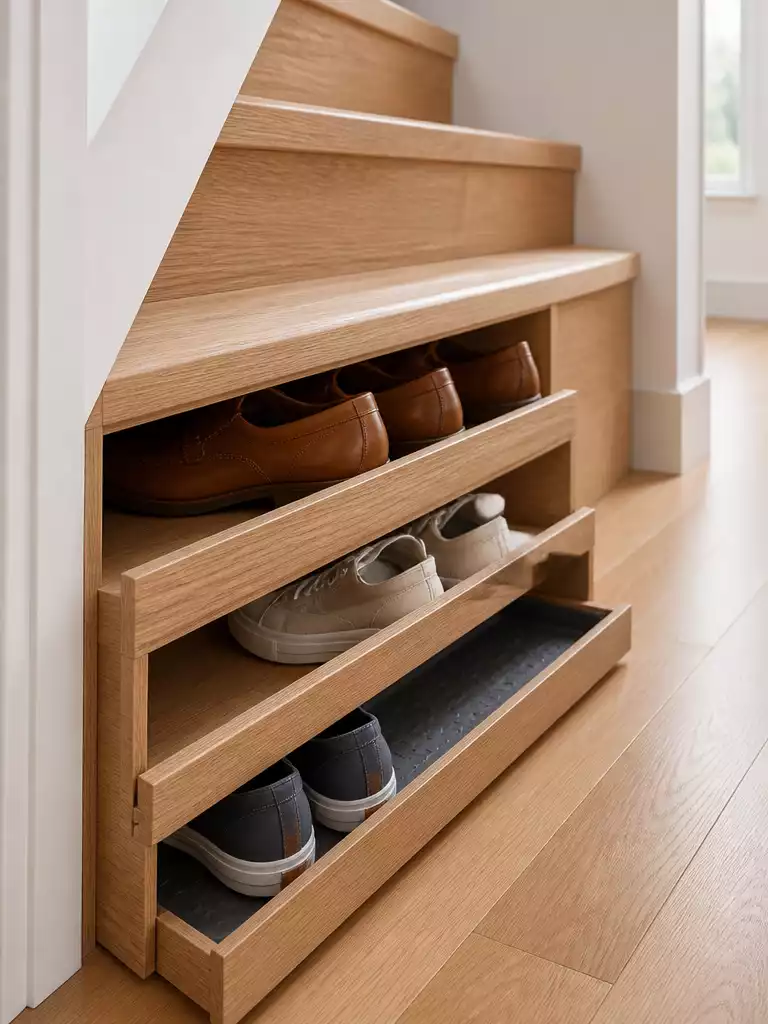
Reclaim the lowest, most awkward inches of your stair void for a clutter-free entryway.
The space beneath the bottom three stairs is often ignored because it is too low for a closet or a standard drawer. By installing custom shoe rack slots, you can turn that “dead dead space” into the most functional landing zone in your home.
This solution uses a series of horizontal dividers that follow the descending pitch of your staircase stringer. It creates a dedicated home for daily footwear so you stop tripping over piles at the door.
Pro-Tip: Always include a removable tray at the base of your slots. Whether it is plastic, rubber, or metal, a liner is essential for catching grit and moisture from wet soles before it damages your floor or woodwork.
When planning your layout, keep these technical constraints in mind to ensure the space remains usable:
- Pitch Matching: You must align your dividers precisely with the stair angle, or the lowest slots will become too narrow to reach into.
- Height Clearance: Avoid making slots too tight, as compressed spaces lead to heel snagging and crushed leather uppers.
- Accessibility: This setup is intended for frequent-use items like sneakers and flats; heavy boots may require a wider, bottom-most compartment.
This is the ideal solution for busy households where “dumping” gear is the norm. If you have the floor depth, it is significantly more organized than a heap of shoes inside a dark, deep cavity.
⭐ Shoe Rack Slots We Love
Six Tier Over Door Towel Rack
Lockable Jewelry Cabinet With Makeup Shelf
Adjustable Double Layer Shoe Slot Organizer
Pet Nook with Storage
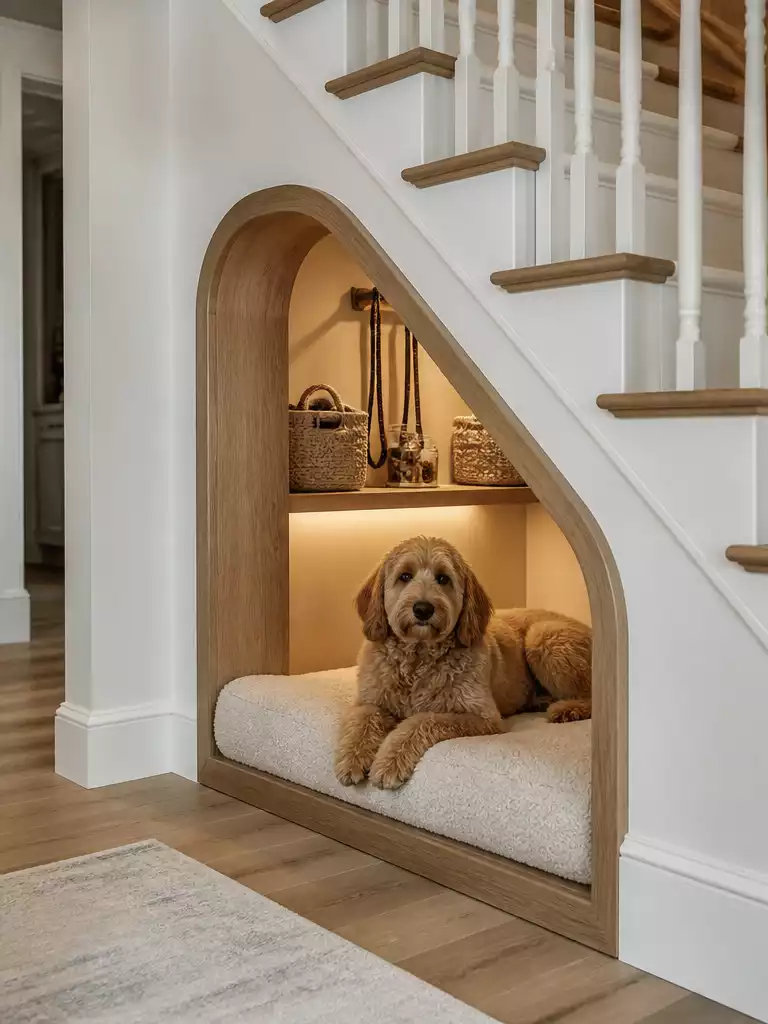
Transform your pet’s sleeping quarters into a tidy, organized hub that clears floor clutter.
Creating a dedicated pet den beneath your staircase turns an awkward structural void into a functional retreat for your dog or cat. By integrating a storage header above or beside the sleeping area, you capture space that would otherwise be lost to dust.
The Ventilation Requirement
Because the under-stair area is frequently enclosed, you must prioritize airflow to prevent the nook from becoming stifling. Consider installing a discreet vent or louvered panel to keep the air fresh for your pet.
To make the space truly useful, incorporate vertical storage directly into the framing around the nook. This keeps essential gear organized and avoids the “pile-up” of pet supplies near your entryway.
- Storage Header: Use the wall space above the bed for installing hooks for leashes, harnesses, and bags of treats.
- Closed Cabinetry: Include a small, pull-out drawer beside the bed to hide bulky grooming brushes or backup food containers.
- Surface Finishes: Opt for non-toxic, moisture-resistant paint or sealed wood paneling inside the nook to make accidental spills or muddy paw prints easy to wipe clean.
Pro-Tip
Install a recessed LED puck light inside the ceiling of the nook. It adds significant value during late-night trips and makes the space feel like a purposeful architectural feature rather than a dark crawlspace.
This layout is ideal for homeowners who want to hide pet gear without sacrificing floor space in high-traffic hallways. If your under-stair void is exceptionally shallow, skip this project to avoid creating a cramped, uncomfortable space that your pet will refuse to enter.
⭐ Pet Nook Mats and Storage
Super Absorbent Pet Door Mat
Matte Black Interior Door Hinges
Scalloped Jute Style Outdoor Rug
🧰 Questions for Your Installer:
- Ventilation strategy: How will we integrate discreet air channels to prevent the nook from becoming stagnant or humid?
- Structural clearances: Can you confirm the depth allows for a comfortable pet bed without interfering with stair framing?
- Finish durability: What non-toxic, moisture-resistant sealant do you recommend for the interior to handle muddy paws and spills?
Rolling Cart Bay
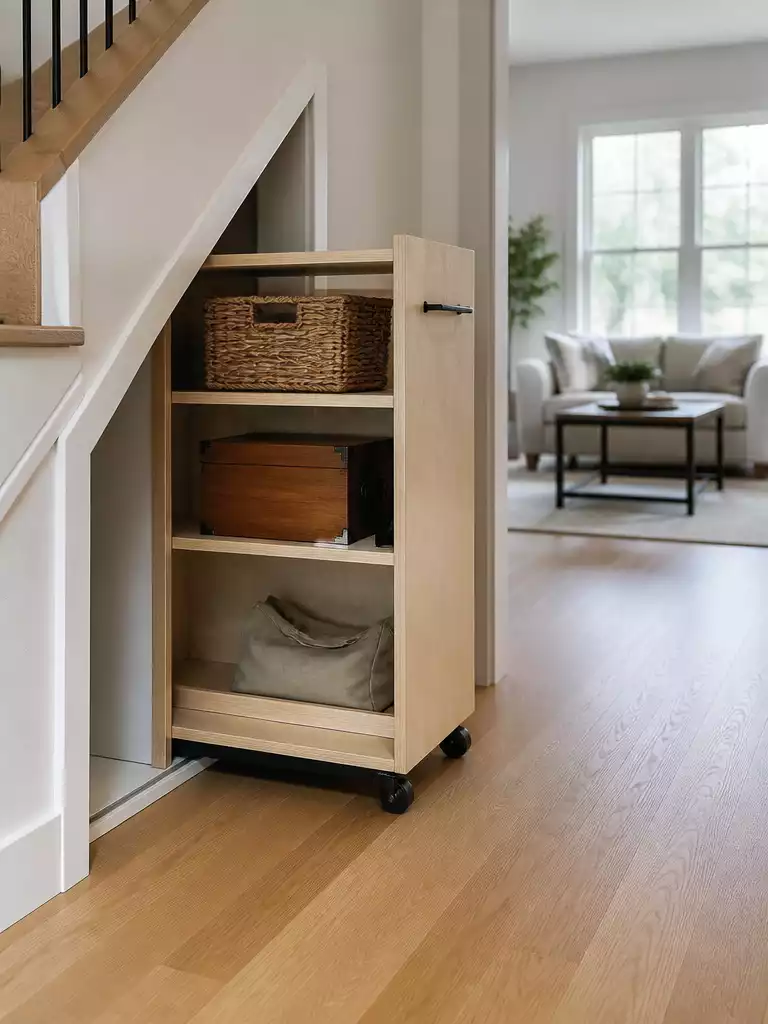
Maximize your reach by bringing heavy, deep-stored items directly into the room.
A rolling cart bay solves the frustration of losing items to the dark, unreachable back corners of your staircase void. Instead of crawling into the space, you pull the entire storage unit out into the light.
This solution is ideal for homeowners who need to store heavy or bulky items like power tools, hobby supplies, or seasonal gear. It works best in staircases that provide a long, low-profile stretch of floor space without significant obstacles.
Critical Installation Factors:
- Clear Exit Height: Measure your entrance height carefully; the cart must clear the bottom of the stair stringer and any trim without catching.
- Floor Evenness: If your floor is slightly uneven, install recessed U-channel tracks to ensure the cart travels in a straight, smooth line.
- Locked Stability: Always use heavy-duty, locking casters to prevent the unit from rolling or shifting when it is parked inside the bay.
Before you build, verify that the floor path is completely clear of debris and electrical wiring. A custom-sized cart built to the exact dimensions of your void ensures no square inch of that awkward space goes to waste.
If your floor is heavily sloped or features thick carpeting, this idea might require professional carpentry to install a level track system. For most homes, a flat plywood base and high-quality rubber-tread casters provide the most reliable movement.
⭐ Rolling Cart Bay Organizers
Over Door Organizer With Five Bins
Hanging Cup Holders For Rolling Carts
Rubber Coated Heavy Duty Magnetic Hooks
🔢 The Right Sequence for Smooth Movement
Installing a rolling cart requires careful sequencing to ensure the unit doesn’t bind or snag as it transitions from the void to the main room floor.
- Level the base: Install your floor tracks or base plate first to create a perfectly flat runway for the casters.
- Test the clearance: Roll the empty frame in and out to verify it clears the stair stringer and trim.
- Finalize the stop: Attach the locking mechanism or floor bumper once you are certain the cart sits flush when parked.
Toe Kick Drawer Line
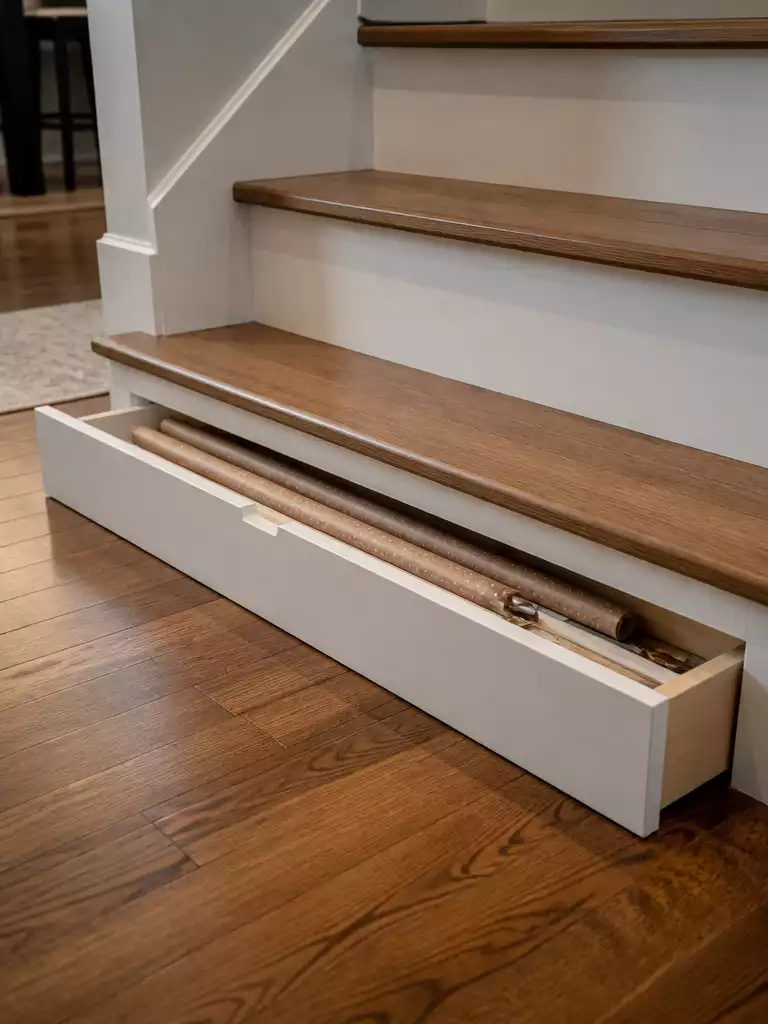
Reclaim the forgotten gap at the base of your stairs for ultra-slim, hidden storage.
The gap at the very bottom of your stair stringer is often dismissed as mere trim work, but it is prime real estate for low-profile storage. By installing a custom drawer directly into this toe kick area, you can stow away flat items that clutter your closets yet rarely see the light of day.
This solution is perfect for items like gift wrap, large maps, or specialty flat tools. If you are struggling to find a home for paper goods that are too long for standard drawers, this horizontal pull-out is your best bet.
Common Installation Pitfall: Always check your finished flooring thickness before building your drawer box. If your hardwood or tile is thicker than expected, the drawer will bind against the floor every time you try to open it.
Because this area is so close to the floor, visibility is naturally limited. We recommend using finger-pull hardware or a push-latch system to keep the face completely flush with the surrounding wall, maintaining a seamless look.
This is a project best left to experienced DIYers or finish carpenters who can handle the precise cabinetry required for a tight fit. If you are not comfortable reframing the toe kick area or working with custom hardware, consult a professional to ensure the drawer operates smoothly without racking.
⭐ Toe Kick Drawer Storage Ideas
Rolling Cleaning Caddy With Detachable Trolley
⚠️ Watch Out for These Mechanical Traps:
- Weight capacity limits: Avoid overloading these shallow drawers; heavy items can cause the runners to rack, bind, or prematurely fail.
- Hardware selection: Cheap slides will struggle in low-profile zones; use high-quality, full-extension, side-mount runners designed for precision drawer travel.
- Mechanical alignment: If your drawer box isn’t perfectly square or the slide is slightly off-level, the low-clearance design will inevitably cause the front to catch.
Angled Wardrobe Rod Section
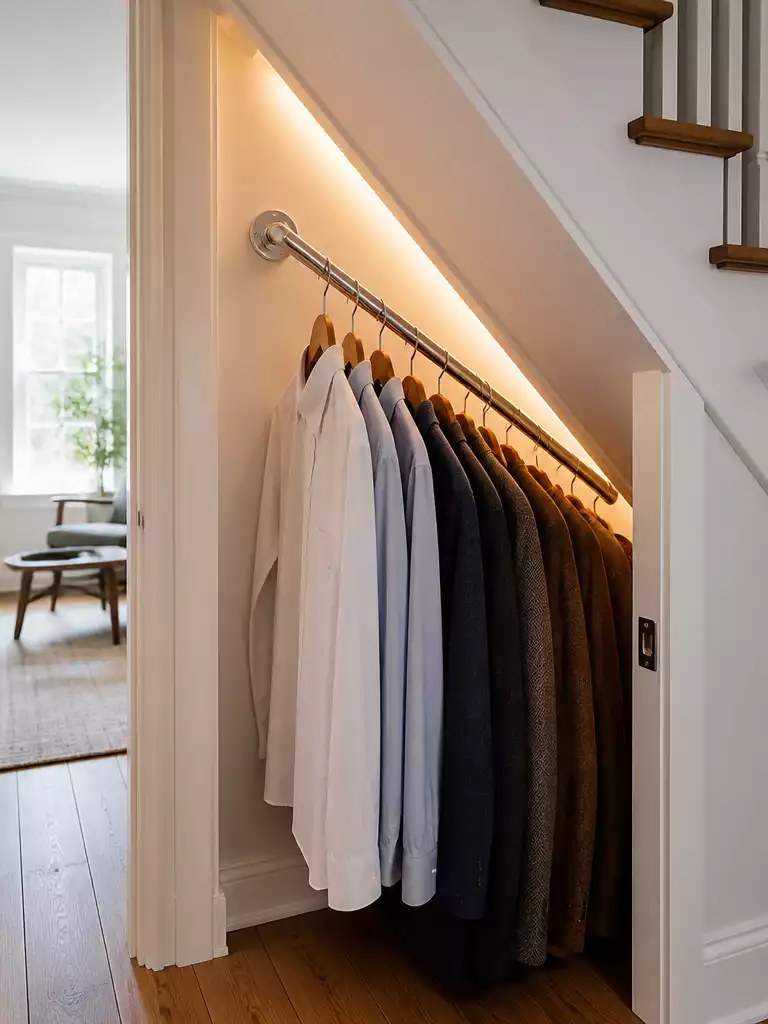
Transform the tallest segment of your stair void into a fully functional coat closet.
The tallest section of the staircase is the only spot in the void where you finally have enough vertical clearance to hang full-length garments. By installing a ceiling-mounted or side-mounted rod that mirrors the pitch of the stairs, you reclaim space that usually goes to waste.
Pro Tip: Before you drill, check your garment length against the lowest point of the slope.
If your coats or dresses hit the floor while hanging, you need to adjust the rod height or focus this area strictly on shorter items like jackets and shirts.
You have a few ways to manage the rod installation depending on the stair construction and wall depth. Here are the most effective methods for maximizing that angled clearance:
- Direct-Mount Rods: Best for deep voids where you can secure the rod to the side wall and the underside of the stairs.
- Pull-Out Rail Systems: Ideal for narrow, shallow openings where you need to bring clothes out into the room to access them.
- Tapered Hanger Strategy: Use shorter hangers at the low end of the rod to prevent garments from dragging against the floor.
The biggest risk here is rod deflection, especially if the span between your support brackets is too wide. If your rod starts to bow under the weight of winter coats, you must add an intermediate vertical support brace tied directly to the stair stringer.
Watch Out for Structural Interference
Never mount your rods into the thin drywall alone. Always locate the wall studs or the structural stair stringer to ensure your heavy winter gear doesn’t pull the bracket right out of the wall.
This solution is best for homeowners who need a dedicated “overflow” closet for seasonal jackets or guest gear. If your stair void is too shallow or lacks sufficient height even at the tallest point, skip this and look at a shelving-based approach instead.
⭐ Angled Wardrobe Rod Sections
Arched Rattan Door Wardrobe With Drawers
Over Door Shoe Organizer With Mesh Pockets
Over Door Ironing Board Storage Rack
📈 The Long-Term Payoff
Converting the deepest, tallest part of your under-stair void into a dedicated hanging wardrobe typically delivers high ROI. It turns a structural dead zone into a functional, permanent closet feature that prospective buyers instantly recognize as a smart upgrade, especially in homes where entryway storage is otherwise limited or nonexistent.
Resale Appeal: Buyers prioritize built-in storage solutions that maximize existing square footage without encroaching on floor space.
With all ten storage concepts now in view, you can see how even the most awkward void becomes a functional asset. Focus on the one or two configurations that align with your home’s specific architecture, as you certainly do not need to implement every idea mentioned here to see a significant difference.
Select the storage method that solves your specific clutter problem first, and the rest of your organization will follow naturally. If you are looking for additional ways to coordinate your home, explore door choices that upgrade every room to ensure a cohesive look throughout your entire living space.




